Tuesday, January 30, 2018
Lots of Lavender birthday
My little make and take this past month was this Lots of lavender from Sale-a-bration. I got the Lots of happy Cardkit and saw the Lavender from there and thought I would make more of the same although this stamp is slightly smaller than the image from the cardkit- it was close enought that I wanted to try. I used wisteria wonder as base cardstock with whisper white embossed with Pinewood planks- it makes the most beautiful woodgrain- this embossing folder is definitely a keeper- Stamp the outline in Smoky Slate then color in the flowers with wisteria and the stems and leaves with Pear Pizazz stamped off. The sentiment is from Bearutiful Bouquet- another one of my go to's for sentiments - in black. Diecut circle from Stitched shape framelit- another one of my Go-to's. Put a strip of Burlap Ribbon and another easy peasy card.
I would like to ask stampin up for a better purple- Lavener lace was a color we had that was a little more bolder purple- just saying.
Saturday, January 27, 2018
Bearutiful Day variations with Brusho
We were playing with Brusho Crystal Colours at my last workshop and I just loved all the different cards that came out- just wanted to share with you. The top was mine and left is Hermerlinda- she just splashed the colors rather than brushing it on the paper and it looks really dramatic. These are some of the others I took pictures of during class but love all the variations. That's the beauty of the Brusho! You never know what you're gonna get!
Play!
Wednesday, January 24, 2018
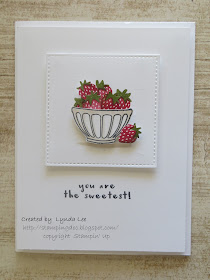
A bowl of strawberries with the Fruit basket stamps
Is this not the sweetest little card? I love the clean layers of white- The base card is Whisper white A2 size with another layer of white on top added with dimensionals. Diecut the stitched shaped square. I stamped the bowl on a scrap piece of white CS and cut it out. The the bowl backside up and then put a little shadow under the bowl with the light crumbcake Stampin' Blend marker. Also stamp some strawberries for the background- hard to see but I stamped 3 of the strawberries in the background. - Flip the bowl rightside up and adhere with dimensionals. Stamp a few more strawberries on a scrap piece of white- then stamp the green with old olive - it goes really fast - I love this punch!
You can punch a bunch in no time at all. Put a punched strawberry on the side of the bowl - like it just fell out... Stamp the sentiment in black- and it is the cutest sweetest simplest card!
Tuesday, January 23, 2018
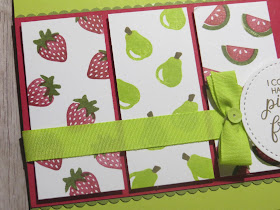
Fruit Basket panels
The Christmas tree is put away- the holiday madness with all the parties, guests, present buying is all over, the kids are back in school and I can finally settle down to play with all my goodies from the Spring mini and Sale-a-bration so I have tons of stuff to post but alas - if I can just buy some time. I will post as much as I can.
I saw this set and of course had to have it- the fruit pieces are just so cute and matching punches to boot- I just LOOOVE punches especially for little tiny things- drives me batty diecutting little tiny things especially when you need a gazillion of it.... Punch a strip of Old Olive with Decorative Ribbon Border punch.
The base card is Lemon Lime Twist. I stamped the strawberries and watermelon with Real Red and the leaves and rind with Old Olive. The pear is lemon lime twist with soft suede stems all onto whisper white CS (3x1 3/8 strips). Sentiment from Beautiful Bouquet in soft suede diecut with the Stitched Shape Framelits (my favorite!) Layer the stamped panels to 3 1/4x 5 1/2 Real red panel using dimensionals. Wrap the Lemon Lime Twist 1/2 " Finely Woven Ribbon around the Real Red cardstock. I made a little bow, tied it with linen thread, then used a glue dot to stick it onto the ribbon then added a Lemon Lime Twist Tutti Frutti adhesive backed sequin in the middle- perfect!
I layered the Old Olive punched small scallops behind the Real Red panel then mounted the whole thing onto the base cardstock and used dimensionals to pop the sentiment.
Enjoy!


