
There has been a lots of different back packs running around on the stamping blogs but I wanted a version using just one sheet of CS and the scallop envelope for the pocket and so this is what I came up with. ( I know I should not end the sentence in a preposition but hey this is the way I talk- so this is the way I am going to write here anyway)
So here is the front, back and side view of my little backpack.
I had this at my last stamp camp and it was a slightly higher level of difficulty but most people did fine with it and was the hit of the party.
First take your CS- Here I used really rust CS- long ways on the top and score at 1/2, then at 2" from the left, if using a scor-pal. Then off set the paper 1/4 inch from the left and score at 6 inch mark, then 7 1/2.
Rotate the paper clockwise and with left side flush and score 1 1/2 from the left and 2 inches from the right. (It doesn't matter which side you do what but the pictures may confuse you if you don't)
These are the dimensions of the each of the sections. If you are compusive you can score a little the two side sections about 1 1/2 in from the top as shown to make cresing easier (or do it by hand later eyeballing- both works fine). Cut out the sections on the top leaving just one of the 2x 3 3/4 on the top- that will be the top of the back pack. cut the little piece to the left and cut the bottom 1 1/2 inch sections as shown.

Round out the top of the CS and a piece of the coordinating designer paper- here I used Haiku- it's about 3 1/2 x 3 inches- actually I picked out the paper first and then used the colors from the paper to decide what CS I was going to use for the back and the pocket. No need to think at all- all the work has been done for you.... the attach it as shown. Punch out 1/8 inch holes to thread the 1/4 inch grosgrain.

then 2 more on the bottom as shown. the template above has larger holes so you can see where the holes are supposed to be.

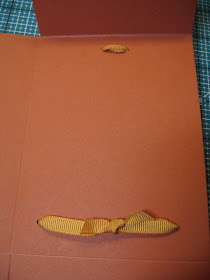
Thread the More mustard ribbon
through the holes and tie it on the inside- believe me it is much easier to do this before you tape the bag up- ask me how I know this-

Tie across the top or bottom- I thought bottom looked neater and can't be seen when the bag is open after it is finished.

This is what it should look like from the inside. Place sticky strips as shown. You will close it up first on the side, then peel the corner strips to tape down the bottom.

this is how it should look.
Finally the te long strip across the bottom and seal it. It makes for a neat pack as all the seams are in the back.
Fold the sides at the top of the bag in a valley fold and see how it looks with the cover over it.

punch a hole and put a decorative brad on the cover, then put a piece of self stick velcro- here is a piece about 3/8 x 3/8 inch piece I cut. Put it on the cover side like this then peel the bottom and stick it closed- You should have a perfectly placed velcro closure.

Die cut a scallop envelope and attach to the back pack as shown at the beginning of this tutorial. It makes for a perfect place for a little stamped 2x3 card. Wouldn't a little girl love this with a set of earrings or other jewerly inside or a little notebook and pen or other little goodies?
Enjoy!


WOW! This is just precious! Thank you for sharing your wonderful idea!!
ReplyDeleteAnnette
These are perfect for those little Ty stuffed animals! Makani
ReplyDelete