I am ready for some flowers aren't you? I saw my little white snowdrops blooming outside and my daffodils and hyacinths are starting to bloom in my back yard.
I am planning a workshop next month I am dubbing Blooming March for all the different flower making technique we will be playing with. This is a card made with a flower making technique that was shown at SU leadership this year that people made at my February workshop.
Base is so saffron- with the fold at the top- embossed with the perfect polka dots embossing folder. Mount a strip of melon mambo and strip of celery on top sentiment stamped with basic gray. The flower is made with 2 strips of 1x 12 inch strips of melon mambo designer paper, border punched with eyelet border punch and crinkled using the crimper to create the gather. Take a small piece of sticky paper and adhere the strips in a gather- non punched end onto the tape- starting at about 1 1/4" size in a circular pattern moving into the center until you run out of paper- it will give you about 3 layers. pierce a hole inthe center and secure a pretty in pink brad in center and layer the whole thing onto the card and you are all done! If you want a smaller flower slide the paper all the way in into the punch- if you want a larger flower like this one shown, slide the paper into the edge of the punch- I hope this makes sense- I can do a tutorial if it does not make sense.
Lynda
Friday, February 26, 2010
Thursday, February 25, 2010
Sweet Pea Stitched Felt Flower card
I love felt. I have a ton of it but wish it would be in SU colors. When I saw these in the mini, I had to have it. It would be easy to die cut some circles and leaves with the big shot and create similar flowers from felt. (if I had the time of course---- this is soooo easy- just stick it on with glue or dimenstionals)
Take a base card of Melon mambo, stamped with the leaves from Tiny Tags set in Versamark. Emboss polka dots with Perfect Polka Dots Textures Impressions folder (yes this is the full 4 1/2 x 5 3/4 to accomodate a full 1/4 sheet of CS rather than the cuttleb*g one that is just too small ( say it like Captain Kirk to get the proper effect ) to get a good coverage. Tie Old Olive satin ribbon as shown. Stamp sentiment form Tiny Tags onto white CS and punch out using tiny tags punch. Mount the little tag and flowers onto the Kisses Sending Love Notes (pg 19 Occasions Mini) then mount on Shades of Spring DD paper and the whole thing onto the base card and ribbon. Another easy peasy card. Thanks Tami!
Wednesday, February 24, 2010
Very Thankful
I have so many wonderful people who support my stamping business despite my crazy life I needed to make some cards to let them know how much I appreciate them. But it needed to be simple and not too time consuming - I am sure most of you can appreciate this- so this is a quick and easy thank you using the Stampin' Up Ronald McDonald set.
It's called that because SU dedicates one set to raise money for the Ronald McDonald house every year and with each sale of this set $2 is donated to them- but it so darling and versatile, I love it even more.
Cardbase is whisper white cut so fold is at the top.
Stamp the image only in black stazon, and color in using blender pen and ink from squeezed dye ink pads. ( If you squeeze an unopened ink pad, some of the inke will go onto the lid of the inkpad and that can be used by the blender pen to pink up a little of the ink to use like a water color.) The hearts were inked with Melon mambo, the turtle shell with Bermuda bay and the turtle itself with Soft suede- following the color found in the DD paper accent.
I inked the heart from Sweetheart set in Melon Mambo, stamped off once and then stamped over the colored image to get a softer heart. I did the polka dot heart from I {Heart} heart on other cards to get a different look, which is really cute. ( This set proceeds go to the Haitian relief fund by the way). Pierce the corner to give something interesting into the corners without being too distracting using the mat pack and paper piercing tool.
Thoroughly Modern DD paper lines the bottom. Wrap a strip of Bermuda Bay polka dot ribbon around to end at the front under the sentiment. Stamp the sentiment only onto white CS then punch out using small oval then mount it onto the larger oval punched in Melon and mount the whole thing with dimensionals. I like angling the oval to get a more playful modern look to it. Hope you like it!
Lynda
Tuesday, February 23, 2010
With all my heart- brad in a button
This is a card I made at my upline Tami's a few months ago and it shows something I thought you may want to see.
The base cardstock is Chocolate chip. Take a real red CS 4x 5 1/4 stamped with sentiment in chocolate chip classic ink pad and take a 6" strip of Sending Love specialty paper and fold it over 1 inch and the backside will show as you can see for a pretty contrast. Layer chocolate chip satin ribbon under 1/4 inch pretty in pink grosgrain and wrap around the red CS.
Take the focal image on to vanilla CA and punch out using Extra Large Fancy Flower punch and another one using Real Red Cardstock. Layer both together.
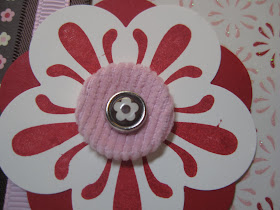
Now this is where it gets to be fun. Tak a 2 holed pink corduroy button and punch a small hole in the center using the crop-a-dile. Yes, it is strong enought to punch a hole in this button. Put a chocolate chip epoxy brad through it and voila! Put the whole thing onto the card using stampin' dimensionals to add some.
Have you got enough pink in your life yet?
Lynda
Monday, February 22, 2010
With all my heart
I have been a tomboy all my life- not much for skirts or makeup or anything too girly. But I have nothing but testosterone running amok at my home with 3 boys and a DH and I really crave some PINK in my life. I really find these colors so happy for me- I have to order more pretty in pink and real red and melon mambo to use because I keep running out of them.....
So this is a card I sketched it down from someone and did not write where it came from ( so if it you, let me know where and I will credit you!).
Base is Pretty in Pink with layer of real red on top. Take a strip of Very vanilla and punch with the Pinking hearts border punch. Layer a strip of Sending Love Specialty DD paper. Isn't this paper scrumptious? I love the preglittered paper in all its pink, red and brown glory.
Stamp the image and sentiment from With all my heart set in red onto very vanilla, layer it onto pretty in pink and tie the new 5/8" pretty in pink satin ribbon. Use trio flower punch to punch out the flower in pretty in pink, and pierce with the paper piercing tool and set a fire circle whinestone brad in center and mount the whole thing onto the base card and another easy peasy card. Really, the hardest part is the punching of the pinked heart strip and all you have to do is match up the strip to the design printed on the punch to get a continuous strip and that is all!
Put a little pink into your life!
Lynda
Sunday, February 21, 2010
A day at Boreal
In California where we live, we don't see any snow at all. But my DH is from Seattle and I am originally from Ohio where we have lots of snow and thought it would be fun for the boys to see what this is all about and get them started on ski lessons so at least they would know how if they wanted to. So last weekend we trekked up to Tahoe to see some snow and the boys all in all had a ball. They were slip and sliding on saucers and innertubes whizzing down the hill and Tyler took a ski lesson the next day and although this was his first time and it was hard and he did gripe about his flat feet rubbing in the ski boot, he loved riding on the ski lift and how cool he looked in all the gear. Dylan was a little apprehensive about the huge downhill slides and after a while decided he prefer to just play and climb in the snow.
Saturday, February 20, 2010
Sweetheart Card
I know Valentine's Day is over but I did not get a chance to post some of the samples we made at my last workshop so I thought I would share one with you. It would be a sweet card for even anniversary or other occastions if you change the sentiment.
Base cardstock is Soft Suede folded to 4 1/4 x 5 1/2 as usual.
Take Pretty in Pink 4x5 1/4" and use the pinking heart corner to punch out all 4 sides to make the corner details. See? no lining up and easy peasy accent that really makes a big impact on the card!
Wrap Melon mambo polka dot grosgrain ribbon and then layer Melon mambo and Very vanilla on top. The heart shaped and heartfelt thanks sentiment both from sweetheart set was stamped in Melon Mambo. The leaves in Soft Suede.
The heart in center was embossed with little tiny hearts and die cut in one fell swoop-LOVE THIS THING!- with the Scalloped heart of hearts embosslits die (by far my favorite toy from the occasions mini catalogue....) and an easy card that I think is really cute!
Lynda
Thursday, February 11, 2010
Mickey Birthday
I love Disney. When EK came out clear stampsets of all the heroines- Jasmine. Cinderella, I had to have it and searched high and low until I found it. Never mind that I have only boys and not sure when I will ever get a chance to use them! I then saw a similar Mickey card at a LSS and cased it for this card- I thought the image would be perfect for a little boy's card. I took Mickey ( they also have another set with Minnie, and another with Donald, Goofy and Pluto ) and stamped him in black pigment ink on white CS and then embossed him. Colored him in with blush blossom, real red and curry markers. The scallop image is a retired SU called so many scallops that matches the punch perfectly. Colored the stamp using red inkpad then used blender pen to take off the ink on the candletop then colored it in with the curry marker(Easy technique to get a little different color on a larger stamped image). It was raised up with the dimensionals and tied a little natural cord to make it look "balloonish". The Mickey paper I had for a long time, not sure from where though and the ribbon is from Creative Imag*nation from the Disney line also. The whole thing is mounted on a textured red cardstock. A little three year old boy got this card for his birthday- Happy birthday Marcus!
Lynda
Lynda
Tuesday, February 9, 2010
The Milk Carton Dog house
I have been playing with the Stampin'Up milk carton diecut since I got it. It has so many potentials and it is so darling. I have seen some birdhouse and other really sweet ideas that I have other people do and I have worked on but this doghouse idea is mine - I came up with this for my little Dylan who loves dogs. It came out after I screwed up the punching of the hole for the birdhouse I was working on and I thought since it was ruined I would make it to something the kids could play with and then i thought it could be a dog house so this is what I came up with.
Diecut the milkcarton in real red CS. I wheeled the love wheel in versamark to get a subtle detail on the house adn punched out the door using the dogtag punch from Stampin up as shown. I put a roof over the house using Background bas*cs- retro stampset from PTI that I've had forever- (but doesn't it look like little shingles?) and you've got your doghouse.
This dog is a variation from the dog face that Marisa Huang showed us (see the steps of the dog face shown below). The face was too big for the dog house so I used smaller punches for the face and snout but the ear and the eyepatch- (upside down here) still uses the word window and the tongue and tail uses the horizontal slot. The body and the legs are small oval and the eyes and the nose is the 1/8 inch punch. (I forgot to highlight the eye before I took the picture- sorry) the dog bone is a punch from All n*ght media from eons ago that just was perfect.
Monday, February 8, 2010
No Candy Valentine Day Treats
I saw this idea at Mish Mash's blog here http://michellewooderson.blogspot.com/2010/01/one-sheet-wonder-valentine-bookmarks.html . She pieced the paper together with a variety of papers but then I saw this double sided MS paper from M*chael's and figured it would be an easy way to make the bookmark sans piecing. I cut the 12x12 paper into 2inches strips by about 6 inches. Knowing I had to make 50 of these, I loved this idea. Especially the non-candy route that the school are going this seemed like a fun idea.
I had gotten the pencils from OTC for this purpose and the ribbon I found at M*chael's and it called out to me. Isn't it just perfect?
I stamped Tiny Treats Valentine from PTI in black inside a circle border stamped in red from Take Note and colored in the image with Cop*cs and punched it out with a circle punch. the sentiment was punched with word window from Stampin Up.
So here are a variety of bookmarks and pencils I made for the kids- (I ran out of the striped papers so there were some polka dot paper with hearts on the back)-and of course Dylan only wanted the doggie ones.......
I had gotten the pencils from OTC for this purpose and the ribbon I found at M*chael's and it called out to me. Isn't it just perfect?
I stamped Tiny Treats Valentine from PTI in black inside a circle border stamped in red from Take Note and colored in the image with Cop*cs and punched it out with a circle punch. the sentiment was punched with word window from Stampin Up.
I stamped Happy Valentine's in the back and had each of the kids pick the image and message and glue it on and sign the back.
I laminated the bookcard using Xyr*n and punched the hole with a horizontal slot punch then tied on the ribbon. I wanted to be pencils to be taped on but not mar the bookmark so I used painter's tape (my DH tells me that there is some fluorescent green that we could have used but oh well,,,)
So here are a variety of bookmarks and pencils I made for the kids- (I ran out of the striped papers so there were some polka dot paper with hearts on the back)-and of course Dylan only wanted the doggie ones.......
Lynda