This is a card I made a long time ago using a now retired set called Neverending joy . It is one of my favorites for many reasons. It was a card I used at my workshop so it was not very difficult. Stamping sentiment in regal nose, on regal rose CS, barely banana CS for the accent piece with whisper white on top. The image is stamped with versamark pad then using a dauber and stampin' pastels added the color (popping pastel technique), corner punched then the white CS slipped in, tied with celery grosgrain and mounted on base CS. Simple.
 . It is one of my favorites for many reasons. It was a card I used at my workshop so it was not very difficult. Stamping sentiment in regal nose, on regal rose CS, barely banana CS for the accent piece with whisper white on top. The image is stamped with versamark pad then using a dauber and stampin' pastels added the color (popping pastel technique), corner punched then the white CS slipped in, tied with celery grosgrain and mounted on base CS. Simple.
The center was the exploding or blooming card and I have been asked how to fold this so here is the step by step.

Take a sheet of paper (I prefer to use really high quality copy paper - it folds better than cardstock ) and cut it into a square shape- for most cards 8 inch square would be best but you can make it any size as long as it is square.
The size you need is the smallest width of your card dimension minus about a quarter inch for a small margin then doubled. Example- I have a 4 1/4 x 5 1/2 inch card. so I need 4 inch doubled and that is how I got to 8 inches square. If you had a 3x3 gift card, you could do one that is 5 1/2 inch square.

Start by folding the square in half. It is important to be as precise as you can. I like to get a crisp fold using my bone folder but your fingernail will do.

You then flip it down and make 2 diagonal folds.

This is what it should look like after the second diagonal is folded.

When you open it up it will have a natural folding pattern if you hold it as shown.

Bring the 2 sides in and this is what it should look like.

Now this is where I have departed from my previous training. I had been folding the edges differently but found crease lines that I did not like and by doing it the following way you will not have that.
Just fold the outer edges into the center as shown on all 4 sides

It should look like this when you are done.

Then, open the edge back up then tuck it to the inside.

as is shown on the left.

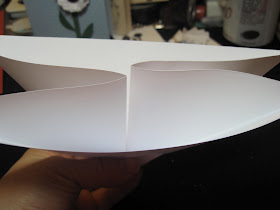
When you are done with all 4 sides this is how it will look and this is the completed blooming center.
This is a side opening card with the fold going vertically so the center fold will also go vertically when you open it up.

just like this.

If it is top opening, the center line fold on the blooming card will be horizontal just like the fold on the card.
If you don't have this oriented properly and stamp the sentiment then you could have it going sideways- as I have often happen because I did not check before I taped it down......

I think the edges on the blooming centers are perfect for showing wheels. You can round it off and I like to use the wheel guide as I am often straigh line challenged and this makes it really easy. The wheel is my favorite "watercolor joy"- retired with pretty in pink.

Again I always try to orient the opening bloom before I stamp the sentiment to make sure it is going in proper direction and then tape it down.

I tape one side lining the corner to the fold.

Then I tape the other side so it lays flat.

This is how the card will look as it opens.
This works well for so many different ideas. It just looks so simple on the outside and it is always such a surprise for the recipient.
With 3D effects impacting our movies, scrapbooks, and now even cards, I am finding it difficult to send something in the mail that lays flat but still has a 3D effect and I think this fits the bill. I hope you do too. Try it for a kid's birthday with trains, cars or tracks all around or candles all around for a birthday card, the possibilities are endless!
Lynda


No comments:
Post a Comment