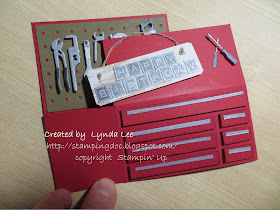
I have been making popup box cards for a long time. I love adding embellishments to make the box -"pop" . I wanted to make a birthday card for Patrick and my sister Chrissy told me that he loves tinkering so I wanted to make him a toolbox card but when I made the tool box card the top was open and did not feel like a toolbox.
I put a top attached from the back but it kept popping up but when I turned it around and attached it from the front, VOILA! It worked.
The pattern is my basic rectangular popup box with the side and front panel cut off. The basic pattern is below.

Turn the cardstock 90 degrees and score at 2 1/4 inches. Cut out the 2 1/4x 8 1/2 inch panel and reserve for the table top and front drawer panels.
Turn the panel so that the first panel you scored is on the right and the panel you cut out is in on the bottom.
(The picture on the left does not have the panel on the bottom cut out but it is best if you cut it out first ) Score at 1/2 inch then 2 1/4, then 5 3/4 inches. and adhere tape to the 1/2 inch tab and adhere to the other side to complete the popup box base.

Take the piece of 2 1/4 x 8 1/2 inch panel you cut out and cut a piece 2 1/4x 3 1/2 and score this along the 2 1/4 inch side at 1/2 inch - this is the table top and you need to attach this to the FRONT of the box - !?4 inch scoring made it a bit too big - 1/2 inch seem better but you may need to play with it to fit perfectly.
The left over piece of Real Red cardstock is cut into 3/8 inch strips to make the panels in the front to mimic drawers.
The top drawer piece was 3 1/4 inch long, the bottom three drawers were 2 1/4 inches and the little drawers on the right were only 3/4 inch wide. I cut little 1/8 inch strips of silver cardstock to mimic handles on the drawers.
I put a panel in the back (Soft Suede CS with Chicken Scratch Cover plate die from Papertrey) to "hang" the tools (dies from Memory Box and Taylored Expressions). The panel in the back holds the toolbox top in place when you click it closed.
The tools were diecut using Silver cardstock from Stampin up (retired)- and used a black sharpie to make the handles and mounted using thin slices of dimensionals. Some tools were lifted with dimensionals to give some depth and the signs can be changed to fit your need.


hi do you have video associated with this card? also, are your measurements off, having trouble getting it to come out like the picture. thank you!
ReplyDeleteI'm having the same problem. I don't have an 8 1/2 piece.
ReplyDeleteThanks for your neat toolbox card, a perfect card for my dad (he's a mechanic) for Father's day
ReplyDelete