Monday, January 31, 2011

Bun in the Oven


I was at a local scrapbook store and found this oven stamp from Art Gone W*ld and thought it would be perfect for a someone who is expecting a baby- unfortunately they did not have the coordinating oven mitt and content inside stampset so I had to make do. I used base whisper white CS and used real red . I stamped the oven on the red and then cut what would be the inside to make a recessed window- see technique here http://www.splitcoaststampers.com/resources/tutorials/recessedwindow/ I then took a basic grey cardstock and drew in the back of the oven and the racks using a black pen and mounted the bread (from comfort food set- SU retired) I stamped on white cardstock and colored in and mounted with dimensionals. I stamped another oven in white, cut out the oven door- around the top and sides and scored the bottom to allow it to open and mounted it on the red CS. I did stamp the oven mitt and colored it in but should have put the hanging tab on the left instead of center but oh well- too late. I then hand wrote the sentiment and pierced the margins to add a little more interest.


Inside is a sentiment from Occasional Quotes(hostess set) and a gift card. I stamped a few images from Clear Art st*mp company to add some baking accoutrements and voila! a fun little play on word card for someone expecting.
Lynda

Sunday, January 16, 2011

My little list book


You've seen them before- the yellow notepads- you buy them by bulk and have an office supply store cut it in half for you lengthwise to get these notepads. I've covering them and giving them as gifts for a while but I was never happy with the closure. After my Christmas card closure idea I made this variation and it is not bad and I like the neatness of it.
It has a little pocket on the left for any loose papers or to add something in.

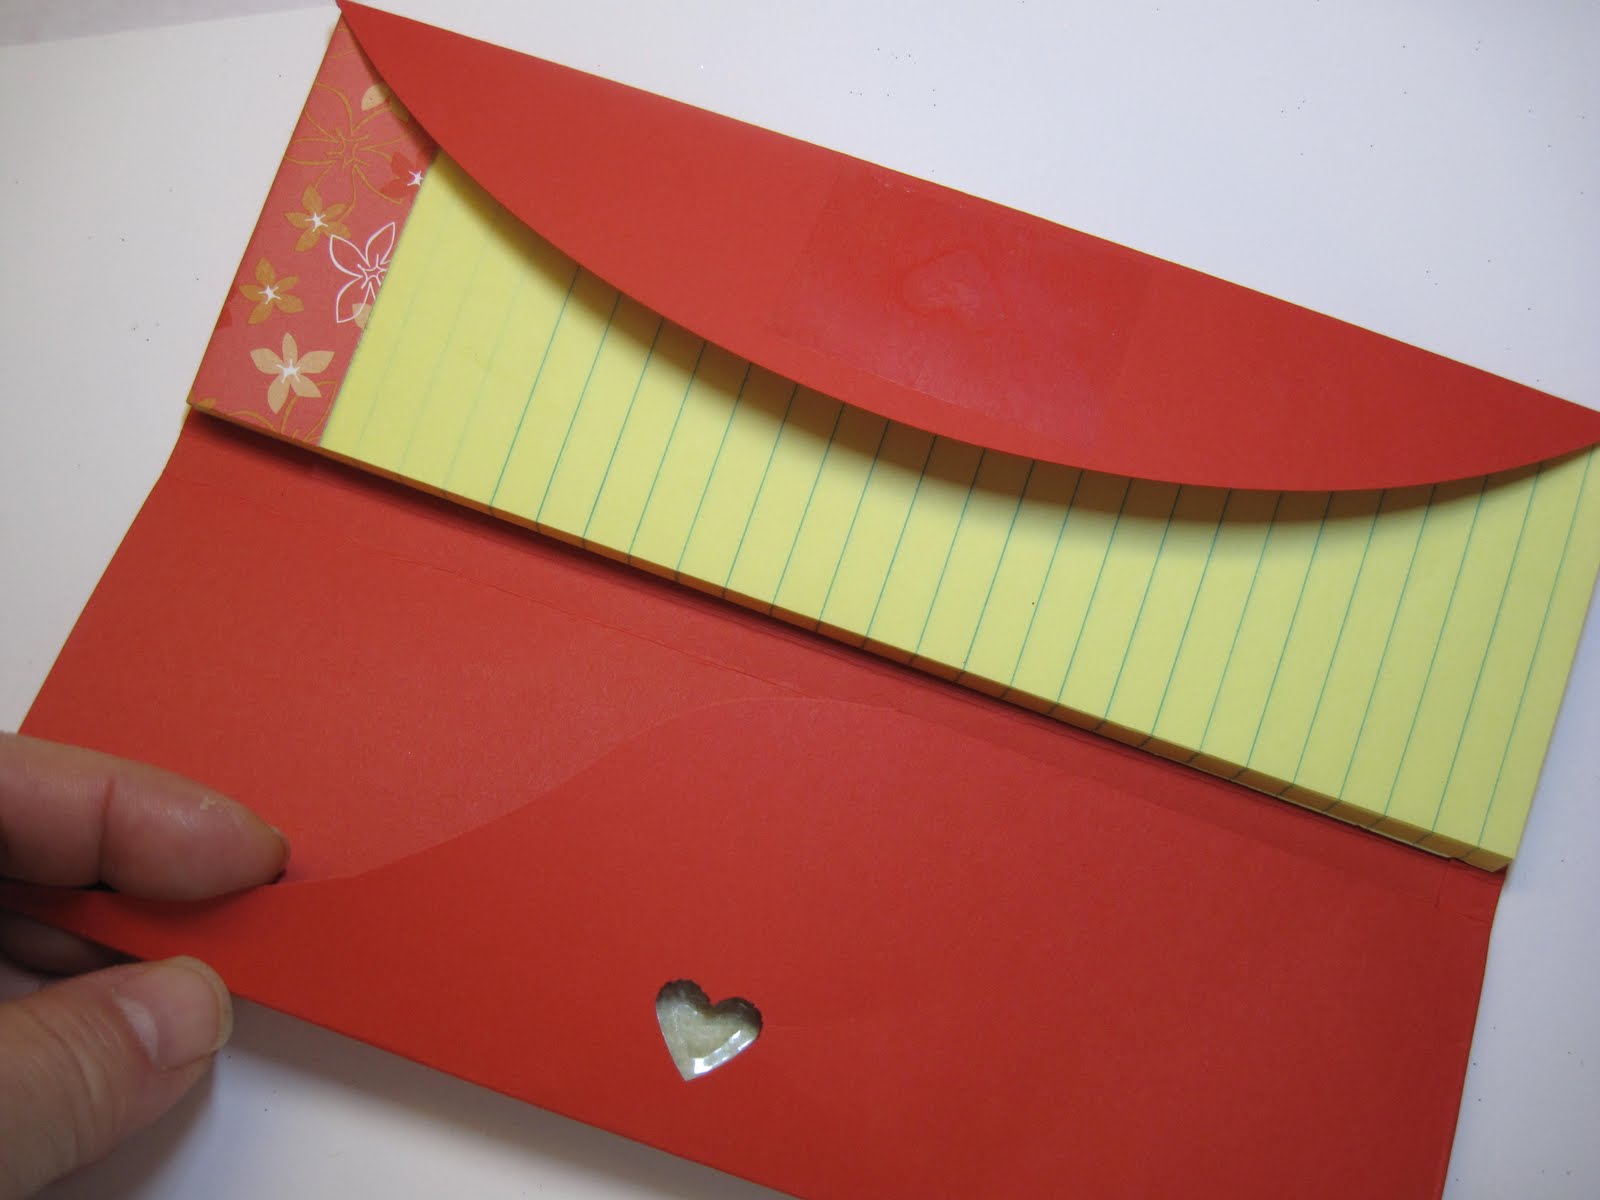
I took an 8 1/2x 11 poppy cardstock and scored it at 2 5/8, then another 2 5/8, then 1/4, 2 5/8, 1/4. This is all detemined by your notebad width and thickness. So score it 2 times, the width of your pad, once the thickness, once the width then the thickness again and what is left over is the closure. Because the pad was not quite 8 1/2 inches, I scored the bottom 5/8 inches so that the pad would fit perfect (and folding over the CS makes it more sturdy- for getting kicked around in your purse bottem!)


I used an oval cutter to cut the closure part.


I folded over the cover part and punched out a heart - but you can punch out any shape.


I also cut out the bottom of the pocket so that the pocket bottom would not be so bulky


When you open it up this is what it should look like.


Ii stuck a piece of packing tape on the pocket side so that the sticky would peek out from the other side- I KNOW you will be tempted to touch the sticky part but DON'T or you will not have a very strong closure and will have to rip it off- carefully and replace the tape. I freehand cut the S shape so the pocket could be easily used but you could just do it at an angle using your cutter. Try to do this before you add the tape so it does not stick to your cutter.


I took another cleanly cut piece and laid it - STICKY SIDE UP - so that it is sticking to my finger on the picture -on top of the heart shaped punched out that has the sticky side peeking through it and centered it and stuck it to the heart- this is going to be on the closure but I wanted it centered to the heart. It is now somewhat free floating but once I close the notepad it will be centered perfectly on the closure to receive the sticky from the heart shape.


When you close the closure flap over the note pad and put the cover on it the sticky heart sticks to the tape on the closure flap and keeps it closed. I just hated the velcro ripping off the notepad as I kept using it and magnets were more bulky although I like it a little better.


This is what the closure mechanism looks like.


I covered the notepad top with a decorative paper to match the cover.


Put a lot of sticky tape to adhere the notepad to the base.


and these are a few variations on the card. The DSP on top is Sunny Garden. The green DSP is Certainly Celery and the saffron paper is retired Sale-a-bration paper that just happened to match. I also punched out 3 little hearts (small heart punch) from the Glimmer paper from the new Occasions Mini- you get 2 12x12 sheets of most fabulous paper - it punched- like butter!- I was worried because it had a lot of texture but no worries! I stamped Love from the Valentine Defined set on the bottom. The one on the left is going to a sweetheart of a gal who babysat my 3 little monsters over Christmas- She did not want to be paid but I just have to thank her in some way! They are some vouchers for my workshop that she attends faithfully as a thank you. How to make those using MDS will be another post.
You know those Weeble? They wobble but they don't fall down.... remember?
I feel like someone just whacked me and I was really wobbly for a while but I think I am finally standing upright again and better than ever! Thank you all for your support through these difficult times - All your words of encouragement really hit home and I so appreciate them!
and more Fun Posts to come- I have been making a bunch of stuff- just didn't have time to post but I'll be better!
xxxooo
Lynda


Saturday, January 15, 2011

My Playdate


I have a few girlfriends who asked me for a playdate- my kids have them, why can't I? Just casual, bring stuff to play with -sort of thing. It was so much fun. Margery brought over a make and take of this dog card- above using the Owl punch for the face and large oval for the body- is he not the cutest? The right side is the close up of the face and if the dog is sick, the variation on the right. Does he not look absolutely ill?


These are the incredibly creative ladies at work, Makani to the left, Margery, and Sachi- who made this most yummy salad that even my KIDS ate it!


Bonnie, Makani and Sheryl made the trek over a big hill to come play. Bonnie is holding the make and take I made- a little notebook holder- I will post details on that later.

We had been playing with the idea of the owl punch being used as a face of Rudolf in the December workshop and Margery was playing with it and made a squirrel face so I went NUTS- and had to make the whole squirrel with it (hee hee). Here is the detail on the squirrel, holding the nut from the Day of Gratitude set.


The background is Woodgrain in Soft Suede. Ribbon is pumpkin and DSP is from Margery. I was at the Used stamp sale at Cranberry hill last year and I bought this ziplock bag full of cut up paper from Marsha- I bought it because it had some flocked paper and I thought I would it use it -some day- and the day had come at last- I punched out the owl body and the large oval for the body, black and white CS for the eyes, pretty in pink for the nose- heart is form M*chaels- $1 punch- used a black marker for the facial expression. The hand is from the Boho blossoms punch that I free form cut from the small flower leaving just the 3 scallops. I tried to figure out how the tail should be after I made the body by drawing it on a scrap paper and used it as a template to make a tail- I had my kids decorativve scissors near by so I grabbed it to make the scallop part. The sentiment is from PTI- My Punny Valentine set. The scallop and oval is made using Nestab*lities.


I love how the exchange of ideas took the little dog into this squirrel. Each of us kept egging each other on, adding the background, the tail, the nut, looking for the perfect sentiment all came out of us just being together and talking. This is Margery's version with the curly tail.
I love you girls!
Lynda


Sunday, December 26, 2010

Christmas card 2010- A tree stands alone


This is my Christmas card for 2010. Now that hopefully most people would have received it by now I wanted to share it with you all. It took me a long time to figure out how I wanted to do this card and it went through several trials before this mechanism worked. I wanted my friends to open the card and have the tree stand up without having to hold it. The cover is medallion in garden green and the Merry Christmas is from all holiday in red punched out with circle punch. Satin real red ribbon tops the wreath. My DH thought it was confusing to open the card - feels like you're going to rip it- he said so I added the sign that says open in whisper white craft ink.


When you open the card there is a SU retired sentiment embossed with silver EP using versamark and my - yes photoshopped again!- picture of my three little not so wise men on the right.


I added a flap of cardstock in red that you fold back and you stick it on the oval and voila the tree stands up on its own.


This is how I envisioned everyone would see the card.

I die cut the X-mas tree using the big shot and the star from the matching tree decorations sizzlet in gold cardstock. I diecut 2 of the same star with the bottom slit and glued them together so they would lay flat on the tree. I also embossed the tree using the petals-a-plenty folder- it was hard to fit the whole thing as it had variable thickness so I had to run it back and forth on 4 sides to make it emboss- it would have taken a lot more time embossing individual pieces although it would have been easier- when you are making close to 90 of these, you have to cut SOME corners!

On some of the trees I did add some sparkle with the 2 way glue - making little dots in the middle of the poinsettia with red and others in the fine cosmos glitter pack.


THe bottom piece to stand it up needs really good taper so make sure you use sticky tape to make sure it really adheres. Unfortunately this piece almost always gets too deeply cut and I have had instances where it tore.


To ensure a good and long lasting mechanism so it could be opened and closed for many years to come, I added a strip of scot tape on the other side to make sure it held well.


The tree standing mechanism was really a tough one for me. I tend to be pretty good at engineering things but I had a really hard time- I thought of a picture stand type back and played with many different variations which all failed on one account or another. My MIL brought over some pictures she had developed at Costco and I saw that the closure on the envelope was done with adhesive tape and BAM! it hit me- I could use the same type of idea.


SO I punched a oval on the bottom of the card where I wanted the tree to open and stick and stuck a piece of packing tape underneath so that the sticky part would show on top - it's the same idea as the glitter window, remember that technique?- then I stuck another piece of tape where the sticky would touch on the side of the picture opened (see picture to the right- yes I know the tape is somewhat unsightly but I embossed the words and the tape is clear so it does not show SO terribly much). When you close the card this sticks to the sticky oval.


The thing that keeps the tree up is the sticky on this side that when you stick to the oval allows for temporary stick that keeps the tree up but you can unstick and close to store flat.


This was what the card looked like completed.


This is the detail on the tree and the ornament top.


This is the detail on the tree skirt- I stamped snowflakes using bliss blue onto premium copy paper- it is thinner so it flattens out better although it costs more than regular copy paper it is definitely worth it. I cut quarter sheets of it trimmed to line inside of dark cardstock cards to have a white writing surface too.
The extra real red CS was about 5 x 3 1/4 or so scored on one side with sticky tape on it to again really stick to allow for repeated play with the tree.

This sentiment is from Peaceful Season the level 2 hostess set from the holiday mini. I love all that elegant scroll work.
I'm going to make some birthday cake cards like this too to see how well it holds. I have not been able to find a way to make this mechanism work with a standard card without it flopping all over the place but I think it is worth the extra paper and postage- what do you think?
Happy Holidays!
Lynda


Thursday, December 16, 2010

To you and yours one layer card- well, almost


I really am trying to simplify my life and I guess it is reflecting some on my cards as well. The ideas of a simple one layer card especiallyf for Christmas keep coming up in my head. I also wanted to meet the SCS challenges this week: the CAS layout, the F4AFriday for a christmas card on a fly, and TLC303 to use sponging and then the color challenge of grey concord and marina mist. Thsis image(retired SU) came up to mind which I think is perfect in marina mist.
The base card is just 4 1/4x4 1/4 ( so that it could be mailed in the standard envelope). I scored te edges 1/4 " so that it would have a border without adding another layer. I then punched out a scrap piece of paper using the 2 1/2 inch circle punch and used the paper as a mask to stamp the image in arina mist. Then I sponged some grey on the bottom and some concord on top. Unfortunately some of the color rubbed onto the house image and it muddled it up a bit- and I really like the crisp white of snow on the house so I used the signo gel pen to add some white back over the roof line and in front of the house whern the snaw would be and a little on the trees where there were supposed to be snow too. I then stamped the sentiment in concord grape. I diecut a snowflake from the Northern Frost die ( actually it was a left over from another project but who would know?) and added a crystal jewel to the center then used 2 way glue pen to adhere the dazzling diamond glitter to it and some parts of the card, the roof, the snow and the trees to add a little sparkle. It is a simple card and one layer- if you don't count the snowflake that is.


Tuesday, December 14, 2010

One Layer Christmas Card- Medallion


This came out of a request by my friend Helen who wanted to use medallion for christmas in an easy to make card so this was what I came up with. Stamped the Medallion in Garden Green onto whisper white CS. Stamped the Merry Christmas from All Holidays set in real red onto another piece of scrap whisper white, punched it out with 1 3/4 inch circle punch and mounted it with dimenstionals. Added a 5/8 inch real red satin ribbon and it really is a simple 5 minute card that you can make on a fly. I thought you could add some red dots around the wreath but thought it better to keep it simple.

Monday, December 13, 2010

One Layer Holiday Cards


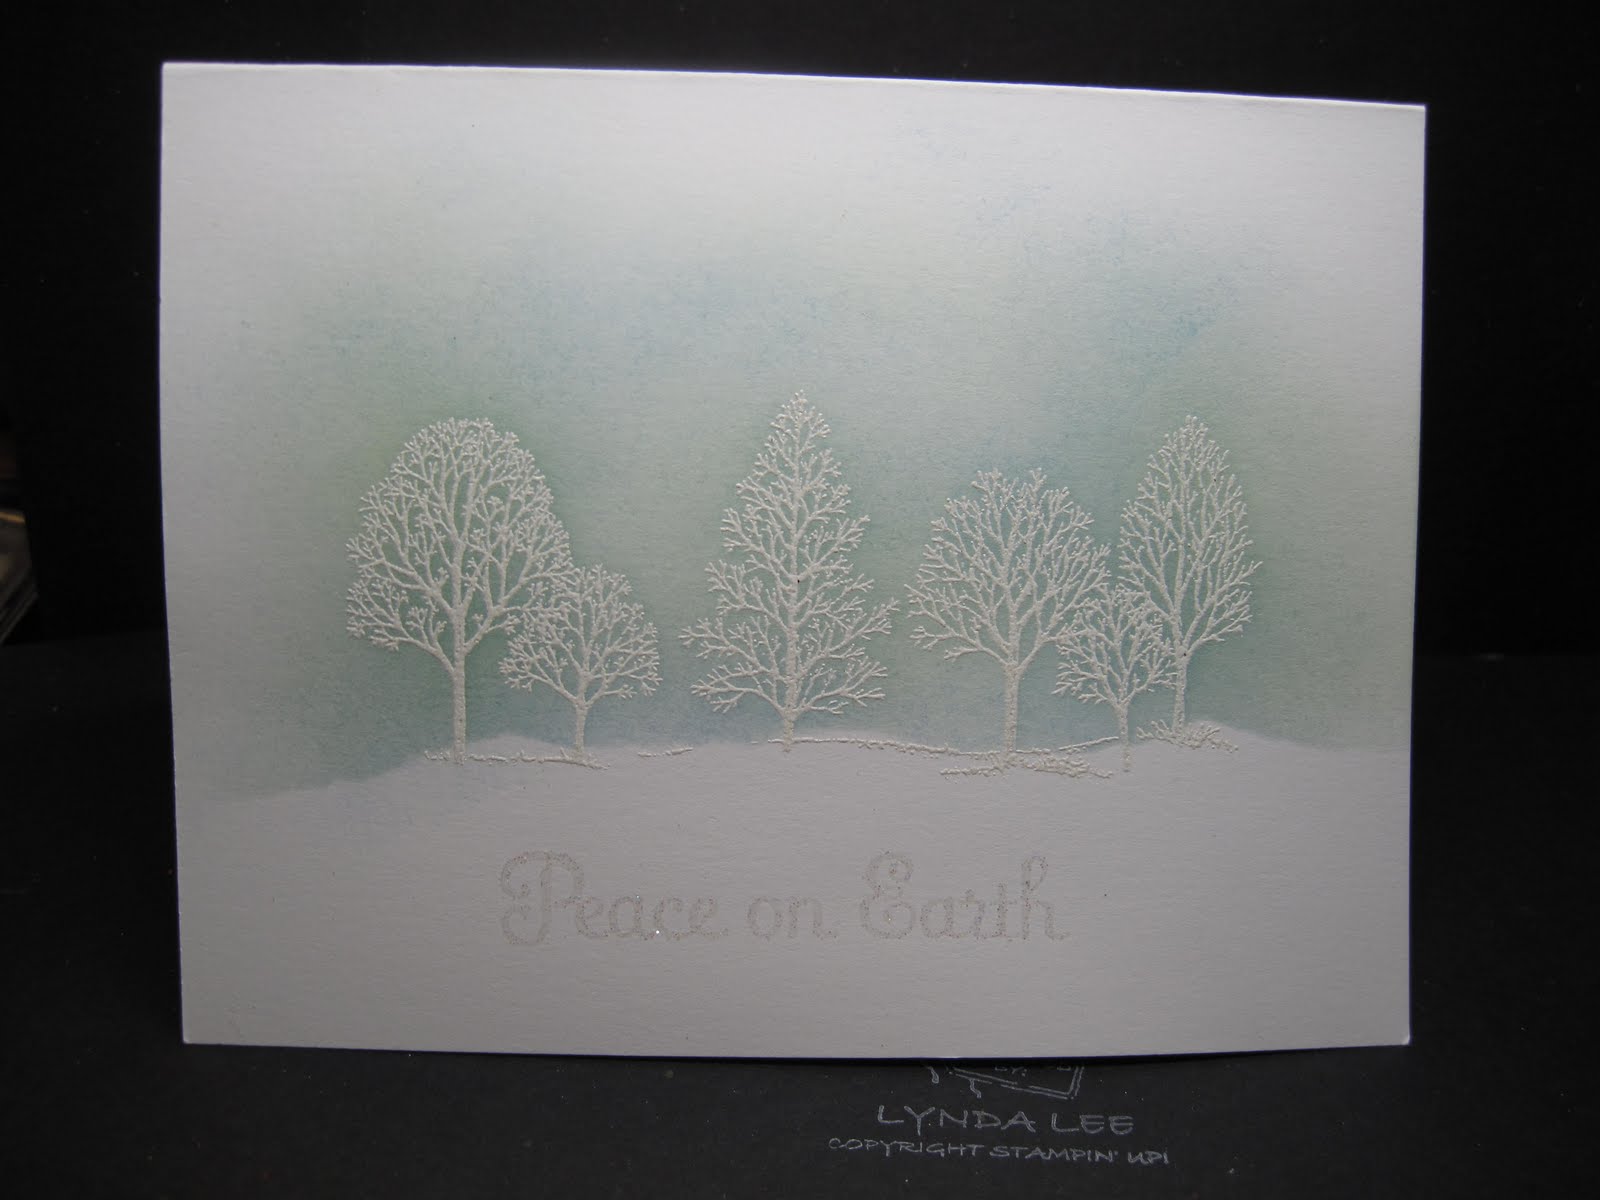
I was thinking about creating some simple one layer holiday cards and this is one I started to play with at my last workshop. I still love the Lovely as a tree set but wanted to make it more winter snow covered scene. I ripped a piece of paper to make the snow covered ground and stamped the image using versamark on top of it so that the bottom part of the stamp would be hidden by the "snow". It was stamped onto whisper white CS and embossed with clear embossing powder (but you could also use white if that's what you have) . I then sponged bashful blue- I think it had some celery in it from an old project so it had bluish green hues which was actually quite pretty.
I took sentiment Peace on Earth from Four the Holidays set and embossed with versamark with iridescent ice EP to make a simple wintery card. You could add a little gliter along the snow with 2 way glue pen if you want. Hope your day warms up!
Lynda


Thursday, December 9, 2010

Greeting Card Kids winter

I just can't enough of this sweet stampset- love the little girl- I have a picture of myself when I was about 7 or 8 with pigtails in a coat just like this one. The sketch is a challenge from splitcoast SC310 herehttp://www.splitcoaststampers.com/forums/card-sketches-f41/sketch-challenge-310-12-8-10-a-t514333.html. The base card is Artichoke. The image was stamped with memento black and colored in with copics except for the scarf which was pretty in pink marker. After coloring, I used 2 way glue pen to add dazzling diamonds to the trim. Layered it on artichoke as well.


I used the Deck the Halls DSP to layer, then added cherry seam binding ribbon to it on top then diecut snowflakes which I glittered with dazzling diamonds as well and added some jewels for sparkleas shown.


Layered the image onto another piece of DSP paper and voila! It literally took me 15 minutes to make it- the longest was getting the little chads out of the snowflakes after diecutting!
Enjoy!
Lynda

Wednesday, December 8, 2010

A RAK from Tami- my version


My upline is so super supportive, when I meet my goals for the month, she sends me a little surprise. This month it was a white on white card that I thought was really cool but of course I had to do a variation of it to make it "mine"- wink wink- but the basic card idea is from her. Take shimmer white CS and stamp Always elegant on it in crumb cake. Emboss elegan lines with vellum CS then add pearl jewels and tear the top to add texture. Tie a vanilla seambinding ribbon around the cardstock and tie a ribbon . Tuna brad around the ribbons and close off to secure the ribbon (not using any holes to secure the ribbon. Stamp Mr&Mrs in crumbcake, then add a pearl. Secure onto ribbin with a dimensional.
I added a line of 2 way glue and sprinkied dazzling diamonds on the front edge to add a little subtle sparkle and easy wedding card.

Tuesday, December 7, 2010

Emboss Resist Foliage

The Technique lover challenge this week is emboss resist- one of my favorite techniques- . Here I combined it with the color challenge 300 from splitcoast using artichoke, cherry and pretty in pink with a little daffodil and cajun sponged in as well. The base card is artichoke. the leaves are stamped using versamark on white glossy CS using clear embossing powder and heat embossed. The cardstock is then sponged with variey of classic ink colors to blend and make the images pop out.

I had stamped a sentiment in the corner but it looked really flat- out of necessity as no punch shape would fit over my booboo- I tore it out which I REALLY liked. I then stamped the sentiment with versamark and embossed it with gold EP as shown.


a
The other challenge was CAS96 for bows- I love mixing up the challenges and trying something different.
I auditioned the artichoke and cherry seam binding ribbon but the vanilla seem to fit better and less intrusive. I stamped the snowflake from snow swirled in artichoke and punched it with the 1/2 inch circle punch, and used the build-a-brad to make a custom brad- don't you just love it?
Mounted the torn piece onto the cherry piece, then I pierced the hole where I wanted the brad legs to go and used it to hold down the ribbon through cherry cardstock. I then mounted the whole thing on the artichoke base card and another easy card. Three challenges in one card whew!