Friday, February 25, 2011

A cupcake birthday


There are lots of cupcake punches out there but I had been resisting because I knew I wanted the one from Stampin Up. It comes with a cherry on top, a candle and sprinkles and I just love it. I also love the coordinating stampset- These guys are marketing geniuses I tell ya- either that or total enablers to stamp addicts like me!
I used the tangerine base, with white on top of that with happy birthday from the same set stamped in chocolate chip. Is it not the sweetest little font?

Ran the tulip embossing folder over the pear CS to fit the smaller profile- ran the cardstock then took it out and turned it around to reimpress to get the smaller size I needed and it reimpresses the corner to make it perfect- LOVE IT!
then a daffodil circle punched then the large scallop circle in white. Cut 1" strips of melon mambo and chocolate chip CS, stamped the cupcake top and the base with coordinating stamppads before punching them out. I punched a heart - I think I am using this red glitter paper for EVERYTHING! Just love that sparkle it adds- I thought it looked like it was missing something though- I had mounted the cupcake using dimensionals so I slid in a small piece of ribbon behind it and just tied it in the front and it just added that special something that I thought made it look complete.
I used this card at my workshop to show people how to partial emboss using the tulip folder and it was not too difficult- but FYI-it did make it easier to tie the bow AFTER you mount the cupcake. Just put the dimensionals low enough on the cupcake bottom to slide the ribbon behind it. This would be such a fun card for a kid's or anyone's birthday. You can try using a vanilla color for the frosting and putting some different color sprinkles, in all the in colors would be fun too.
enjoy.
Lynda

Thursday, February 24, 2011

faux pressed flower


This was a technique I saw on line I thought made an easy card using the Thoughts and prayers set and all the flowers including bottles of Primas that I have been acquiring.
I stamped the stem in olive on a white CS and also on corners of the crumbcake CS base. Stamped the sentiment in black and then glued the flowers and the white cs and pressed the whole thing using the lattice embossing folder.
Love the effect and really easy!
Time to get out your flower collection and finally put them to use.

Wednesday, February 23, 2011

My Love card


I was playing with a bunch of ideas for valentine and this was the final card I had for my workshop. I used the tree, quote box and sentiment from Valentine defined and the 2 birds from Aviary- I thought there should be some little animal but I wanted 2 animals facing each other. The bird in the tree legs were too long so I only inked up part of it. The tree was stamped in Garden green then the branch part removed with blender pen then reinked using the chocolate chip marker. I used the blender pen to color below the tree to ground it a bit. The 2 birds were inked with chocolate chip. The quote box in real red then added a punched glitter heart in center. It was mounted on garden green CS corner rounded. The red CS was pressed using the Lots of Love letterpress plate.


I stamped the love in red then punched out with modern labale punch. I then ran the ribbon through a hole on the left and mounted with dimentsionals. Added a crystal jewel to add a little sparkle- fits perfectly over the O!


Saturday, February 5, 2011

Valentine Treats


It's that time of the year again! Valentine's Day is just around the corner and it is time to make 63 valentine's treats for 3 classes- I had to make it not too difficult so here it is. Little valentine posies. There are specialized dies to make just these kind of things but of course I do not have any so I used my old Island floral die to make these but any large flower die would work.


I punched a larger hole in the center to fit the tootsie pop I wanted to use. I cut through one of the leaves and petal between so I could roll it up a bit to make it more dimensional. I even used the stylus and a mouse pad to add some leaf lines as you can see.


after I put the lollypop in the center then I used some tape to overlap one of the petals.


I overlapped the petal fully to make a 4 petal flower.


The leaf petals were only overlapped about 1/2 to make an asymmetrical leaf as shown.


This is what the completed flower set looks like. Easy peasy flowers.


When I was at the local M*chael's - with generous gift cards I received for Christmas, I saw these ribbons for 50% off and I had to have them. 4 yards for a buck- not bad! I cut off each happy valentine's day and punched a hole with my cropadile to pierce it and threaded the lollypop bottom as shown on the right.


I wanted to add a tag so that my kids would have to write the names of the recipient so I used this retired stamp that matched the tag punche in red to make easy tags. Originally I had added the tag with linen thread but my kids had a hard time tying it- they are supposed to make their own valentines- so I used the modern label punch and 1/4 inch circle punch to make a tie the way like those bread ties. I just cut through with scissors and it stayed on the lollypop reasonably well. It does shred after the while so I would have the kids sign it in the back and put it on at the end.


and here it is. My kids are having a ball making these- I hope you do too.
Lynda.


Friday, February 4, 2011

A simple card


Julie just had a birthday
and of course my card was about 2 weeks late- how can it be that someone that makes as many cards as I do cannot remember to send a birthday greeting to people they love in time? Got me! My mom just got a phone call this year... Shame on me.
But better late than never so I sent an unbirthday card to Julie and a few cards that I stamped with her name on it. The sentiment and the alphabet stamp are from PTI. You're a Gem sentiment from the Occasions Mini from SU. Crystals jewels from SU. I layered white with Poppy Parade then another layer of whisper white. I stamped the sentiment and then used my black pen to draw a line between the sentiments and 1/4 inch away from the edge. I tried both crystals on either side of her name and to dot the i. A clean and simple cardset for a real gem of a person!
Lynda

Monday, January 31, 2011

Bun in the Oven


I was at a local scrapbook store and found this oven stamp from Art Gone W*ld and thought it would be perfect for a someone who is expecting a baby- unfortunately they did not have the coordinating oven mitt and content inside stampset so I had to make do. I used base whisper white CS and used real red . I stamped the oven on the red and then cut what would be the inside to make a recessed window- see technique here http://www.splitcoaststampers.com/resources/tutorials/recessedwindow/ I then took a basic grey cardstock and drew in the back of the oven and the racks using a black pen and mounted the bread (from comfort food set- SU retired) I stamped on white cardstock and colored in and mounted with dimensionals. I stamped another oven in white, cut out the oven door- around the top and sides and scored the bottom to allow it to open and mounted it on the red CS. I did stamp the oven mitt and colored it in but should have put the hanging tab on the left instead of center but oh well- too late. I then hand wrote the sentiment and pierced the margins to add a little more interest.


Inside is a sentiment from Occasional Quotes(hostess set) and a gift card. I stamped a few images from Clear Art st*mp company to add some baking accoutrements and voila! a fun little play on word card for someone expecting.
Lynda

Sunday, January 16, 2011

My little list book


You've seen them before- the yellow notepads- you buy them by bulk and have an office supply store cut it in half for you lengthwise to get these notepads. I've covering them and giving them as gifts for a while but I was never happy with the closure. After my Christmas card closure idea I made this variation and it is not bad and I like the neatness of it.
It has a little pocket on the left for any loose papers or to add something in.

I took an 8 1/2x 11 poppy cardstock and scored it at 2 5/8, then another 2 5/8, then 1/4, 2 5/8, 1/4. This is all detemined by your notebad width and thickness. So score it 2 times, the width of your pad, once the thickness, once the width then the thickness again and what is left over is the closure. Because the pad was not quite 8 1/2 inches, I scored the bottom 5/8 inches so that the pad would fit perfect (and folding over the CS makes it more sturdy- for getting kicked around in your purse bottem!)


I used an oval cutter to cut the closure part.


I folded over the cover part and punched out a heart - but you can punch out any shape.


I also cut out the bottom of the pocket so that the pocket bottom would not be so bulky


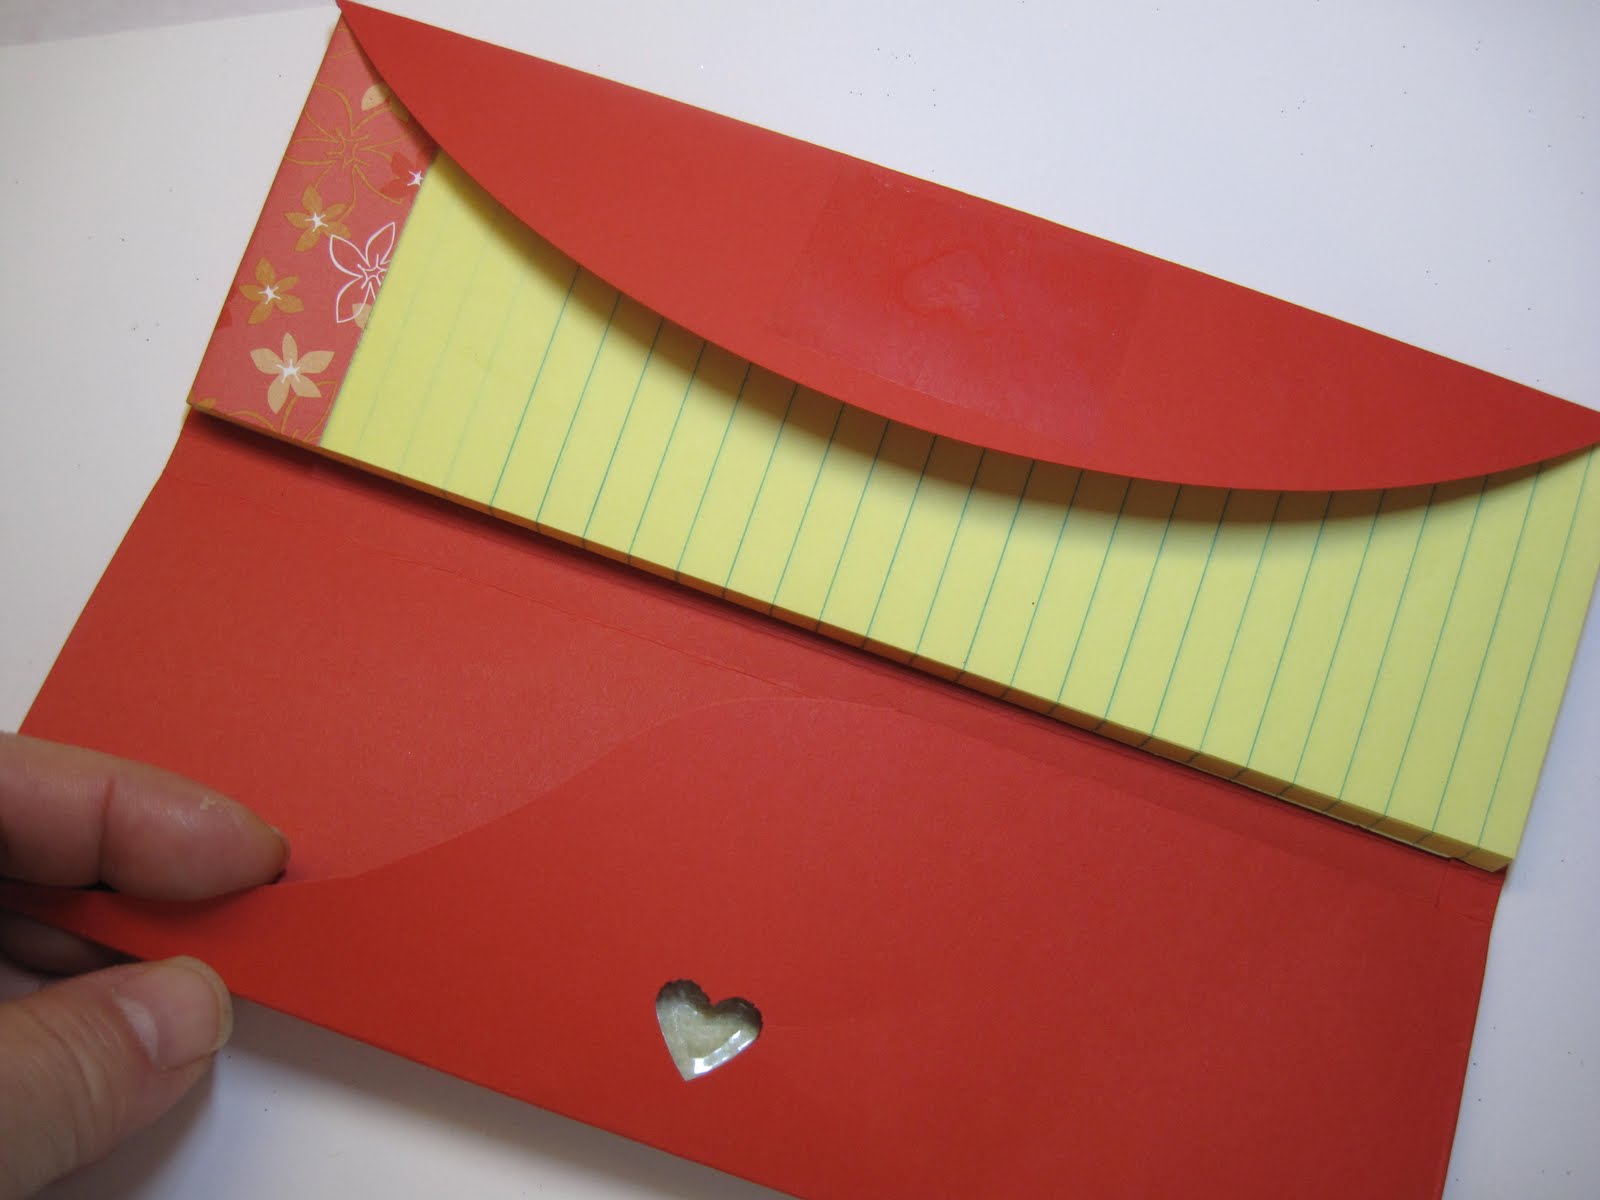
When you open it up this is what it should look like.


Ii stuck a piece of packing tape on the pocket side so that the sticky would peek out from the other side- I KNOW you will be tempted to touch the sticky part but DON'T or you will not have a very strong closure and will have to rip it off- carefully and replace the tape. I freehand cut the S shape so the pocket could be easily used but you could just do it at an angle using your cutter. Try to do this before you add the tape so it does not stick to your cutter.


I took another cleanly cut piece and laid it - STICKY SIDE UP - so that it is sticking to my finger on the picture -on top of the heart shaped punched out that has the sticky side peeking through it and centered it and stuck it to the heart- this is going to be on the closure but I wanted it centered to the heart. It is now somewhat free floating but once I close the notepad it will be centered perfectly on the closure to receive the sticky from the heart shape.


When you close the closure flap over the note pad and put the cover on it the sticky heart sticks to the tape on the closure flap and keeps it closed. I just hated the velcro ripping off the notepad as I kept using it and magnets were more bulky although I like it a little better.


This is what the closure mechanism looks like.


I covered the notepad top with a decorative paper to match the cover.


Put a lot of sticky tape to adhere the notepad to the base.


and these are a few variations on the card. The DSP on top is Sunny Garden. The green DSP is Certainly Celery and the saffron paper is retired Sale-a-bration paper that just happened to match. I also punched out 3 little hearts (small heart punch) from the Glimmer paper from the new Occasions Mini- you get 2 12x12 sheets of most fabulous paper - it punched- like butter!- I was worried because it had a lot of texture but no worries! I stamped Love from the Valentine Defined set on the bottom. The one on the left is going to a sweetheart of a gal who babysat my 3 little monsters over Christmas- She did not want to be paid but I just have to thank her in some way! They are some vouchers for my workshop that she attends faithfully as a thank you. How to make those using MDS will be another post.
You know those Weeble? They wobble but they don't fall down.... remember?
I feel like someone just whacked me and I was really wobbly for a while but I think I am finally standing upright again and better than ever! Thank you all for your support through these difficult times - All your words of encouragement really hit home and I so appreciate them!
and more Fun Posts to come- I have been making a bunch of stuff- just didn't have time to post but I'll be better!
xxxooo
Lynda


Saturday, January 15, 2011

My Playdate


I have a few girlfriends who asked me for a playdate- my kids have them, why can't I? Just casual, bring stuff to play with -sort of thing. It was so much fun. Margery brought over a make and take of this dog card- above using the Owl punch for the face and large oval for the body- is he not the cutest? The right side is the close up of the face and if the dog is sick, the variation on the right. Does he not look absolutely ill?


These are the incredibly creative ladies at work, Makani to the left, Margery, and Sachi- who made this most yummy salad that even my KIDS ate it!


Bonnie, Makani and Sheryl made the trek over a big hill to come play. Bonnie is holding the make and take I made- a little notebook holder- I will post details on that later.

We had been playing with the idea of the owl punch being used as a face of Rudolf in the December workshop and Margery was playing with it and made a squirrel face so I went NUTS- and had to make the whole squirrel with it (hee hee). Here is the detail on the squirrel, holding the nut from the Day of Gratitude set.


The background is Woodgrain in Soft Suede. Ribbon is pumpkin and DSP is from Margery. I was at the Used stamp sale at Cranberry hill last year and I bought this ziplock bag full of cut up paper from Marsha- I bought it because it had some flocked paper and I thought I would it use it -some day- and the day had come at last- I punched out the owl body and the large oval for the body, black and white CS for the eyes, pretty in pink for the nose- heart is form M*chaels- $1 punch- used a black marker for the facial expression. The hand is from the Boho blossoms punch that I free form cut from the small flower leaving just the 3 scallops. I tried to figure out how the tail should be after I made the body by drawing it on a scrap paper and used it as a template to make a tail- I had my kids decorativve scissors near by so I grabbed it to make the scallop part. The sentiment is from PTI- My Punny Valentine set. The scallop and oval is made using Nestab*lities.


I love how the exchange of ideas took the little dog into this squirrel. Each of us kept egging each other on, adding the background, the tail, the nut, looking for the perfect sentiment all came out of us just being together and talking. This is Margery's version with the curly tail.
I love you girls!
Lynda


Sunday, December 26, 2010

Christmas card 2010- A tree stands alone


This is my Christmas card for 2010. Now that hopefully most people would have received it by now I wanted to share it with you all. It took me a long time to figure out how I wanted to do this card and it went through several trials before this mechanism worked. I wanted my friends to open the card and have the tree stand up without having to hold it. The cover is medallion in garden green and the Merry Christmas is from all holiday in red punched out with circle punch. Satin real red ribbon tops the wreath. My DH thought it was confusing to open the card - feels like you're going to rip it- he said so I added the sign that says open in whisper white craft ink.


When you open the card there is a SU retired sentiment embossed with silver EP using versamark and my - yes photoshopped again!- picture of my three little not so wise men on the right.


I added a flap of cardstock in red that you fold back and you stick it on the oval and voila the tree stands up on its own.


This is how I envisioned everyone would see the card.

I die cut the X-mas tree using the big shot and the star from the matching tree decorations sizzlet in gold cardstock. I diecut 2 of the same star with the bottom slit and glued them together so they would lay flat on the tree. I also embossed the tree using the petals-a-plenty folder- it was hard to fit the whole thing as it had variable thickness so I had to run it back and forth on 4 sides to make it emboss- it would have taken a lot more time embossing individual pieces although it would have been easier- when you are making close to 90 of these, you have to cut SOME corners!

On some of the trees I did add some sparkle with the 2 way glue - making little dots in the middle of the poinsettia with red and others in the fine cosmos glitter pack.


THe bottom piece to stand it up needs really good taper so make sure you use sticky tape to make sure it really adheres. Unfortunately this piece almost always gets too deeply cut and I have had instances where it tore.


To ensure a good and long lasting mechanism so it could be opened and closed for many years to come, I added a strip of scot tape on the other side to make sure it held well.


The tree standing mechanism was really a tough one for me. I tend to be pretty good at engineering things but I had a really hard time- I thought of a picture stand type back and played with many different variations which all failed on one account or another. My MIL brought over some pictures she had developed at Costco and I saw that the closure on the envelope was done with adhesive tape and BAM! it hit me- I could use the same type of idea.


SO I punched a oval on the bottom of the card where I wanted the tree to open and stick and stuck a piece of packing tape underneath so that the sticky part would show on top - it's the same idea as the glitter window, remember that technique?- then I stuck another piece of tape where the sticky would touch on the side of the picture opened (see picture to the right- yes I know the tape is somewhat unsightly but I embossed the words and the tape is clear so it does not show SO terribly much). When you close the card this sticks to the sticky oval.


The thing that keeps the tree up is the sticky on this side that when you stick to the oval allows for temporary stick that keeps the tree up but you can unstick and close to store flat.


This was what the card looked like completed.


This is the detail on the tree and the ornament top.


This is the detail on the tree skirt- I stamped snowflakes using bliss blue onto premium copy paper- it is thinner so it flattens out better although it costs more than regular copy paper it is definitely worth it. I cut quarter sheets of it trimmed to line inside of dark cardstock cards to have a white writing surface too.
The extra real red CS was about 5 x 3 1/4 or so scored on one side with sticky tape on it to again really stick to allow for repeated play with the tree.

This sentiment is from Peaceful Season the level 2 hostess set from the holiday mini. I love all that elegant scroll work.
I'm going to make some birthday cake cards like this too to see how well it holds. I have not been able to find a way to make this mechanism work with a standard card without it flopping all over the place but I think it is worth the extra paper and postage- what do you think?
Happy Holidays!
Lynda