Friday, July 26, 2013

Convention 2013 Highlights


 I have been to convention but this really was the best ever.  I got to hang with my dearest stampin' friends, Mercedes, Margery and Sandy and I laughed so much at every turn, I am glad I brought extra panties, if you know what I mean.  And with Shelly and Sara presenting,  you knew with all the beautiful stories, you were gonna just cry your eyes out.   I just never suspected I would choke up with Ronald McDonald but I did. 

 After having attended convention all this time, you'd think I visited the main office, but No.  So I took the opportunity to do so at this one.  The lines were long to get there and it was a dreadfully hot day but I got to see where it all happens.
 This is us melting in front of the campus after the long bus ride but it was really fun to see it all. I found that waiting in line with other stampers was so much fun, and we mets hoards of people from all over who were just as nice as the friends I came with.  The tag hanging from Mercede's bag was made by Margery.  She made one for each of us and everywhere we went people were like-"can we take a picture?"  - I am so blessed to have such talented and generous people in my life!
 We got to tour the place and I thought this was kind of fun.  I never thought to stick flowers on the wall but lookit here!  How fun for a little girl's room.  Never mind the next people who owned the house who'll be hollering and cursing to get those dimensionals off the wall....
 At each turn there was a little surprise for your eyes.  I love this little chabby chic display of sewing do dads....
 There was this big room lined with a writing wall where you could just write down your ideas and I loved seeing this vision for Stampin' Up laid out like this. It makes now some more sense as to why they are doing some of the things there are doing.  I now understand better that for the company to survive that they have to innovate and that requires you to reach out to new people and try out new ideas.
 We toured through the workroom of the staff and they all had these little displays of cards and things which were just all too cute.  I started to run out of battery, I was taking too many pictures.

 This was another display at one of the staff desks.  I just loved it.
 Shelly demo'd some new ideas and products. This is using the Karen Burniston Deco Label pop n cuts that I had been debating getting but look how cute it is. She turned it sideways to make a popout card and I thought it so cute and so many ideas using the die- now I have to get it!  (Did you notice how the main theme of the convention- at the top-  used the same die shape?)
 They also had Karen run a demo booth and she had gazillion samples using the dress up die - so-so cute. 
 And then the envelope liner die- what the heck am I going to use it for?  Yah, yah, liner is cute but what else?   Well this cinched it for me.  They used the envelope die to make a cute little pocket, easy peasy.  I just loved that too.  I am always looking for new ways to give that birthday or some other special event gift cards so this is right up my alley.


 And talking about dies, would you check this out?   die for making flip cards.  They are releasing 2 different dies, one with this shape, another with the circle with cute little diecuts that go with it - the one that says thnx is one I want. Some people won the die- I was so Green!

Speaking of winning, they have prize patrol, and those of you who know me, know that I NEVER and I mean NEVER win anything that is chance related.  But what do you know? I actually won the very first prize patrol.
I could not believe it and when I did, I commented that if I won that usually means everyone will win something - and you know what That's what really happened.  Everyone in the end got something-  I have to laugh- but I have to say, my streak still holds!

This opened my eyes to possibilities I never considered.  Using the personalized stamps for a saying ( I thought of you Chrissy when I saw this- in case you are reading this).
 And my WOW of the whole meeting was this- Undefined stamps- it is basically carve your own stamps set- You gotta love it.  One of the staff demonstrated this and we just cracked up..  She made the bacon strips right on stage - it took her 3 minutes start to finish.  She said that it was her breakfast set.  It is not so unhealthy since the coke had some lime and the donuts had strawberry sprinkles.....
 Convention has what seems like miles and miles of card samples, old and new and I found my card that I submitted last year for the scoring challenge on display.  Oh, joy at seeing my little card on display....
 But the biggest joy of the meeting was being privileged to room with -yes- drum roll------- Stampin Up Artisan  Mercedes Weber.  My heart was pounding, I was SO excited for you- we screamed like those crazy contestants on Let's make a deal- for those of you old enough to remember- She got this beautiful box with her personalized Artisan stamp-  I don't know anyone more deserving.   When I first got to my room, I saw this beautiful Stampin Up wall hanging.  I had seen hotel gifts from Stampin up and I thought "Wow this is fantastic- Stampin' Up is doing this for managers now?"  then realized it was from Mercedes- I am such an idiot!  then next night another little box with deliciously scented body wash and stuff with the most adorable tag on it. I swear I got a gift every night.  I hand carried those precious gifts and now they adorn my kitchen front and center.  I SO LOVE IT!  
 On the last night, my upline Tami hosted a dinner and swap at the Roof which was fabulous.  This is the view of the church from the window of the restaurant which was fantastic.

( Gosh, I keep using these words- love fantastic cute- but it really was!)
 The party that Stampin' Up hosted was a ball!  People were dancing and the musicians played lots of dance music from the 80's and 90's and it really was a blast!  They had tables and tables of cupcakes decorated with our - what else?- In-Colors and they had aerial acrobats and hip hop dancers mixing with the crowd- just an absolute ball.
One of the things they showed was this banner kit decorated with the snow flakes.  I had been debating about the snowflake stamp and die bundle but I loved nestling them together to get the piece she is holding.  And for those of you thinking about signing up to be a demonstrator, if you do it before end of August, you can get a banner kit ( up to 29.90 value) for FREE!


They also announced that for New signups the Paper pumpkin will be only $10 for the first two months.  Just use promocode Pumpkindeal and designate me your demonstrator when you sign up.

Offer Dates: July 18, 2013 -August 31, 2013
Offer Details: Use the promotion code PUMPKINDEAL to join Paper Pumpkin before August 31, 2013, and pay only $10 a month* for the first two months.  You must join by Saturday, August 31, 2013; 11:50 PM (MT)
*plus tax, where applicable. Shipping included!

visit mypaperpumpkin.com to join.

You must click "Add Promo Code" and then enter the promo code PUMPKINDEAL in the "Promo Code" field when you sign up on the mypaperpumpkin.com website to take advantage of this promotion.

My head is spinning from all the whirlwind of products and ideas coming down from Stampin' Up but OH SO EXCITED!  Now I can't wait to go to Leadership!

Saturday, July 13, 2013

My Conventions Swap

 I have a swap with my upline's downline group and the requested was it be a full card that could be demo'ed at a workshop so this is my card.  Embossed the Coastal Cabana Cardstock using the new very "in" Alphabet Press EF part way as shown.  I am also in love with the Tape It set that mimics washi tape.  The tag from the Notable Notions set matches the Chalk Talk dies perfectly and would you not know it? My favorite sentiment from the Yippee-skipee set fits inside perfectly.  Stamp the tapes using Smoky Slate, Calypso coral and the sentiment using the same color markers adn cut it out.
The tag is stamped using Coastal Cabana too- better to stamp the sentiment and then center the tag image around sentiment then diecut.

Now I made a bunch of these ribbons copying the idea from page 152 of the catalog but the center was too much of a pain to make and I did not have the matching DSP in Coastal Cabana so I made my own.
You need a three inch strip and 2 inch strip of 1/2 CS strips with the Tape It image stamped in center- the side parts get tucked under so you can't see it anyway so don't worry.  Fold then in half and free cut them as shown.  Use multimono on each of the 2 block dots and fold over to make the ribbon body.  Use Glue dot to adhere the back part of the ribbon to the paper clip - the glue dot peeks through the paper clip, sticking to the ribbon body.  Use glue dot to stick on the button from Notable Notions set stamped in Calypso coral and punched out using 1/2 circle punch.  Just attach to the tag using the clip and mount the tag with dimensionals .  This card just feels so "summer" with its beach colors.  Love It!

Thursday, July 11, 2013

Animal Talk Bird in a tree card

I do peruse the catalogue when it comes out front to back then back to front.  Why?  I find that when I reverse the process, I sometimes see details that I miss just flipping the pages as it is laid out for me in order.  Like this Animal Talk set-  The sample in the catalog was intriguing.  It used rather unconventional colors but what caught my eye was their use of the little leaves peaking out to extend the theme of tree and wood.  So I took that idea and embossed wood grain onto 1" strip of Soft Suede cardstock.  Stamped the sentiment below in Cherry Cobbler.  Stamped the image using Cherry Cobbler, Marina Mist and soft Suede markers, punched it out using the large oval.  Diecut 2 little leaves in Old Olive and assemble as shown.  I mounted the oval using dimensionals and a pretty easy card that would not be mistaken for a CASE per se but I will call it an IBI card- Inspired By an Idea. This will be one of the cards we will be making at my next party.  I think it is so sweet!

Tuesday, July 9, 2013

A masculine Chalk Talk

 I wanted to make a masculine background so took a night of navy CS, embossed it with houndstooth EF after braying some black ink onto one of the sides and this is what came out-  (Warning: wash out the folder right away with black ink as it will permanently stain it if you leave it out overnight....) I punched the large oval in the embossed paper .  I originally stamped the sentiment in the black oval but it came out crooked so I just stamped a piece of scrap Vanilla CS with the sentiment and punched it out and laid it in the hole and it looked a lot better.  Wrap a piece of natural trim around to the front . 
Now the button is made from the button & blossoms simply pressed mold using the nautral clay color which is white.  I tried a whole bunch of different buttons but none of it "felt right".  I took this white one, and using the side of the brush end of the marker, just colored it in leaving it to touch just the elevated edges and it left this stitch like accent in white which I just loved.  Because it is paperclay, you can color, emboss, whatever you do to paper you can do to this.  Isn't it fabulous?    Now I am not going to worry about mixing in colors, and just make the buttons in the natural color and color it to the color I need when I need it!    I put the seambinding ribbon through 2 of the holes and tied it loosely and glued the whole thing down with gluedots which is really secure. 

Monday, July 8, 2013

Coordination Hello


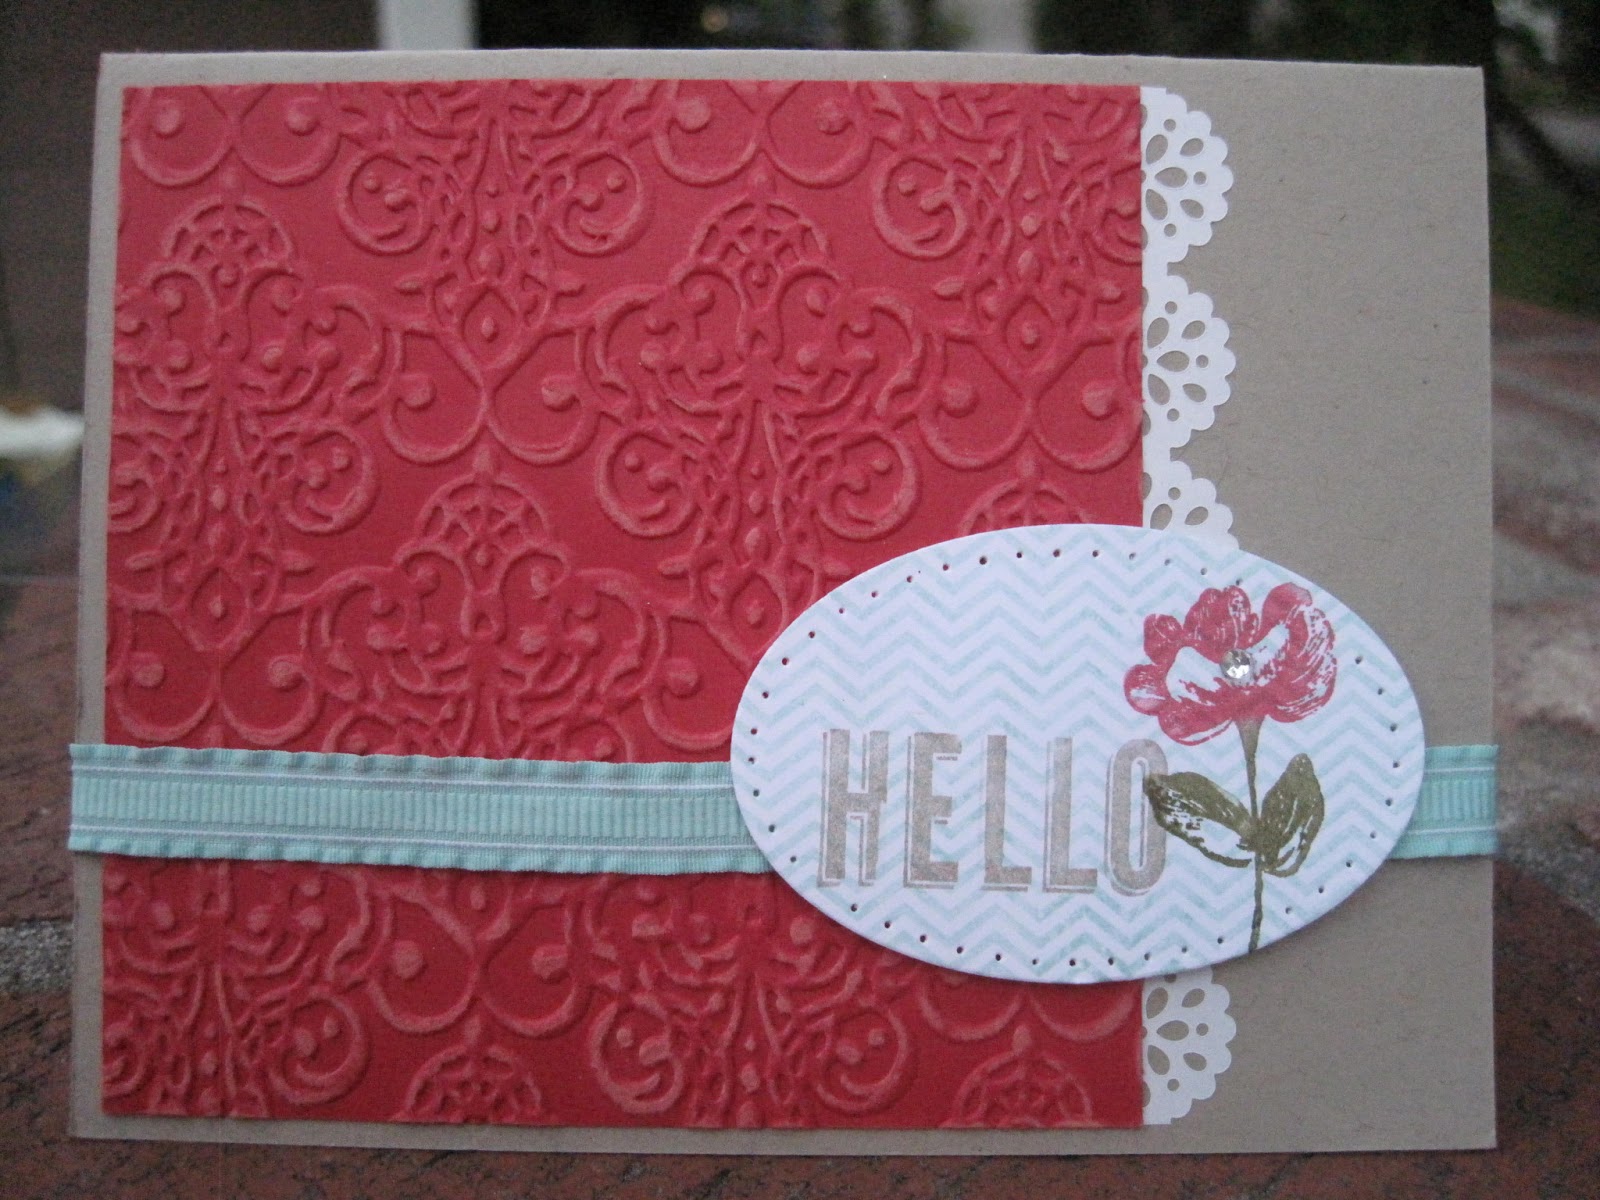
This was a card we made at one of my stamp parties I forgot to post earlier. Base card is crumbcake. then Rose red Coordination Cardstock, sanded after embossing with Lacy Brocade EF using the Sanding system.  I cut the delicate details lace tape in half to edge the rose red cardstock then wrapped the Pool party ribbon around to the front behind the label. 
stamp the Oval from Oh, Hello on white CS stamping off the Pool Party, then stamp Hello with crumbcake marker,  and the flower in rose red and leaves in olive marker.  Add a little sparkle and you are finished.

Sunday, July 7, 2013

The Dog days of Summer


 There has been a heatwave in the bay area and it was just way too hot to do anything outside so much of Fourth of July weekend as spent inside allowing me time to do some catch-up stampin.  One of my boys are so into dogs, I thought this was just so "him".  Very simple card.  Take a Soft Suede basecard and diecut a circle larger than 2 1/2 inches.  Stamp the image onto a verfy vanilla CS with soft suede ink then use crumbcake marker to color in the eye and buttock of dog.  Punch it out with 2 1/2 in circle punch and mount with dimensionals on the inside of the card.  Stamp the sentiment on the inside using Soft Suede - the little paw print is from the retired "C is for cat" set.  Tie a 7/16 in natural trim  around the card as shown. 
I punched the bone using the 4 sided flower from the Itty Bitty Shapes punch pack.  You have to cut a piece of paper like a barbell and then run it through the punch one side at a time but it was just perfect size.  I guess you could use a heart punch too but the heart from the owl is smalle enough to use it for something this size.  Wrap the bone with linen thread and mount it with dimensional cut in half to make it dangle. 

Monday, June 24, 2013

June Paper Pumpkin - Hello to you.


 This little box you get every month is actually quite fun.  This time there was a zigzag background, hello to you, and small heart stamps and 3 diecut hexagons in polka dot yellow, red pattern (self adhesive) and blank white in addition to the base cards and envelopes and a soft suede stampin spot.  The base cards have little hexagons cut that you can punch trhough but I left some of them for a more minimalist look that I liked.  For the one on the left I punched out 2 of the windows, stamped the heart through one and attached the polka dot yellow one on the inside.  Then I stamped hello - stamping off each time to get the gradation and stamped the "to you" on the inside to the right of the heart- you can't see it though.
 I played with the supplies but I really LOVE the square zigzag background so I started to play with that- the card to the left is one I made using just one layer of whisper white and the new in-colors- I did use stampamajig to place the squares- kind of fun card- beach colors- Coastal Cabana on top left,  Crisp Cantelope on right top, Strawberry Slush bottom left and Pistachio Pudding bottom right- HELLO to you is in Baked brown sugar.  I thought about punching out a heart stamped with the red zigzag and putting it over the pistachio square but I stopped myself. I think this would be a great background for lots of punched shapes
This is a variation from above using the the square from this set in Pistachio pudding then stamped the flowers from Summer Silhouette in Strawberry Slush  and sentiment in Baked brown sugar again for a one layer card.  Added little tiny pearls in the center of the flowers - the large one had black stamens stamped first.

I am enjoying these kits much more so than I would have imagined.  I hope you are too.....

Friday, May 31, 2013

New Catalogue Launch with a great sale on Greeting stampsets

 The New Stampin Up catalogue is ready for orders starting TODAY and to top it off they are offering a really super deals on some greeting sets that I have been eyeing- and at these prices, I am ordering ALL THREE!  So Get them while they are HOT!
 Click on the catalog photo on the right to peruse the catalog and shop anytime...


Grab Your Greetings Promotion


Sale: 25 percent off three of our greeting sets!
Dates: May 31-June 30, 2013
Sale Price Retail Price Description Item
$17.96 $23.95 Sassy Salutations Wood-Mount Stamp Set 132070
$13.46 $17.95 Sassy Salutations Clear-Mount Stamp Set 126707
$14.96 $19.95 Sweet Essentials Wood-Mount Stamp Set 132085
$11.21 $14.95 Sweet Essentials Clear-Mount Stamp Set 126457
$21.71 $28.95 Petite Pairs Wood-Mount Stamp Set 128706
$15.71 $20.95 Petite Pairs Clear-Mount Stamp Set 122497

By the Tide

I can't resist  beautiful seashells and the lobster and the coral is so gorgeous- I knew I could use it for so many different applications I had to have this. The base card is primrose petal with images stamped in summer starfruit, primrose, crumbcake and bashful blue to add more subtle colors.  Diecut white CS with apothecary accents and then use the outline of the die to pencil in the semicircle and handcut - perfect each time. Stamp you;re from Oh, Hello set and Wondeful from Loving thoughts.  I am normally using Evite or some such for invitations so stamped You're invited gets very little use anymore- Now you can use at the top half for Lots of things- You're Cool, Hot, Dynamite, Greatest, lots of Cool Font words to use with it.  I punched the hole through the tag and the base card and tied the ribbon just half way which saves some ribbon as well.  enjoy!

Sunday, May 26, 2013

Paper Pumpkin- Hey There Try It Kit Variations

 Ever since I signed up with Paper Pumpkin- the monthly paper craft club delivered to your door- I have been patiently waiting for the box.

 The first box everyone starts with is this Hey There Try It Kit.  It comes with a clear D block- $8.50 value alone- 2 clingmount stamps- The sentiment and the distressing splotchies, 4 basic grey cardbase, 4 sheets of precut DSP to layer and a sheet of adhesive diecut elements enough to make 4 cards, 4 white envelopes and 4 turquoise buttons, and a Basic Grey Stampin' Spot pad. All in all not a bad deal and I love the surprise element of it.

The kit comes with enough supplies to make four of the card shown on the left but you know me- Variety is the spice of life! and I had to use the supplies to make something different. 
I did make a rule for myself that I was going to try and only use the  supplies it came with- I did however use some tools I had on hand to spice it up a bit and 2 sheets of So Saffron Cardstock to make 4 extra cardbases.

This card was made with the So Saffron base. I cut the Basic Grey Cardstock and the DSP to put on top of the So Saffron base.  I put a dot where I thought the center of the green starburst would be with a pencil and then punched it to make a ring to put through the ribbon and embossed the Basic Grey CS with honeycomb to make variation #1.
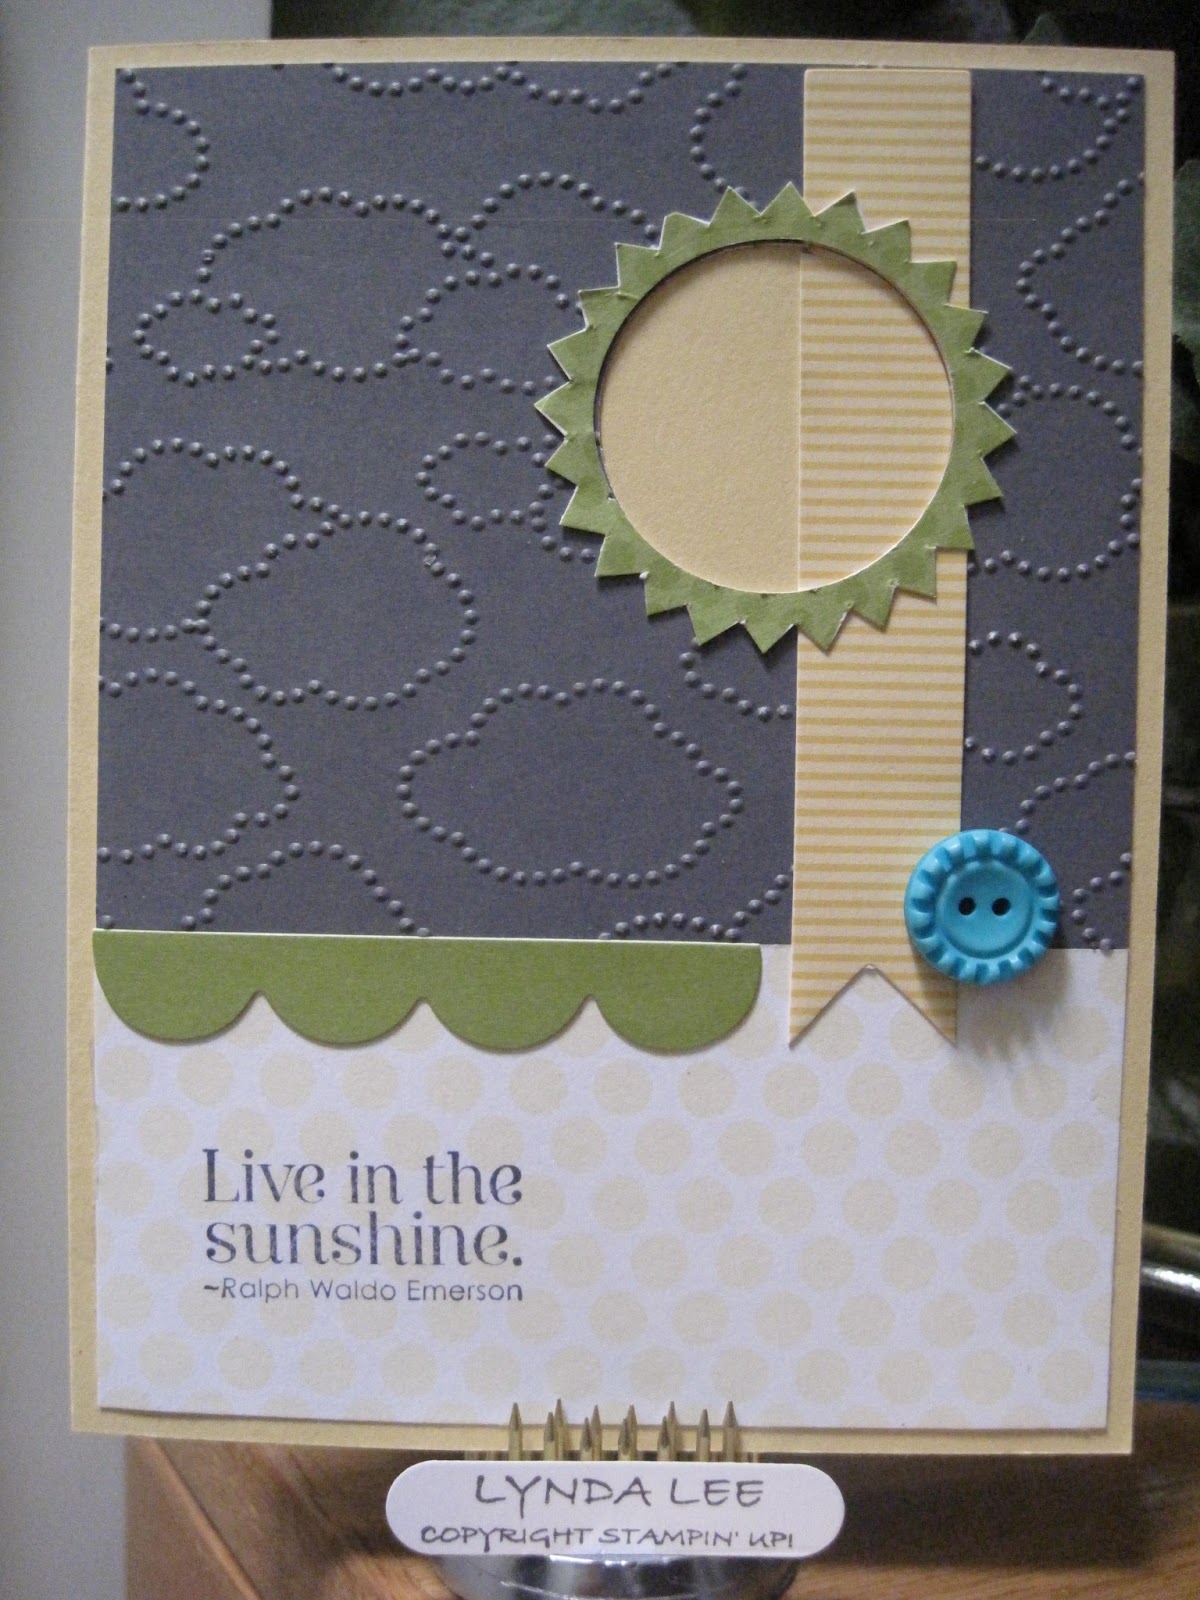
 I was looking at the left over piece after I removed the center green starburst and it looked like the radius of the sun.  I took the Basic Grey and DSP I had left over from the above card and punched a circle from the basic grey piece to show the so saffron color below that looked like the sun. I embossed it with cloudy day.  I  layered the yellow banner.  I used the same circle punch to get rid of the center jagged edge before peeling the back and sticking it over the circle.  Add the green scallop and the button.  Stamp the sentiment- from the Pursuit of Happiness set - one of my favorites!- soon to retire -in Basic Grey to finish the variation #2.
This is the one I thought was closest to the original.  When I trimmed the one Basic Grey Basecard to layer over the so saffron cardbase, I had to trim 1/4 inch from each side to fit so I used it as an extra layer.   This time I cut the outside zigzag  circle to add some interest.  Took very little time with my extra sharp paper snips.
  This is variation #4.  The left over pieces from here are used for cards #6 and #7.
Stamp the splotches and the sentiment in basic grey.  Use a butterfly punch to punch out the yellow DSP right behind the green circle- it will hide it.
The basic grey CS is embossed with honeycomb EF and sanded to add some distress and show some white beneath. Add a strip of yellow band- left over from outside the banner. Adhere the green medallion, then butterfly with taper just down the center.  Add a small basic jewel to accent.
 Before I unstuck the medallion from the backing, I put a little dot in the center to figure out where I wanted to punch the butterfly.  I added the splotches, and sentiment as shown, added the green scallops and strip of left over strip from the banner as shown, add the button.
I used a brush and cornstarch to make the wings not sticky as more but left the center sticky so it would add some dimension.  Add a small jewel and variation #5.
 I cut the 3 inch piece of DSP left over from card #4 into 1" strips before adding the rest of the embellishments and stamping.
This is the most hodgepodge of them all.  I was just trying to figure out how I was going to make a card from the left over pieces.  I had centered the medallion in the first card using a pencil, then punched it with the little flower first, then a circle, then the small scallop before peeling it to make these pieces.
I stamped the sentiment from a Round Array in Basic Grey onto the DSP and put the scallop around it to fit.  Added strips left over from the banner around the center panel, added the scallop and used the left over circle of Basic Grey CS from card #2 to make the sun- and punched out the little butterfly again adn left over pieces of grey to make the stems.  Add some jewels and layer over so saffron card with left over piece of basic grey - embossed together.

Limiting your supplies really forces your creative juices and I thought it was really fun!
Enjoy!

Lynda