Thursday, June 19, 2014

Sea Street Hello


   Love this little Octopus.  The base card is crumbcake with a layer of whisper white stamped with images in  Hello Honey and Lost Lagoon.  The sentiment is from Just Sayin' - I cut out the inside word to use separately from the word bubble.  After you stamp all the images then run it through the Decorative Dots EF to add eht bubble like texture. 

I then punched a piece of whisper white and stamped the Octopus with Lost Laggon and sponged the edges to make it pop a bit.  Layered Soft Sky diecut with a  circle framelit to accent and mounted with dimensionals.

Added a strip of DSP from Moonlight paperpak  that looked most appropriate (you can get 6 pieces from one sheet if you cut it where the color changes.)

 I stamped the flags and used the stay put ribbon technique to tied the baker's twine in place, then threaded it through the stamped and punched scallop circle piece pierced with the paper piercer (threaded the baker's twine using a floss threader- it's tight but I like how it looks.)

Tuesday, June 17, 2014

Envelope punch board box CASE


 Is this not the cutest thing ever?
This was a case of a box I got from my upline Tami.   We made this at my Stampin' Party this month.  We used 2013-2015 In color DSP cut into quarters to 6x6 pieces of squares.

We used the Envelope punch board punched and scored at 2" and 4" on all 4 sides as shown and then use the scoring tool to score the flaps at 3" down to the base of the cards then fold up the sides to make the box as shown below.
 Tape or glue down the flaps if you wish.  This is what it looks like on the inside.
 The top is made using the Starburst framelit using the Silver Foil sheets and the circle i using the Strawberry Slush CS with 1 3/4 inch circle punch.  The sentiment from Num-Num stampset is inked with the Basic Gray inkpad and diecut with the Word Bubbles Framelit.  It fit perfectly!
 Added a little color with Strawberry Slush marker and a rhinestone jewel over the i and mounted with dimensionals for a sweet little treat.


This is the original box I cased for one of my projects this month- super cute!

Sunday, June 15, 2014

Something for Baby Father's Day Card


 When I saw the dies that came with Something for Baby set I envisioned this card with the man's shirt made with the baby onesie die.  It's perfect for a father's day card or any man's card- Hawaiian print or any print will work.  I originally made this shirt with a white CS and my DH said it looks collegiate/ preppie so I changed it to Smoky Slate to make it more manly.  The base card is Smoky slate with a piece of Night of Navy embossed with Stylish Stripes EF.  Another piece of Smoky Slate with a Blackberry Bliss on top.   The tie is diecut using the Moonlight paper stack. Actually I wanted the
stripe pattern for the tie and the DSP is how I chose the colors the card turned out. 


This is the template for the shirt.  I first cut the waist as shown then used paper snips to cut straight up the sides of the crotch to make the pocket ( it's the perfect width! and I like the slight curve on the bottom)  then folded the paper in half to make symmetrical collars from the curves of the leg ( the collar is a bit too tight for a man's shirt but the curves of the legs are really perfect).
 This is how it goes.  The collar on the right is from the piece cut from the left side of the leg (I put them side by side so you could see where it came from).
I stamped the image from Label Something set using Blackberry Bliss and punched it out with Modern label punch.  The Happy Father's day is from Teeny Tiny Wishes using Night of Navy inkpad. 

It would be really cute with a small Rhinestone jewel as a tie tack, too.

Time to Play!
Enjoy...
Lynda

Tuesday, June 3, 2014

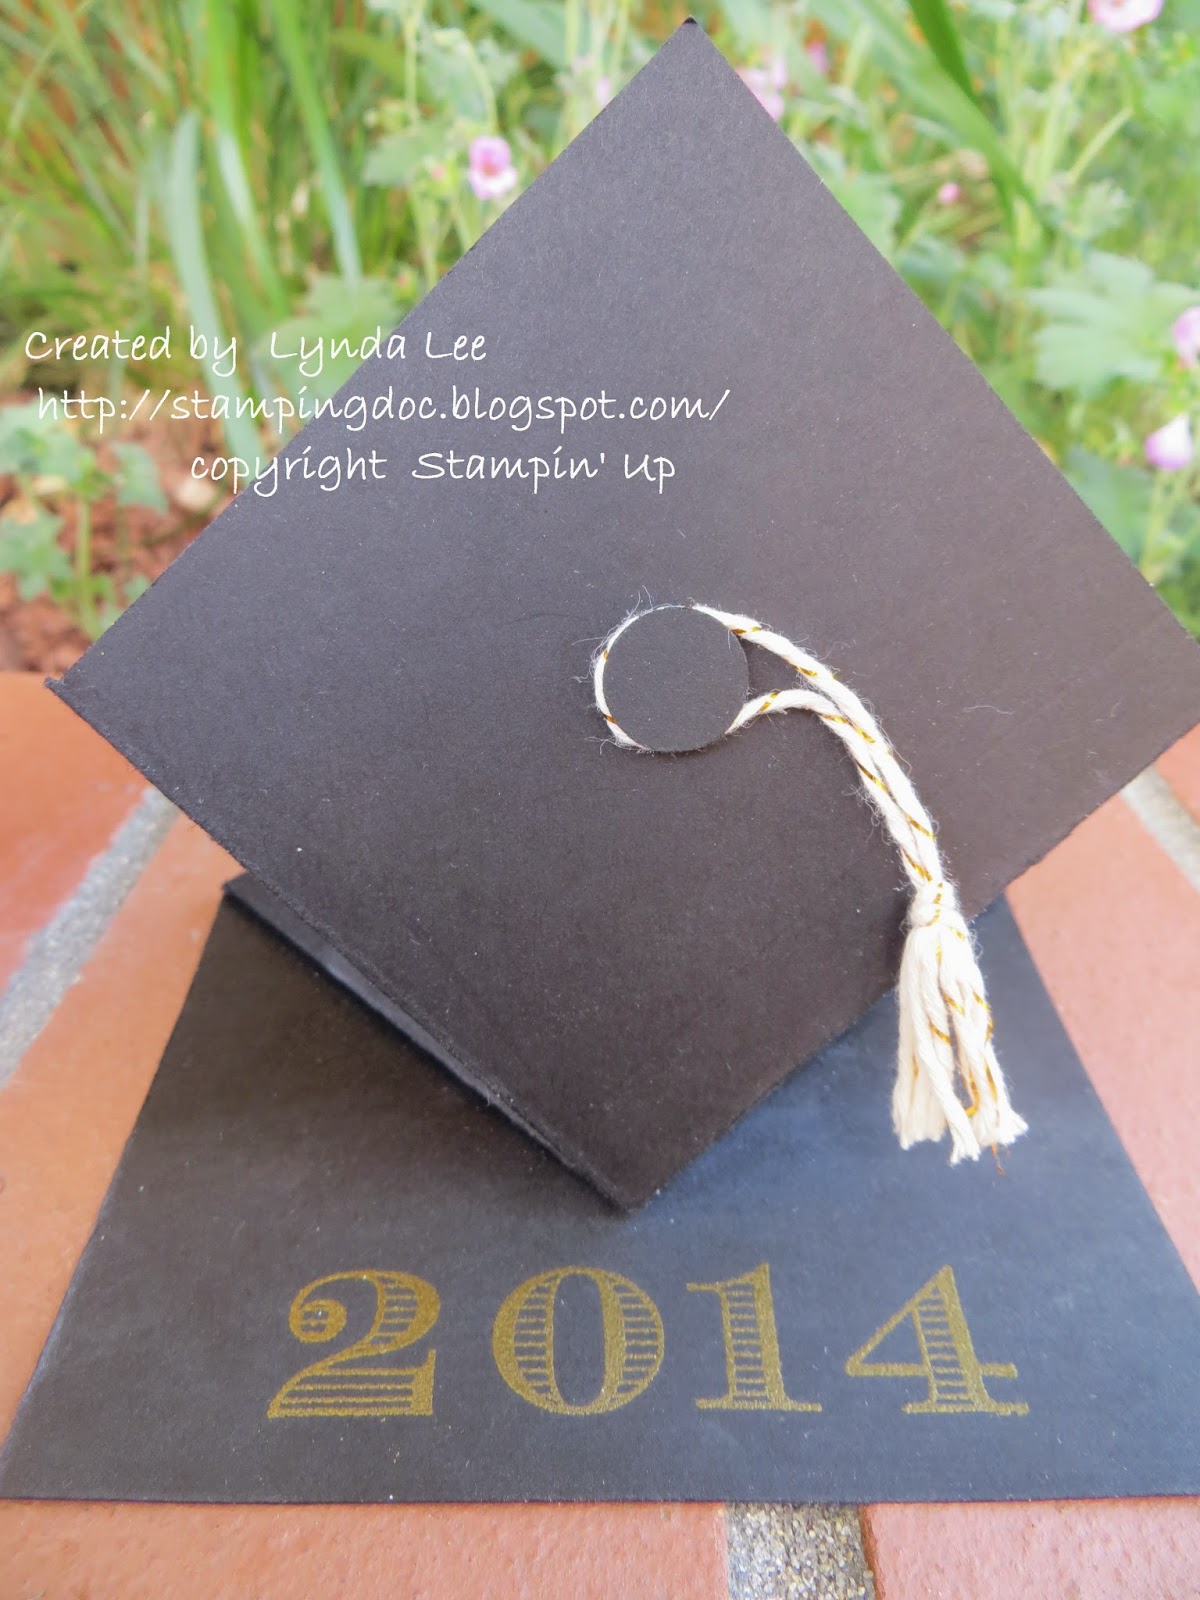
Graduation 2014 PopUp Card variation

Take the same card from yesterday and leave out the second score line to keep the bottom part straight instead of folded over and this is what you get. The message is front and center.  I think I like the pop up better for reasons I will share later- but a variation nevertheless.


Monday, June 2, 2014

Graduation Pop Up Spring card


My nephew is graduating from high school this year and I wanted to make him a pop up graduation hat card but all the cards I saw had a weird dimension to it that would not fit in an A2 card so I had to reverse engineer a card to make it so.  I knew it had to be 4 1/4" across and that made the dimension 9 1/2" in the length.  That meant I could get 2 cards out of each sheet of cardstock which works out even better.

Because the cards are 4 1/4" across, use the diagonal scoring board and score with the card held in the tall direction at 2 1/8" which is the
half way point as shown in the first picture, then flip over and score again.  Then turn the card 90 degrees so the long side across the top and score again at 2 1/4 then flip it over and do it again.  There should be a diamond at the edge.
Now I switched the scoring plate to the regular scoring plate turn the card over and score between the scored X- at 5 1/2" mark (the diamond will be on the right side).  Make another score line down at 3 1/4 line where the diagonal line on the left ends.
Cut off the triangles from the corner of the diamonds, fold the score lines and you have an easy pop up card.  I used 2 3/4" white CS squares to stamp the message on the inside.  The sentiment is from the Remembering your birthday set which is perfect for any celebration event. the graduation sentiment is from the Blue Ribbon set stamped with Basic Black and Island Indigo.
2014 is stamped using Memorable moments set with versamark and embossed with gold embossing powder.  I used a 1/2 inch circle punch with a dimensional to make the button for the hat and made the tassel using the gold baker's twine.  I hope he likes it.


Monday, May 26, 2014

May Paper Pumpkin trip into the Redwoods

 My husband's friends from college days and their family get together once a year for a camping trip in Redwood State Park in Humbolt county which we look forward to every year.  The air is so clean and fresh and dewy, the trees so majestic, you can't help but relax- even for a type A like me.  We took hikes along trails although Dylan got a horrible tendonitis of his foot by the end of a 6 mile hike- poor little guy!
 The elk are aplenty - grazing all over the place.  We went to Fern Canyon where they filmed Jurassic Park, the place looks absolutely prehistoric with ferns growing up and down the canyon walls and wood pilings rich with green growth.


At the beach  it is miles and miles of beautiful sands.  Driftwood here and there but rarely with anyone else besides us.  We even saw some whales from the shore  spewing through the blow hole and surfacing and diving which was amazing.


 This was our campsite with the huge netting for the mosquito- challenged family like mine- although my legs today still looks like a map of the constellations with all the bites I still got...

Now what does all this have to do with stamping?  Well, as I was leaving for the trip, what arrived in the mail but my favorite little monthly box!  I took the box off and tucked away the package with my portable stamping bag (with all my essential stamping gear). just in case I had any time to kill.
 This was the corner of the picnic table where I laid out my kit to figure out what I wanted to do with it. The kids were still snoozing, I had my morning cuppa and I had my little Quiet Time- Yippee Skippee!  Time to get out the Paper Pumpkin!
This is a picture Kyle took of me literally "stamp camping" as he was goofing with my camera after he got up.  Now I am more in love with my Paper Pumpkin than ever. I love it that it is complete and portable.  I used my catalog as the stamping surface, even.

Below is one of my finished cards- a variation on the sample in the pack.  Love the stamps in this Hey, Man kit-  Love the baby tags and the words that go inside it- Dad, Son, and Bro.  And out of the whole kit I brought the only thing I really needed was my scissors and that was because 'I had to be different' and wanted to make a horizontal card instead.

I think Stampin' Up should have a "where can you take your Paper Pumpkin?"  challenge- Imagine it on a plane, on a train, in a box, with a fox....
by the pool, at a game....


Friday, May 23, 2014

Endless Birthday Wishes Challenge


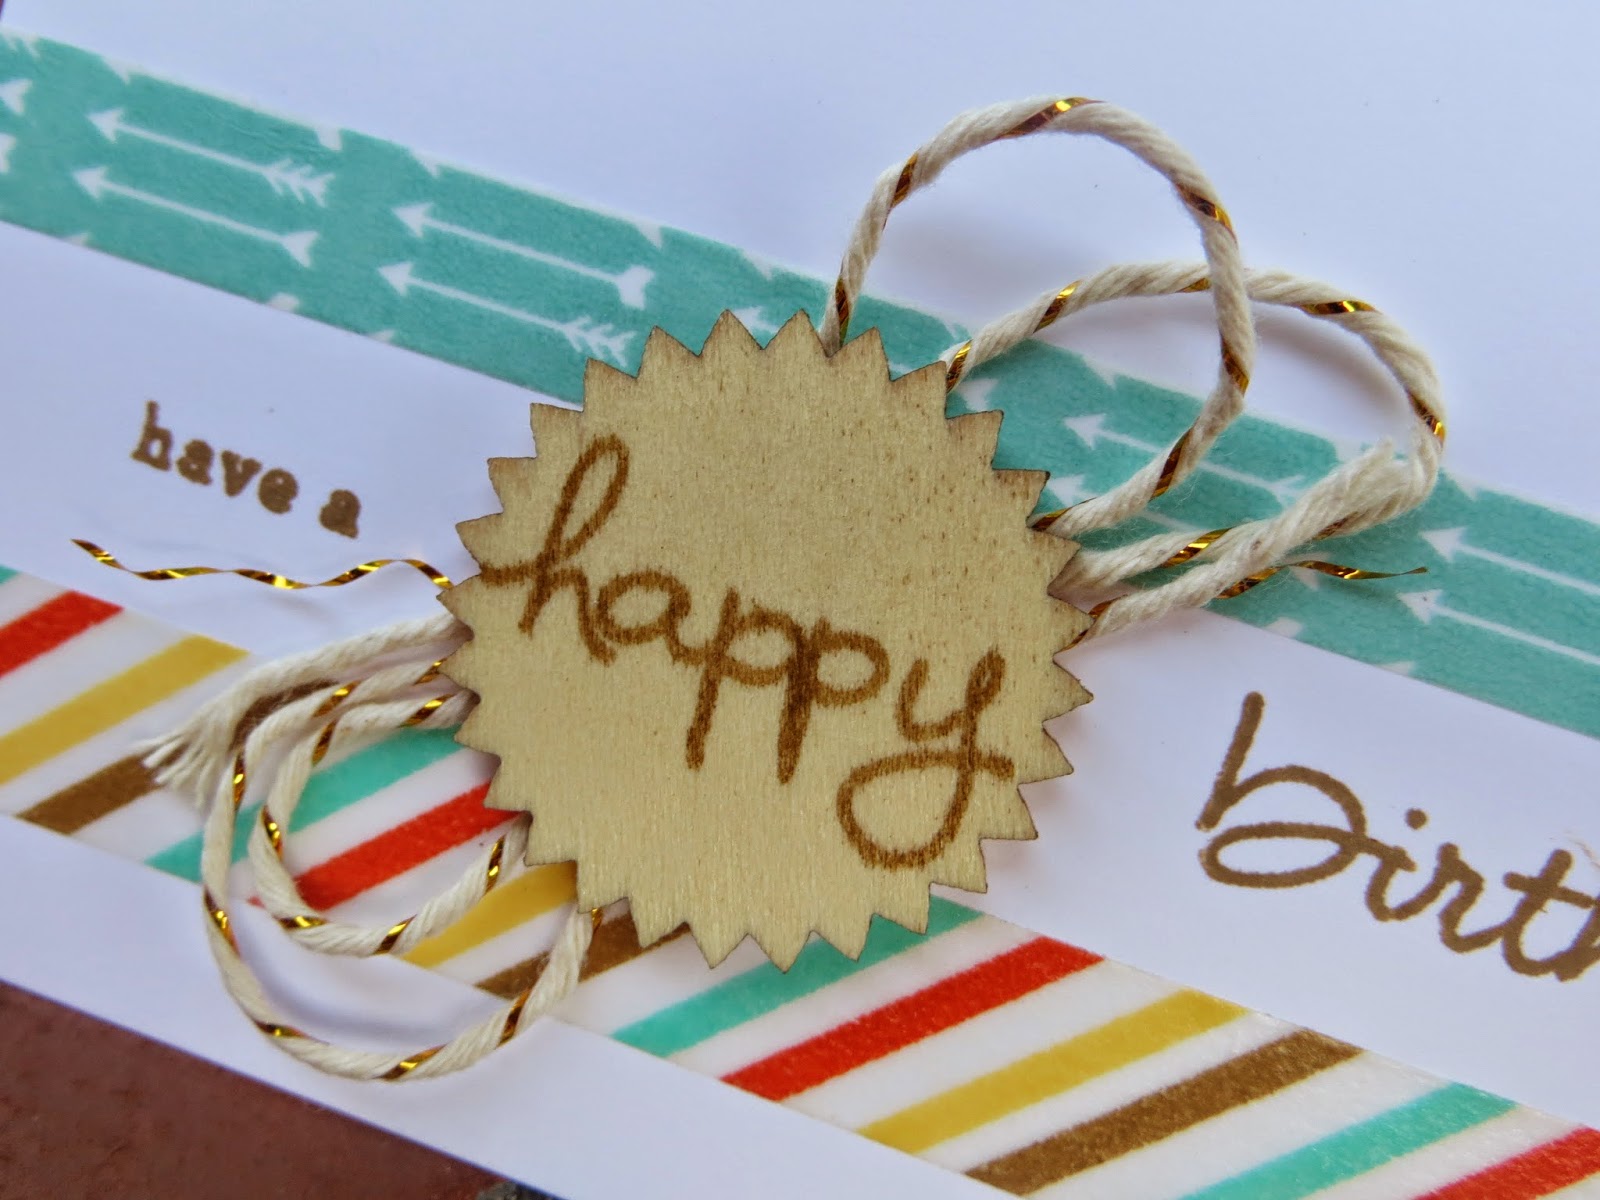
 My upline Tami has a get together quarterly and we were given a challenge - to use Endless birthday Wishes set to make 4 different cards using notecards and washi tape and you could stamp but only using one color for the stamp.  (so the colors do not get messed up during workshops for example) and these were my takes on it.

The funny thing is, I really love limited item challenges because it forces you to use things you normally would not have- like these wood pieces but they were SO MUCH FUN!
 And the Endless birthday set is that- Endless!  you can create so much different combinations of messages.  Love It!
So challenge yourself and get started on some cards- you can always use them as gift enclosures and everyone has a birthday- what a nice surprise to find a card for a co-worker, a teacher, a friend or family on their special day....

This one was so simple but was my favorite. 
The wood pieces fit these words so nicely and gave a fun dimension to the cards.  Enjoy!

Monday, May 19, 2014

Watercolor Peaceful Petals

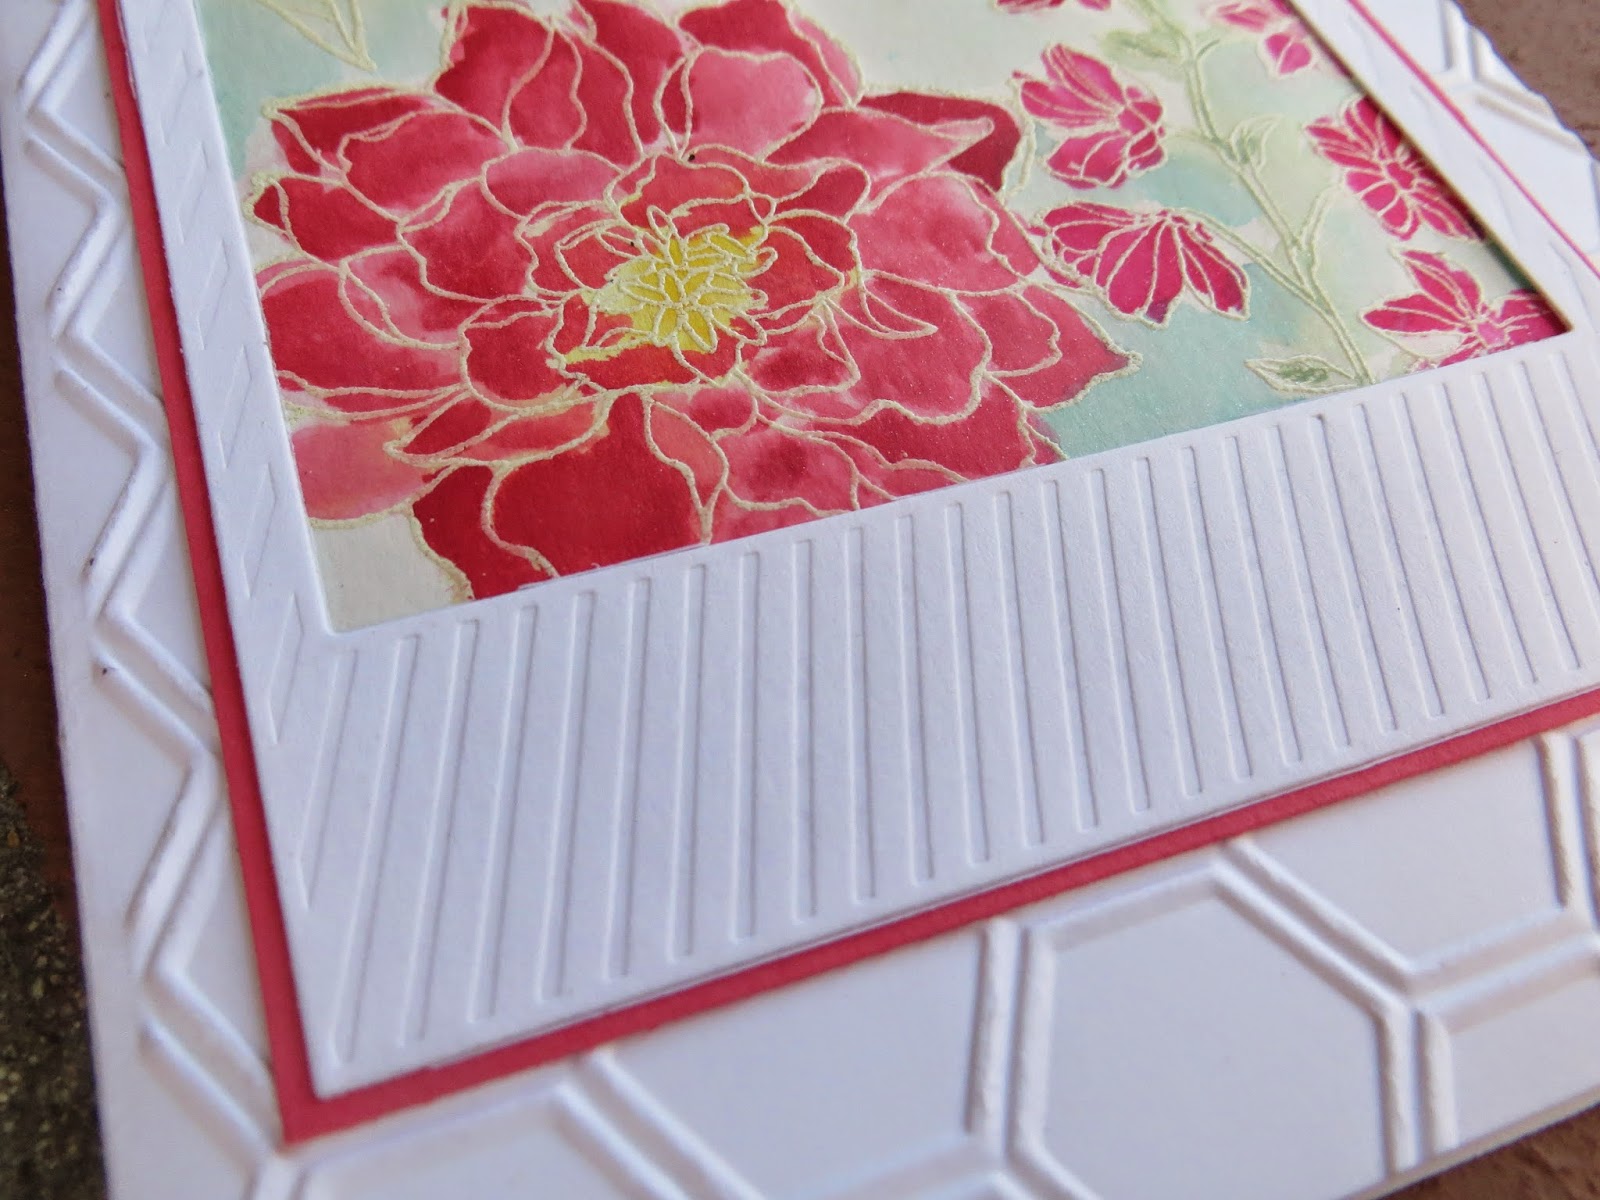
 A very simple looking card but it took a little doing. I had the card in my head but the watercolor part took a little more time than I anticipated.  The base card is whisper white textured with Honeycomb embossing folder.  I then took another piece of whisper white and diecut it with the On Film framelit - my totally favorite tool for the moment!-   then layered a piece of Strawberry Slush behind it about an 1/8" larger then the diecut on 2 sides to add just a touch of color.  

I then took a piece of Shimmery White a tad
smaller than 31/2 square (which makes it perfect for the opening without hanging over)  and used versamark to stamp the images from Peaceful Petals stampset (in Occasions Catalogue Pg 20) after using embossing buddy to get all the static off. After stamping , I used white but you could also use clear embossing powder to set the image.  I then used the Aqua Painter to put a thin and I mean THIN! layer of water all over the heat embossed Shimmery white paper then used dabs of Strawberry Slush, Melon Mambo, Pistaschio Pudding and Coastal Cabana and Daffodil Delight ink refills on a plate to get the watercolor effect.  I suggest you start with the lightest colors such as the daffodil  then slowly then the blues, and greens in a very diluted way then add the pinks , then more concentrated colors where you want it.  The embossed lines should keep the colors within the area you want.  I love how this looks very much like some of the asian print fabrics.  I left the area on the bottom blank on purpose so I could add a sentiment later but I think it is a very pretty general card you can use for anything!
Enjoy.
Lynda

Monday, May 12, 2014

Cutie Pie Besties card

Don't you just love this Cuite Pie set?  It was a card I made for my stampin' sister Mercedes.  Base is Baked Brown Sugar with a layer of Crisp Cantelope with Coastal cabana diecut with On Film framelit die.  I stamped the 2 head that was the closest to our hairstyles and drew the table with a straight edge.  I stamped the accessories from Totally Tess (retired). Isn't the marker and the card and the wheel the cutest ever?  then drew the body around it to kind of fit.    Colored it in with markers ( Blush blossoms for the skin because the skin tone blenderabilities were not yet available then!) Sentiment on the top form a special stamp I got from convention years ago and the stampers first sentiment from the Star Stamper photopolymer set we got at Leadership.  I thought it stated what I feel so perfectly.  I heart you Mercedes!  I am counting the days until we go to Convention!  

Saturday, May 10, 2014

a quick Undefined PS3 controller Birthday card

It feels that everything at my home is so Rushed.  My son Tyler was invited to a birthday party that I did not know about until an hour before and of course, I am expected to whip out some fabulous card for the occasion.  So I fell back on the PS3 controller that I carved from Undefined which seems appropriate for all 13 year olds in his crowd.

The base card is Bermuda Bay, embossed at an angle with Arrows Embossing folder.  Two different Kaleidoscope DSP is diecut with On Film framelit as shown.  I stamped the controller using versamark pad onto whisper white CS and heat embossed with black embossing powder and cut it out.  I drew a black line where the cord would have gone and mounted the controller with dimensionals.  The Happy Day banner is from this year's hostess set Banner Greetings, stamped with Bermuda Bay inkpad.  The For You is from the new 2014-2015 catalog hostess set called Hello There stamped in Strawberry slush both mounted with dimensionals.  Little pocket on the inside using the smallest of the envelope liner die, stuff it with cash and he was good to go.  Not bad for a 15 minute on the fly card, eh?