Saturday, June 27, 2015

Birthday card for Max

 Kyle was invited to one of his classmate's birthday party and this is the popup card I made for the occasion.  They don't seem to want presents at their age- they all seem to be asking for money and this has a pocket in the back that hold it just perfect.

Balloon Framelits fit the sentiments perfectly
I had stickers, rub-ons and acrylic embellishments (non-SU) to decorate the box and it was a sweet little card that popped up to say Happy Birthday to a little boy- the size was not normal A2 so I had to make the envelope using the envelope maker to fit the off size card- Gotta love the envelope maker!
 What did we do before this little gizmo?  In matching DSP to boot.

Wednesday, May 27, 2015

Sheltering tree with heat embossed bicylcle frame


I just love how the bicycle frame just POPs with its bold colors on top of the tree trunk.  I had planned on doing it with Pool Party EP but it retired so I used Cherry Cobbler EP instead and I love it!

The base card is Blushing Bride with Pear Pizazz on top.  Stamp the tree from Sheltering Tree with Early Expresso.  Then ink Blushing Bride for the leaves then "rock and roll" it using Cherry Cobbler to accent the edge of the leaves.  I then used the little dots to add extra pear pizazz leaves randomly.   I then stamped the grass then the bicycle with Memento black because it dries quick.. I then tapped the embossing buddy to make sure the card was dry then inked the bicycle frame with versamark then heat embossed it using Cherry Cobbler embossing powder which just makes it a stand out.  If it had an accessory stamp for a little tiny basket in the front with options for books, flowers or bottle of wine and bread, it would have been a perfect set! I just love bicycle stamps and have been known to buy every one I find and this one especially is so sweet with the tree.....
Maybe they will make a Sheltering Tree accessories set with a bicycle built for 2,  baskets like I said, a park bench to put under the tree and a little sled to lean against the tree in the dead of winter.... I could just go on and on!

Monday, May 25, 2015

Rock and Roll'ed Painted Petals

This was a reasonably quick card we had for the May Stampin' party.  Basecard is Rose Red embossed with woodgrain EF.   I then layered a strip of  Painted Blooms DSP - scored 1/4 inch in and folded over to show the other side and used multimono adhesive  in a fine line and attached the venetian lace.  Wild Wasabi CS distressed around the edges with my nails, and the center panel was stamped with the sentiment first in Rose Red, then added the leaves in Wild Wasabi and then used the stamp positioner to stamp the flowers but  inked first with Daffodil Delight then used Rose Red around the edge of the stamp in the Rock and Roll technique to get the dual color look.  Distress the edges - I think the more the better- then layer over the Wild Wasabi piece and it was the easy card of the evening.

Lynda

Saturday, May 23, 2015

Tap, tap, tap

 I was surprised to find this stampset that I really adore make it into the next catalog and when I needed a card for my May workshop it was perfect.    I unfortunately did not have a new DSP that fit my card design so I used the Moonlight DSP which I am hoarding - I love it's color combo- a gender neutral/ slightly masculine pack perfect for this type of card. 
 The base card is Sahara Sand ( my new neutral favorite!). with a 1 inch strip of Typeset DSP and a 1/4 inch strip of Blackberry bliss. Piece of Shimmer paper was used to stamp the typewriter in Memento Black.  Then made a mask to cover the typewriter then stamped the notepaper stamp in Sahara Sand.
Then used Lost Lagoon ink to watercolor in and Hello Honey marker to add some accent.  The banner was stamped in Memento and sentiment stamped with same ink.  I used the banner die to cut out the Note banner and the piece of DSP .  The banner is cut at the top to make it fit and then I used the stapler to attach the note banner.  But after all that it still looked unfinished.  It just needed a little something.  I got the metal buttons.  I used one the letters in the long stamp to see if I can make an alphabet typekey but it was the wrong size and how could I make the card fit everyone's needs?

Well, the answer was to try the Hi sentiment.  The one on the right used 1/2 inch punch and put on a big button.  Because I had too many people in my class of the amount of buttons I had so I tried and alternate button - the circle is the larger eye circle in the owl punch but inside the smaller button with the raise lip and I think I like it even better- it really looks like one of those old fashioned type keys.  Use glue dot to adhere it - works the best.
Just change the message to Happy Father's day and it would be perfect for that too.......

Enjoy.
Lynda

Thursday, May 21, 2015

Beautiful Bunch Gift certificate Holders


With MDS retiring, I wanted to make sure I download all my digital purchases from the website before it disappears and it was a good opportunity to upgrade the look of my gift certificates.

I love the ease of MDS and am sad to have it go away but have to admit I did not buy as much of the digital downloads as I did the stampsets and paper supplies.

I get 4 gift certificates out of one sheet of 8 1/2x11 sheet and use my hoards of DSP from the past to make the trifold envelopes.  Use the envelope maker to make the perfect center indent on the inside, round the corners in the front and use the same DSP backwards to make the belly band.  The Beautiful Bunch flower is stamped in Smoky Slate 3 times for each flower and then onto the DSP to punch out the center then an extra large pearl in the center (retired)- each layer is separated by dimensionals and 2 leaves are added using coordinated DSP.  My favorite way of making long envelopes.....

Enjoy,
Lynda

Tuesday, May 19, 2015

A little flower box topper

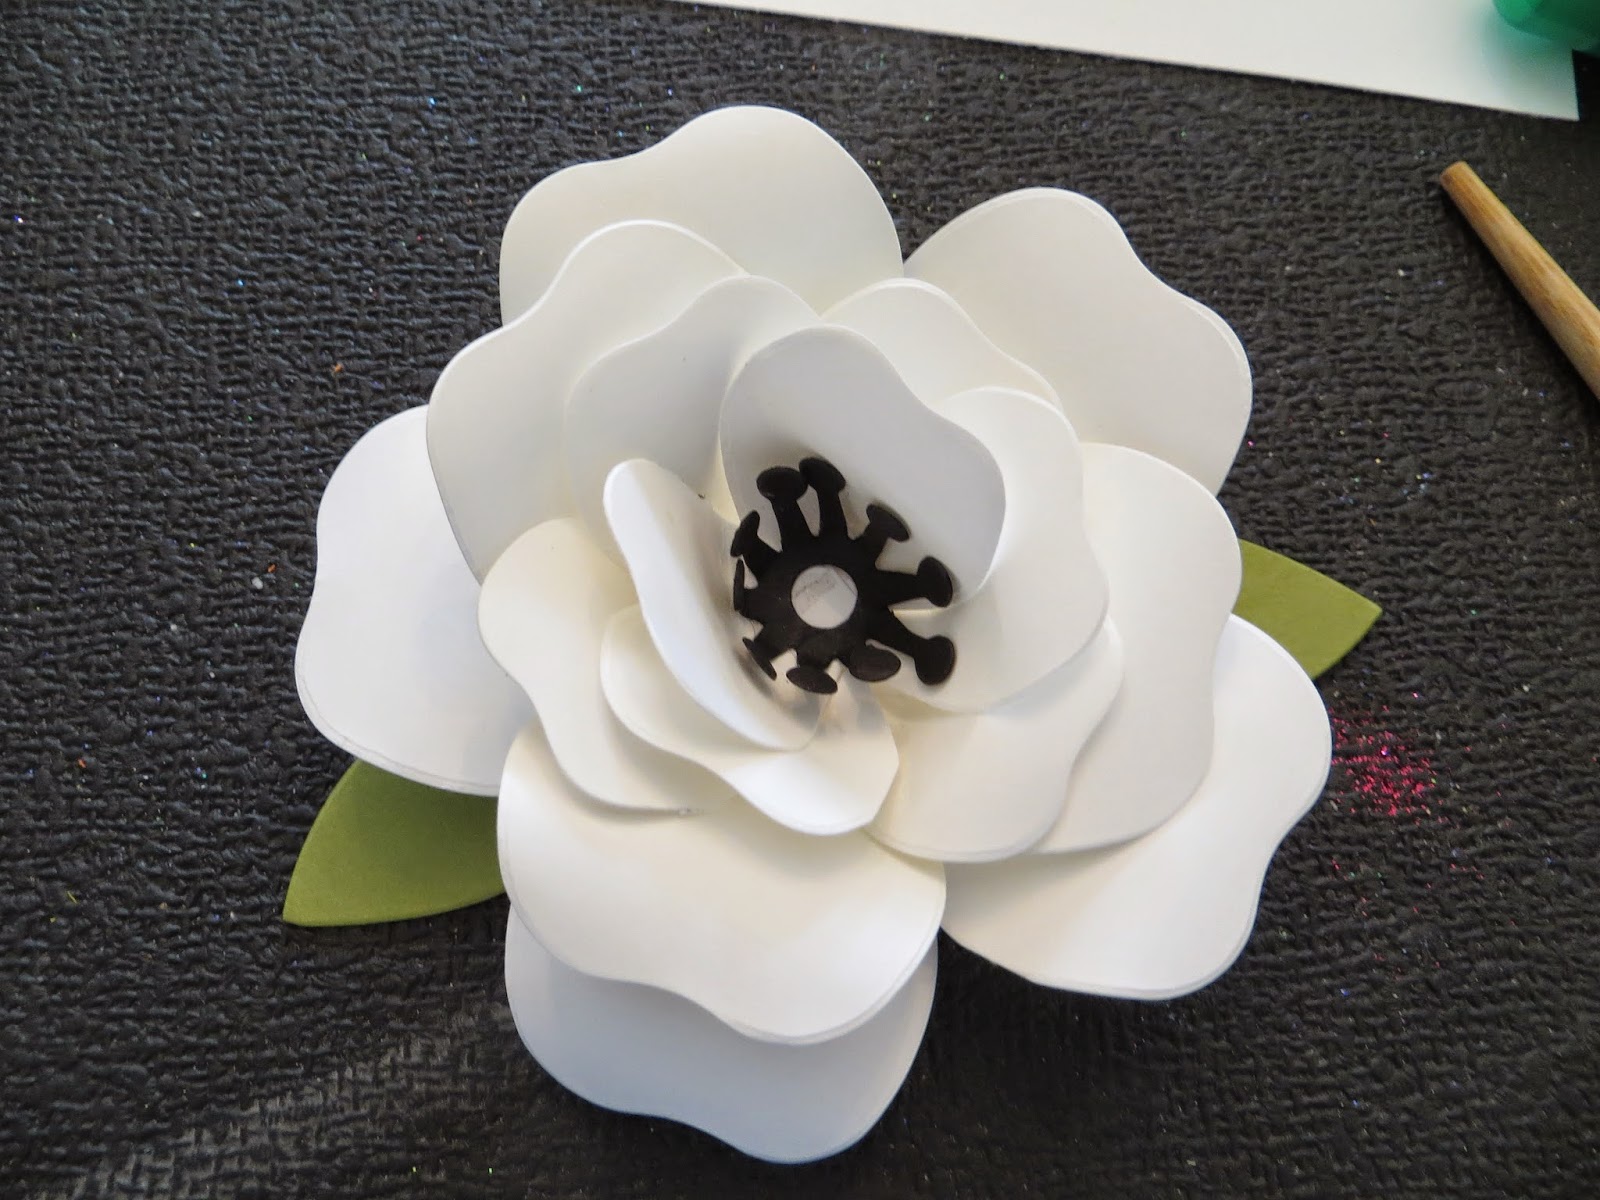
 I got the Bouquet Bigshot die when I saw the bouquet on the occasion catalog cover but the largest flower in the set was really huge - a bit too big to use for the projects I had in mind but the rest of the die was really quite useable and I wanted an easy way for people to make the flower so this is how I set it up for my workshop.

Each person got a sheet of whisper white CS.
They are cut longways into 2 1/8x 11 inch pieces as shown on the left.
 I stacked 2 of the pieces and cut them 1 1/4 inch piece rectangles as shown.
The other two strips are cut into 1 3/4 inch pieces.  I used 8 of each on my flower but this will make lots more for people to play with or make fuller flowers.

You can put a stack of 4 larger rectangle over the bigger flower and 4 thinner rectangles over the smaller petal as shown. Then you only have the run it twice to make all 16 petals. Really speedy.  Then run the black for the stamen and the Old Olive for the petals.

 Here are all the ingredients to make one flower.
8 Big petals, 8 smaller petals, 2 green leaves, a black center.  I used one 1 1/2 inch circle as the base to build the flower and a daffodil delight 1/2 inch circle (the clear faceted button shows what is underneath and the daffodil circle helps it look better)
 The outside petals are folded over but less severely than the ones that go in the center.
 Use a chopstick or some rounded stick to curl the petal edges.  This step is crucial to make it look a little more realistic.
 Use the circle to tape down the 5 petals as shown.
 I then added the 3 left over petals in the center as shown.
 Then the smaller petals are placed, 3 petals per layer in 2 more layers. 
Then I put the 2 left over petals in the center- you could put 3 which may make it easier then add the center stamen.


This is how it looks from the back.  I initially made it without the base and it was all wonky after it was made - with the base it is more sturdy and easier to attach to the box anyway.
These are the flowers I made with 2 different size faceted buttons- both really pretty!  Enjoy and try it yourself.  You can make the box with the boxmaker from Stampin' Up in different color for a more masculine look, texture the box, or stamp on the box  to make it your own. 
Lynda

Friday, April 24, 2015

Money card for the Graduate

Soon, the school year will be at the end and I am going to need a bunch of envelopes to give a little money or check to those graduating.
This is a real easy  way to do it with a little style.
Take Blackberry Bliss 7 1/2x 9 1/2 and score along the long side at 3" and 6 1/2" to make the trifold.
Use the envelope punch along the 7 1/2 inch side and put the left edge at 3 3/4 (half way point) to punch out the little divot to make it easier to take the contents out ( better than using a circle punch half way like we used to eh? - LOOOVE IT!)
Tape along the front side to create the pocket, money or check goes inside.  I stamped the sentiments inside using versamark and Wild Wasabi embossing powder- did not realize until too late that it was retired- but use whatever color that coordinates.

Make a band with a strip of Painted Blooms DSP with coordinating CS beneath - here Wild Wasabi again. Stamp sentiment with Blackberry Bliss and color in with daffodil marker and punch out with the note tag punch.

Stamp Petal Potpourri with Rose Red and punch out with Flower Medallion punch, stamp the center with Daffodil and punch out with a small circle punch and mount both with dimensionals to make it pop.  You can make a bunch of these ready to go in different colors for any occasion to fit your needs....

Tuesday, April 21, 2015

A Butterfly Basics case

 I saw a card by Miss Vicky on Splitcoast with this flower out of the box and I just loved it- changed the colors, ribbon, sentiment but still basically the same template. 

I really like the Sahara Sand as a neutral - embossed with theSpring Flowers EF and a layer of the Best Year Ever DSP from Sale-a-bration- such pretty color combination!

I tied the Coastal Cabana ribbon from the Best Year Ever accessory pack.

All the colors are lifted from the DSP.
I stamped the Butterfly Basics flower on a slightly larger piece of whisper white and colored it with blenderabilities and removed some color with the color lifter to highlight and then stamped the honeycomb with Sahara Sand.  Cut the cardstock to size and cut around the parts outside the box. Layer with Crushed Curry cardstock. Stamp the butterfly and ink the sentiment from BYOP - thanks so much with soft suede and Calypso Coral markerss on a piece of whisper white.  Cut the banner and sponge the edge with Coastal Cabana and mount with dimensionals.   Add a little pearl on the butterfly and all done.

Tuesday, April 14, 2015

Card for a special friend


 One of my friends was recently diagnosed with metastatic cancer and told she would have about six months to live.  I was so shocked because she is one of the most loving, most full of LIFE person you could ever meet and it seems really UNJUST to have her be the one with such a short life left.

I thought of this card and fidgeted with it over and over.  I wanted to let her know I was thinking of her and wanted to spend some time making it so it kept growing to what you see on the left.
Those of you who have followed me know how much I do not like to use scissors but here it is.  This is the most scissor work I have ever done on a card but it is little compared to what she is going through.
 I stamped the background on Sahara Sand- my new neutral and stamped it with the dictionary background with baked brown sugar.  Although the blenderabilities is no longer available, I loved that we could stamp the image with the Baked brown sugar pad and the inks did not run.  I stamped the leaves with Old Olive and thne cut out the oval and left the overhang out of the oval so I could free hand cut it.
 I used blenderabilities to color the flowers and the leaves but the colors were pretty dark so I only used the light color and then used the Color Lifter to take away some of the color to create the reverse shadow.  I wanted to have some texture on the white cardstock on top but I had already stamped the flowers so what to do?  I took the woodgrain EF and laid it down on the table and used the Simply Scored stylus to follow the grooves along the card avoiding the areas that I had stamped and colored ( a light box would have helped a lot eh?) then I added a little baby pearls to the center of the stamen.
 Stamped and diecut the butterfly and stamped the sentiment from A Dozen Thoughts on a strip of whisper white and layered it over a strip of old olive, put a little pearl on each of the corners.

Maybe it's true that God wants back his most precious people but I guess selfish me wants to keep her here a little longer.

Praying for a miracle.
Lynda


Sunday, April 12, 2015

My Strawberry Berry Basket

 I have been going nuts with my Berry Basket die.  I have made baskets for almost every occasion we've had since it's debut but I wanted to make a strawberry basket card to go with some fresh farmer's market strawberries I was giving away.
I started with the a 1/2 sheet of Always artichoke.  Cut  the sheet with the entire die and then cut the bottom in half as shown.  You will also need 1/2 of the borderstrip as well.  Cut along the score line already there. I ran it with the woodgrain EF to add texture. I do not like to have things "floating" on cards so I grounded the basket with a 1 inch strip of old olive embossed with polka dots.  I then attached the basket bottom only so I could put berries behind the basket and get a sense of how it was going to look by flipping the basket part open to glue things down.
 To make the berries, you need what is shown here.  I tried different dies and punches to see things would look but I liked this best-  You need 2 different size flowers in Real Read and 1  branch in Old Olive shown from Flower Frenzy.

You also need several Old Olive punched with Bojo Blossom punch and the little flowers from Itty Bitty Punches.  I used the sentiment and frames from From the Garden set for the tag in Artichoke and Real Red.  Pick what works best for you.
 This is how the strawberries are made.  For the smaller flower, the Boho Blossom fits perfectly in the center so you only need one and then punch them out as shown.  The larger flower needs to have the piece moved a bit so I used the left over pieces to make the cap. Stick it on as shown.
 Then use the large oval punch to make the berries separate.  It makes it easier to hold to punch if you leave the flower whole.
 Then you keep going around the petals to make the berries! 
 The last piece can be tucked under the basket so no one will know you didn't have a cap on it- as you can see on the far left and right berries. You mark it up with the white gel pen for seeds.
This is how they look with the berries underneath the basket and some placed on hop with flowers added.    Now, I wanted to add a little filaments in the center of the flower but there was nothing appropriate but then VOILA!
The Perpetual Birthday Calendar stamp set had so many little things you could use for the cent of the flower that I snipped one off (when I want to use it as intended, I can just attach it where it was supposed to go- and you can see exactly where you want to to put it-  the beauty of photopolymer stamps!).  So here at the end is another one I did first before the one above- I was packing the strawberries and one just fell off and I loved how it was sitting by the basket so of course I had to copy nature!  Enjoy! 
Lynda