Tuesday, July 28, 2020
Spellbinders Stay Wild May 2019 kit
I've been a bit stir crazy- I miss my old haunts and strolls through the Michael's aisles leisurely looking at new products to make cards and scrapbook - and going though my local scrapbook at different manufacturers tools and samples dreaming of how I would use them. So while they were closed I did a lot of on- line shopping and I found many different monthly kits including this one at Spellbinders. It's an old kit from May 2019 but it was a fantastic price with dies for flowers and leaves, embellishments of 3D butterflies, ephemera, cardstock including a brassy metal
cardbase- 10 of them with matching envelopes. there were cardstock frames, a pack of 6x6 designer paper and a stampset that is really darling.
It kept me busy the whole day and I loved it!
And I still have a mound of ephemera, butterflies, and designer paper to use later.
Since I have not been having any parties at home I've essentially moved by stamping room out to the dining room table and vowed to use all of my kits to make cards and send to all of my friends. I hope you like some of my effort.
The card above was made using nothing but the ephemera from the kit except for the embossing folder on the green background is from Stampin' Up called Greenery from the new 2020-2021 catalog. It comes in a set of two and it is a little smaller than a full sheet- you cut the cardstock and place the die on one corner, put it through the diemachine at an angle halfway then take it out, turn around and do it again with the folder moved to the corner and it looks great. I love the embossed look on this carstock and it gave it a little extra something I liked.
This one above here is mostly using the Designer paper and ephemera that came with the kit. I love the saying so stamped it in black and I did turn a ephemera around to use it as a blank because the print on it did not fit the card theme.
I did fussy cut the butterfly and the leaves because I don't like so much white border and cut the word strips to make it seem more me.
I stamped the bear on this one, the balloons and the banner from the set and cut it out. Put the DSP down, then the big giant flower behind the frame.
Added the ephemera using dimensionals.
Thought I would send it off as a more masculine birthday card for someone.
the set comes with this 2 set flower die that I am absolutely in love with- yes yes- I did end the sentence in a preposition but this blog is primarily my thought in free form - so there!
I took the base card layered it with the soft green embossed with Greenery embossing folder from Stampin' Up again. Layered a black behind the saying ephemera then layered a few tickets with the sweet words and flower, cut out the 2 layer flower and some leaves. I used some watercolor - using flamingo reinker and using a aqua brush just smeared it around and it still looked fantastic - I thought- and it matched the butterfly - I did the same with the diecut leaves in whisper white, brushed some old olive diluted and made such a beautiful leaves with variegations that you don't get from diecutting from colored cardstock.
Even though it is just two layers it gives the most 3D flower look- amazing - whoever designed it at Spellbinders should pat themselves on the back!
I was not so sure of this card - seemed a bit muted but still a nice card. diecut leaves in white and water colored it with old olive diluted, layered the ephemera and butterfly as shown. Fussycut the word ephemera a bit.added the wonderful and amazing with dimensionals. the sequins come with the kit but I did not use much of it. I am sure I'll find other places to use it.
I had the hardest time with this one- I really liked the wreath but it looked unbalanced when I tried to put a big butterfly on it so I nixed that idea.
I embossed the Greenery embossing folder onto the soft green cardstock - as I explained before offset the die so it would cover both corners by embossing on an angle halfway. All the ephemera come in pairs so I cannibalized one of them - it's hard to see but cut out the flowers and some of the leaves to add dimension to the first wreath and mounted with dimensionals. I stamped the sentiment from the same set onto and banner diecut - not sure who the manufacturer is since I have them all in a folder- but I think it is Lawnfawn (sorry if it is in error).
I added the other ephemera as shown and done.
I have a weakness for black and white stripes-
Love this one with the ephemera in the center with the number strip border. I want more borders like this! diecut flowers in white then used some diluted Soft Suede ink smeared around with the aqua brush to mimic the flower colors on the ephemera and this time used a more concentrated Old Olive ink on the leaves and I love the look. I did fussy cut the butterfly more and used a dimensional to mount it only in the center so you can pop out the wings a ibt more for a realistic look. Did I tell you I love this flower and leaves die? Yes I did.....
My favorite card is above. The designer paper is from Park Lane from Joann's - beautiful cardstock and great price- better if you use a coupon. Used the ephemera center, ticket and 3D butterfly- die cut the flower and leaves in whisper white and watercolored it - again just SMEARING the diluted ink refill onto the cardstock and the flower look totally 3D- Love the colors- I want to send this to my bestie Julia who is an optometrist- thought she would get a kick out of it.
Love this one to the left although I screwed up and put the number on the right thinking it was the fold but I had it upside down but it still worked out.
Placed a 3D butterfly on the designer paper- isn't it gorgeous? wish I had a few more sheets of that one. the sentiment and the words mounted with dimensionals and the leaves already in the kit I fussy cut more to removed the white border and mounted with dimensionals as well.
Last but not least- this is closest to the sample that came with the kit- base designer paper on the white card, layered the center ephemera on the brassy metal cardstock for that extra shine. THe 3 D butterfly and the Hey from the center of the wreath ephemera used above. This time I diecut the flowers and did not touch it and diecut the leaves in Old Olive Cardstock and as you can see still absolutely gorgeous. Layered the brassy smile for the sentiment and still love it.
It has everything you need for 10 most gorgeous cards ever and you are left with the stampset, diecuts and so much extra to make lots more.
It's really a gorgeous set and on sale last time I checked .
Saturday, April 4, 2020
Ornate Garden Suite
I know with the current shut down, my family seem to find that one day flows into another- weekends are the same as the weekdays but for me still working I still so look forward to the weekend when I can squeeze a few minutes to do something for myself.
I am missing my stamping friends and get togethers which used to relieve the stresses in my life. so I took out my stuff and forced myself to make a card that had been swimming in my head using the new Ornate Garden Suite (an early release from Stampin Up available now)
The base is Whisper white with a melon mambo embossed with the Ornate Floral embossing folder. Then a layer of Old Olive diecut with the Ornate Layers dies. I cut a piece of whisper white to fit inside the dots (otherwise it was too dark a background for the flowers)
The sentiment is from Tags in Bloom (SAB set).
I took a retired Stampin' Up newsprint DSP and cut it into 3 " square and folded it to make the flower wrap, tied the Ornate Garden Ribbon around it.
I stamped the daisy from the Ornate Style Stamp set seven times (odd numbers always look better)
in versamark and embossed it with white embossing powder and heat set it. I watercolored the flowers with daffodil delight, melon mambo and old olive with aqua painter.
I cut the flowers out (while watching our governor Gavin Newsom give an update on the COVID situation) and leaves separately so I could arrange them as I wanted and mounted them with dimensionals to pop it out.
I am forwarding a picture of this to my stampin' sisters to let them know I am thinking about them.
Stay safe everyone! Lynda
Monday, March 30, 2020
Korean Origami Dress card
I am crazy about paper dolls and although there are a lot of Japanese or Chinese origami dress I had not found much in terms of Korean traditional dresses.
but I found one here: https://ameblo.jp/kimys-kr/entry-12103300448.html
which was cute. I used a much smaller squares so it would fit my needs but the instruction work for any size square as long as the top and bottom is the same size.
I thought it would work well for the lady in the Power of Hope bundle stampset.
I was at the LSS and found this Poppy Stamps' Summer Blossoms Sidekick frame which I thought was just darling - diecut in Whisper white and colored it in and mounted my little origami dress on it- I did tape some little strip of paper to create the traditional Korean colors.
I hope she likes it as she was under sheltering order so had to celebrate her birthday alone!
Happy Birthday Sis!
Lynda
Saturday, March 28, 2020
Lovely Lily Pad
Hope everyone is staying safe in this mad world right now. My boys and DH are studying or working from home but the medical world marches on. Although I am still leaving home to work, my heart really goes out to the people out there in the ER or in the ICU on the front lines putting their lives at risk to help the patients infected with the coronavirus with the limited resources that is causing challenges to all of us.
Being able to do something else to take your mind off the 24 hours of news and trying to mitigate some anxiety, stamping has been a Godsend. We all know we all have enough supplies to last us two lifetimes of crafting (you
know who you are!). I am trying to take a couple of minutes every day to make a card and send it to some (take a picture and text it to someone or mail it but if you go to the mailbox, wipe the handle down or use something else to not touch it) to brighten someone's day.
My parties are on indefinite hold as we are all sheltering at home so if you need anything, order on line (be patient as many companies are working with skeleton crew so orders maybe a little slow in filling) to keep the businesses going.
Base card is whisper white with a piece of melon mambo embossed with Coastal Weave 3D embossing folder , then layer of Old Olive then the whisper white. Stamp the leaf in Memento black and color in with olive blends. stamp the lily twice on a scrap piece of whisper white and die cut or cut out. I fussy cut the bottom so I would not have a border of white. Mount with dimensionals. cut the second lily but the center leaves only. I put green glue on the bottom part of the leaves so it would meet but used dimensionals to separate the leaves on top.
Take a piece of Daffodil Delight scrap and die cut using the die from Sending Flowers Dies and mount it using dimensionals. Add the sentiment stamped with part of the Peaceful Moments stampset on a 1/2 inch strip of whisper white. I cut the stamp to just use the Thinking of you part. Add a piece of From My Heart faceted gem for a little bling and a simple card you can make in minutes.
Let someone know you are thinking about them.
Stay safe my friends!
Lynda
Tuesday, February 18, 2020
Sending Flowers
This was one of the make and takes from my February Stampin' with Lynda.
The base card is whisper white diecut with Sending flowers die. I tried a variety of different ways to do this cutting it out of old olive cs and pasting it behind, but what turned out to be the easiest is to leave the white flowers as they are and color the stems with Old Olive and Mossy Meadow markers, die cut the flowers and glue it on top. the flowers were Daffodil, pumpkin Pie and the tulips were colored in with Melon Mambo pen. My marker is getting a little dry and it caused some streaks which I actually liked- mad it more realistic.
Used the Layers 3D EF behind it using soft sky CS (retired) mounted with dimensional as well as dimensionals behind some of the flowers to pop it up.
Diecut the banner- Love the little holes on the banner and stamped the sentiment from the December 2019 PaperPumpkin in Melon Mambo. Used a strip of 1/2 inch melon mambo to make the whole pop a bit. Add the pearl basic jewels to accent.
If you use a curved tweezers to make the little cuts around the circle pop up it is super cute!
Enjoy
Lynda
The base card is whisper white diecut with Sending flowers die. I tried a variety of different ways to do this cutting it out of old olive cs and pasting it behind, but what turned out to be the easiest is to leave the white flowers as they are and color the stems with Old Olive and Mossy Meadow markers, die cut the flowers and glue it on top. the flowers were Daffodil, pumpkin Pie and the tulips were colored in with Melon Mambo pen. My marker is getting a little dry and it caused some streaks which I actually liked- mad it more realistic.
Used the Layers 3D EF behind it using soft sky CS (retired) mounted with dimensional as well as dimensionals behind some of the flowers to pop it up.
Diecut the banner- Love the little holes on the banner and stamped the sentiment from the December 2019 PaperPumpkin in Melon Mambo. Used a strip of 1/2 inch melon mambo to make the whole pop a bit. Add the pearl basic jewels to accent.
If you use a curved tweezers to make the little cuts around the circle pop up it is super cute!
Enjoy
Lynda
Monday, February 10, 2020
Botanical prints thank you
I love the botanical prints stamps - it seemed a bit pricey but it comes with the stampset, coordinating dies including 2 triangular corner dies that are the bomb- do you not agree?
coordinating pack of paper, ribbon, diecut images, labels, and a bunch of these cute little metal bees.
I always hoard these but they are so cute and I really wanted to use them for these thank you cards for my January customers.
the base card is Calypso Coral embossed with Tin Tile 3D embossing folder.
Take a 4x4 piece of DSP- it is not colored in so you can choose your own colors- I used so saffron to color the flowers and olive for the leaves and calypso coral of course for the fruit images using water colot technique with aqua painters.
take 3 3/8 inch square piece of whisper white CS and mount it using dimensionals.
Cut 4 decorative triangles (the set comes with 2 dies so it goes pretty fast) and glue onto the whisper white. stamp the flower image on a scrap whisper white piece and color that in. mount using dimensionals.
Stamp the sentiment on a 1/2 strip of whisper white and mount using dimensionals. Mount the bee on the label using a mini gluedot. This is such a gorgeous set, anything you do with it will look good!
Lynda
Wednesday, February 5, 2020
Sending a Bouquet of Flowers
Isn't this the sweetest thing?
The die is from the Coordination Product Release available now through Stampin' Up.
The base card is whisper white with a layer of Soft Sky CS (retired) embossed with Scripty 3D folder. layer of whisper white diecut with Stitched so Sweetly die (in the Jan to June 2020 Mini Catalog) I sponged some soft sky color behind the bouquet for a subtle color.
Take a 2 1/4 inch square whisper white cs and score it diagonally to one corner to make the
paper bundle.
stamp the script from Very Versaille stampset. The Thinking of you is from the same set with the Always cut out. Sentiment was stamped with tuxedo black memento ink on whisper white and mounted with dimensionals
Position the linen thread where you think it will need to be on the rectangle and put tape on it so it won't move around. I put the stamped paper bundle but leave it open so you can position the flowers.
Diecut the circle flower die from Sending
Flowers Die out of old olive CS. I find it best to color the leaves while they are all still attached.
Diecut the flowers in daffodil, pumpkin and melon mambo and red and adhere to the stems as shown.
Put some mini dimensionals behind some of the flowers and tie the bouquet and make the bow then adhere the bouqet down. Attach the sentiment with dimensionals - on the right side I put on double layers of dimensionals so it would lay flat.
Enjoy.
Lynda
Monday, February 3, 2020
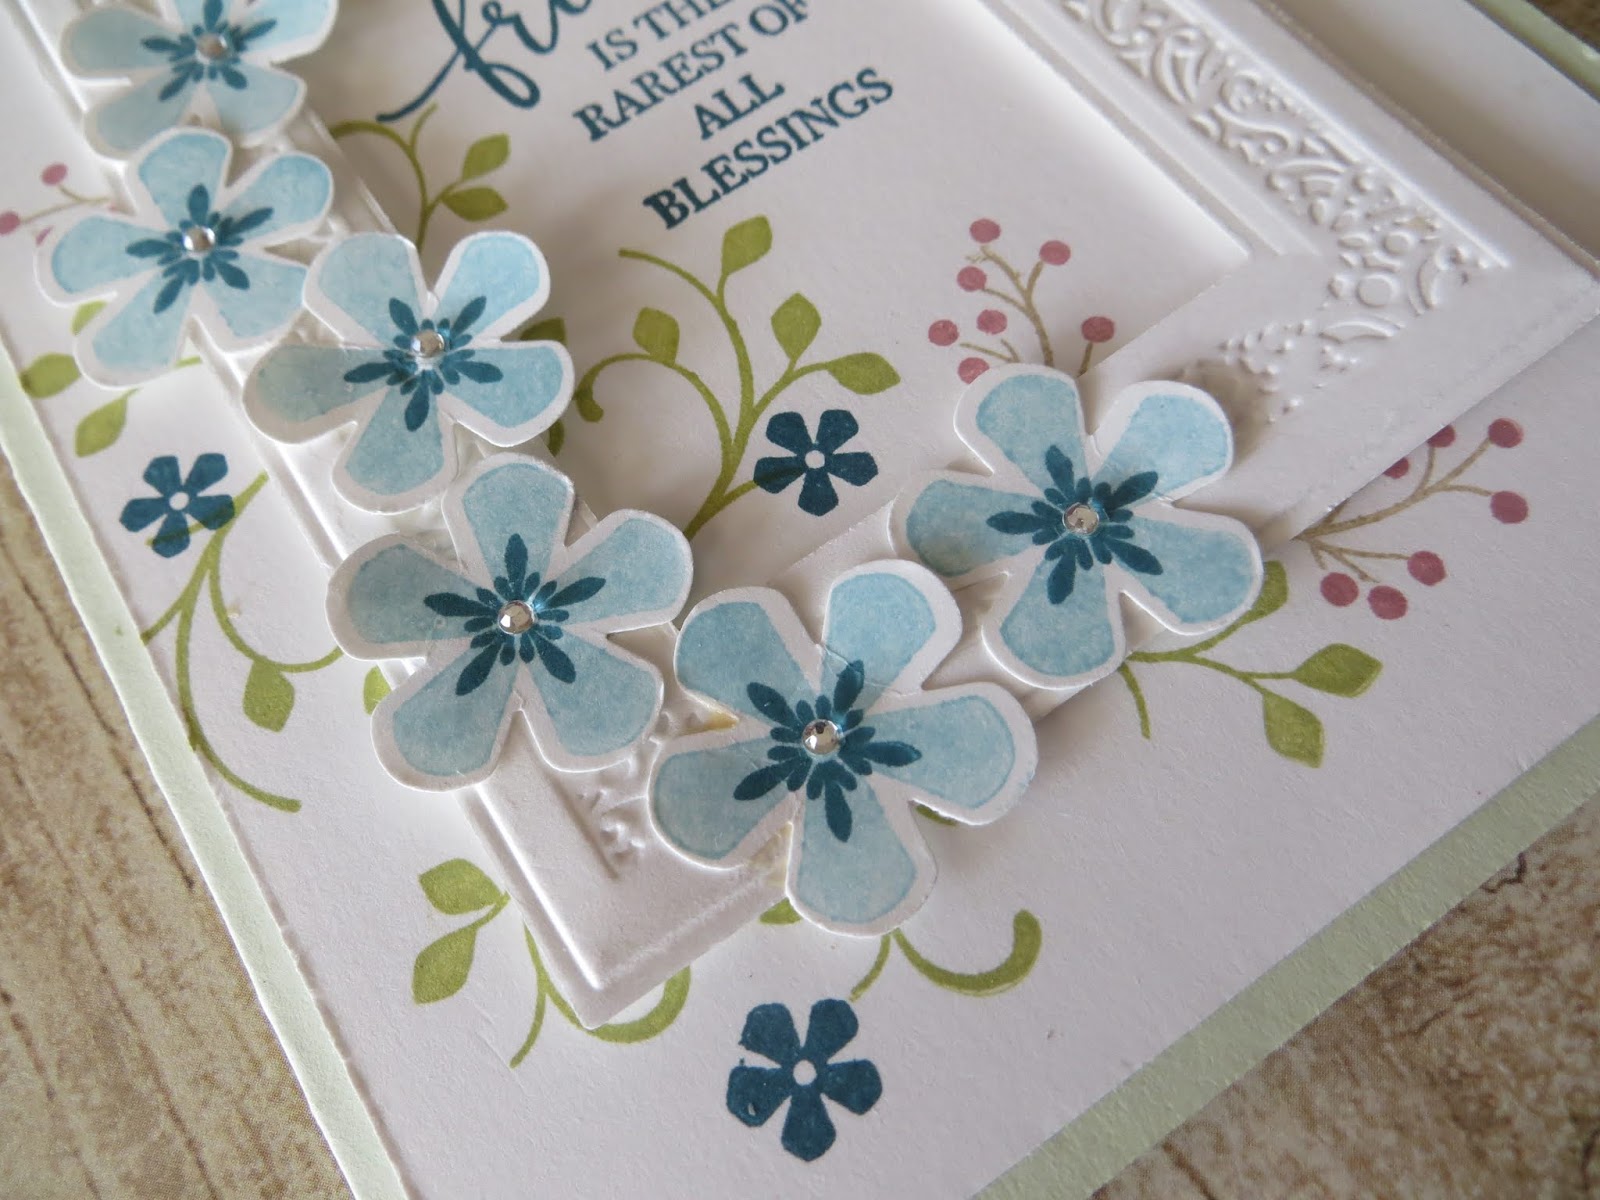
Sale-a-bration Thoughtful Blooms
One of the cards from Stampin' with Lynda January. Basecard is Soft Sea Foam.
Diecut the rectangular Heirloom Frames and emboss it- ( I have the middle piece permanently mounted on the embossing folder with a piece of tape so that it is always perfectly centered)
Take piece of whisper white CS and stamp the sentiment- using the frame to center the sentiment in Pretty Peacock then the vines Thoughtful Blossoms in Old Olive. Stamp the small branch in soft Suede and the berries in Rococco Rose. ( I love how they separated the stamp so we can use multiple colors- They are finally getting it! ) stamp the little flowers in Pretty Peacock. Stamp a bunch of solid flowers in Balmy Blue - STAMP OFF otherwise it is a bit too dark. Stamp the center in Pretty Peacock- use the Small blossom punch to punch it all out. - i had 7. Mount the frame with dimensionals and mount the flowers either flat or with dimensionals.
add the smallest of the rhinestone basic jewels in the center of each flower to make it sparkle.
Monday, January 27, 2020
Heart to Heart homemade DSP
Isn't this pretty?
THe base card is Flirty Flamingo with a layer of From my heart Specialty DSP - it has a metallic shine. Took a piece of whisper white and stamped the flowers in flamingo then I used the Granny Apple Green to stamp the leaves then red flowers until I filled the whole piece of paper with the flowers and leaves. I used the real red marker to add a few dots in clusters of 3 and it makes it so much more interesting.
Stamp the sentiment on a whisper white piece diecut with Stitched Rectangle Die and mount it also on red cardstock and mount the whole thing with dimensionals. I also added a little heart sequin (retired)
Monday, January 20, 2020
Valentine Heart Foil Tins
So Cute! the Heart doily fits the Heart Foil Tins perfectly.
The DSP has little hearts that you can punch out with the scallop heart punch.
Stamp the dotted heart outline and the sentiment in red and punch out.
I got a little smudge on the white while I was working on it and the From My Heart Faceted Gems fit there perfectly. Ha Ha Ha.
Cut 2 strips of Real Red 3/8" double stitched satin ribbon underneath the doily to mimic arrows.
Fill with treats and give to someone special. You can also put a message on the bottom of the tin underneath the treats as well.
The DSP has little hearts that you can punch out with the scallop heart punch.
Stamp the dotted heart outline and the sentiment in red and punch out.
I got a little smudge on the white while I was working on it and the From My Heart Faceted Gems fit there perfectly. Ha Ha Ha.
Cut 2 strips of Real Red 3/8" double stitched satin ribbon underneath the doily to mimic arrows.
Fill with treats and give to someone special. You can also put a message on the bottom of the tin underneath the treats as well.
Subscribe to:
Posts (Atom)