Tuesday, January 30, 2024

Sending Love centerfold card

 Sending Love centerfold card


I am going blind with Presbyopia (that's a medical term for old eyes!) so in order for me to see what I am typing I am changing the font to Large - I hope it does not bug you.

I love mail boxes and I've bought many of these but this was so cute - I love how it opens and when you close it it perfectly fits over the opening so I had to have it - and love the folded envelope and the ribbon die.
basecard is Poppy  parade 8/1/2 x 5 1/2 folded in half to create A2 card ( 4 1/4x 5 1/2) Diecut piece to make the panel.
top panel on front 4x 5 1/2- use cloud stencil with blue ink of your choice to create soft clouds behind the mail box 
mailbox- gray granite
grass- Green apple green
Wood stand- pecan pie
use a small brad to make the black flag pop up and move
the letter is pool party with poppy cardstock for the ribbon die and hearts.

stamp the sentiment in black and punch it out with a circle punch or circle die- I used the circle dies from Reach for the Stars stampset and coordinating dies. 

inside - use regular cardstock -not thick - 5 1/4 x10 inches scored with long side across the top at 2,3,4,5,6,7,8 inches and fold as shown.

Stamp the sentiments and side stripes and attach some punched out diecut hearts as shown. make sure they don't peek out when you close the card though.


You can enclose a secret message if you want since the letter come out- the ribbon is adhered to the back side.

Tuesday, January 23, 2024

punched belly band money/giftcard holder using Filled with Happiness stampset


punched belly band money/giftcard holder using Filled with Happiness stampset

basecard is 3 1/2x 11 Tahitian Tide cardstock- score with long side across the top at 4 5/8 and 9  1/4
DSP 3x 7 3/4 score at 1/2 and a smidge over 4 1/8 - punch out the center with modern oval punch (but any punch will work)


Stamp the image and Punch it out using the same punch in white cardstock here 
You want this to show exactly where the DSP was punched out when the belly band is on.
Left side gets folded over to create a pocket for the money or giftcard as shown.
inside panel whisper white  4 3/8x3 1/4
Stamp with different (or same) if you want from the same set and color as desired.

Easy peasy card using basic card items but a little different
I am always looking for a different fold using the basic card size that fits into an A2 envelope and however way we can use up our ever growing stash of DSP!

Tuesday, January 9, 2024

baby boy cards for a friend


I have a coworker who is having a baby boy and I thought it would be helpful to make some thank you cards she could use so i dug up some stamps and dies I have in my baby stash to make these simple thank you cards.

One above was using a memory box baby carriage die from a long time ago. My boys are now in college- that's how old - but I love the look of the die so much I always kept it  for just this purpose. 
the scallop around it is from Stampin Up Scalloped Contours die and the sentiment from Stampin Up (reitred ) All for Baby stampset. layer it on a base of thick white cardstock embossed with a cloud embossing folder (although hard to see here) 


This simple little card uses a thick white cardstock as base, a layer or a white cardstock stamped with the giraffe from Stampin Up (retired) Zoo Babies stampset and the sentiment from Celebrate Baby set. a run of gold tape around the edge to add a bit of sparkle.
I do clean out my supplies every once in a while but I do buy these things because I love them and find that I go back to it time after time if I love it enough so there is a stash of some things I just won't part with. .... If I just had the space to keep it all!

Mug Wrapper for craft supplies

 This is a little thing I sewed up for our gift exchange for the holidays with my Stamp N Chat friends. The criteria was that it had to be under $10 - I think and handmade.

I have been  hoarding this fabric bundle from Stampin' Up when they used to have fabric eons ago. It is sew cute! I still have a few packets of this and the christmas fabric that they used to have- good quality for quilting and I made several fabric shopping bags with pockets inside for going to the farmer's market. 


the button fabric is twice the height because it is folded over to double side it the pleated and sew every 1 1/2 inches or so to create the outside pockets.
I then make a binding out of the red checker fabric and sewed it all around the edge to create a cute binding.  this is the inside of the mug .


this is the back of the piece with velcro attached so that I can loop it through the handle of the mug to help this stay in place. 

Sunday, December 31, 2023

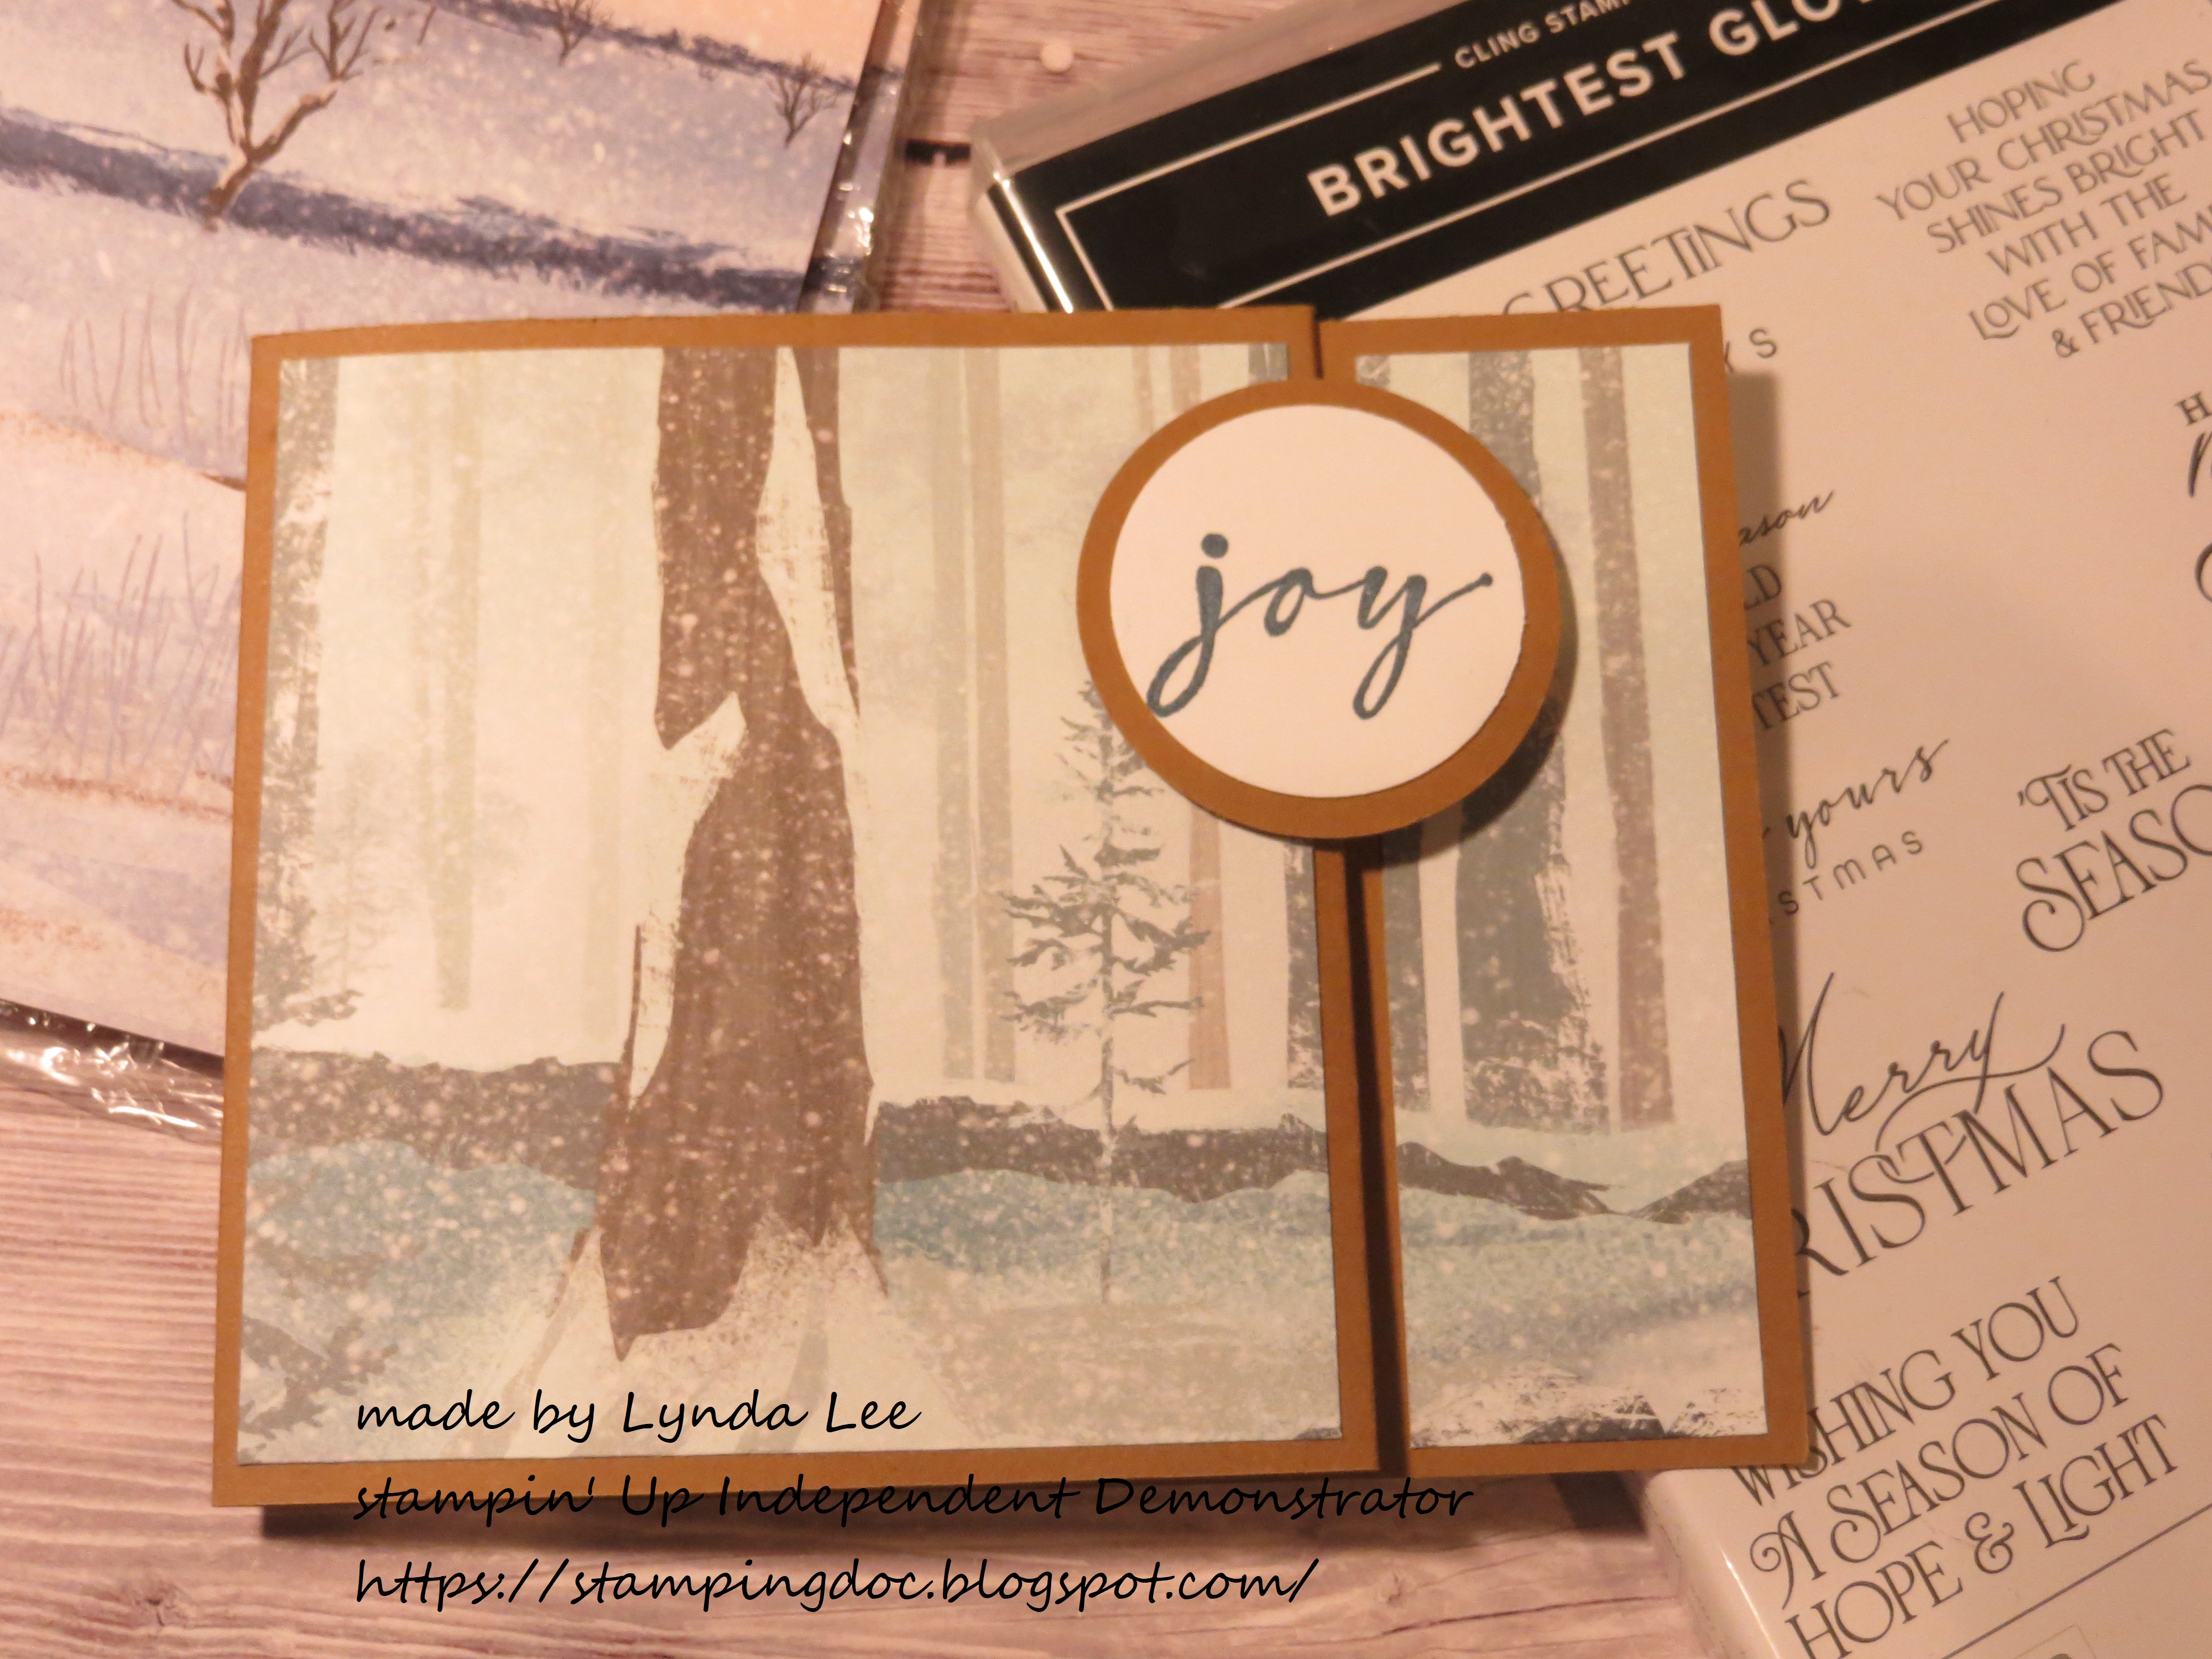
easy fold Gift or money holder card-


 easy fold Gift or money holder card-  using standard A2 cardbase ( for 4 1/4x 5 1/2 inch size )

take basecard of 11 x 4 1/4 inch and score in half at 5 1/2 inches and fold the right front of card at 1 1/2 inches from the edge  to create the pocket on the left on the inside as shown. this is where you put the money or the gift card.

use any 6x6 DSP - you need to cut the DSP so the picture is continuous (we are using One horse open sleigh DSP) -make sure your paper is right side up.
height of DSP is 4 inches -and 6 inches across  and cut at 3 3/4 for the left side main panel and the next piece is 1 1/4 " to go on the right side and the 1 inch left over piece you can glue on the inside near the pocket 

sentiments from Brightest glow  stampset
something fancy dies to cut it out 

added a little layered circle sentiment in the front- - make sure you only glue it down on the left side of the opening. place on the top or bottom or middle depending on the DSP paper - whatever looks best to you. 


another example depending on the DSP you choose it will all look a little different.


Saturday, December 23, 2023

giftcard envelope and Ornament box and tags from Sending Cheer


Last minute panic for giftcards and money envelopes for stocking stuffers solution!

The giftcard envelope uses a 6 x 5 1/2 cardstock scored at 1 1/4 and 3 3/4 along the 6 inch side and scored 3/4 inches from both sides on the f 1/4 inch side. cut the 4 corners as shown and taper the middle tab.-
DSP  3 1/2 x 5 3/4 inches (here Merry Bold and Bright) 
wrap around the outside 1/8 inch from the edges.
Punch out a half circle from the inside end as shown to make it easier to pull out the card.
Tape the 2 tabs to close the envelop as shown below. 

Place the gift card and wrap with a piece of ribbon. Here I added a piece of stamped and diecut bulb and put the ribbon through the top loop for a fun element. 

easy peasy stocking stuffer and you can make 4 out of any 12x12 cardstock  and 6 out of the DSP so use up your hoarded stash!


 Ornament box and tags from Sending Cheer Stampset and Dies- one of my faves from the holiday mini- I'll be using it to make tags forever.

2 -2 5/8 inch circles (BUT ANY SIZE WILL DO)
2 1/2 INCH DSP (HERE MERRY BOLD AND BRIGHT)

Gold foil for the ornament topper using country corners die-(you need 2)- smallest for the topper to fold in half to make the top of the circle ornament - punch out center with a 1/8 circle punch to thread the gold ribbon. 

Box  3x 4 3/4- score 3/4 inches on both sides along the long end
score at 2 2 3/4 inches with the long side on top . and glue between 2 circle ornaments to create a little box to put in some money or candy. 
stamp the gingerbread man in pecan pie and diecut out after stamping the face with early expresso. for you from the same set using the label die. Use dimensionals to adhere. 

Tuesday, December 19, 2023

Merry and Bright card CASE


-Stampset:  Merry and Bright stampset
-Tools: Merry and Bright Dieset; Cheery Patterns embossing folder, Scalloped contours dies
-cardstock: white thick cardstock and real red, Silver foil Real red cardstock was embossed using the circles from the Cheery patterns embossing folder
- embellishments: Merry Bold and bright DSP and Simply elegant trim in Silver
- Inks: Daffodil delight, Crushed curry, real red, and shaded spruce  

Tuesday, December 5, 2023

Winter Owl and Double barn door Owl card


I used base of basic black with a lyaer of midnight muse with spotted with white craft ink.
a layer of glow in the dark paper for the moon, a branch in pecan pie and stamp the owl with black memento ink and die cut. highlight using smoky slate light to add some shadows.  stamp the sentiment with versamark and emboss with white Embossing powder to finish the card. 

Winter Owls Double barn door card
-Stampset:  Fragrant Forest and Winter Owls stampset
-Tools: Winter Owls Dieset, Timber embossing folder, white embossing powder and heat gun
-cardstock: white thick cardstock and Crumbcake
- Inks: memento Tuxedo Black and Shaded Spruce

Double barn door card
mechanism dimension: 2 pieces of 5 x 1 1/2 - scored half lengthwise. 
make a make 1 1/2 inches from one end and score from the closer corner to the 1 1/2 inch mark on both sides to create and X on both pieces. cut out a section as shown on sample.
Align longer side to the left and right margins of the card- Glue the back of the shorter side to the inside of the card. 
open up the mechanism the fold over the top triangle back and glue down to the back of the front panel.


pop up panel is 1/2 x 4 inches scored at 1/2,1, 3, and 3 1/2 (so 1/2 and 1 inch from both ends) 
you will make this into the pop up mechanism for the owl. 


Tuesday, November 28, 2023

Above it all pendulum card using a penny


You will need a penny for this card and lots of dimensionals -1  small  for sure and more to layer
white thick cardstock basecard
poppy parade for the gondola and shaded spruce ink for the trees
tuxedo black memento inkpad for the lines
you will need 1 penny and a lot of dimensionals for this -the dimensionals will need to be put in for the layering.  the penny needs to swing freely  
you will need some blue ink pad and blender brush or sponge dauber and sky stencil if you have it to create the sky before we mount the gondola.

the kids are from lawn fawn.


You can see how it swings left and right here.

you can find a tutorial with Jennifer McGuire here:
https://www.jennifermcguireink.com/2020/09/pendulum-cards.html

Thursday, November 23, 2023

Merry and Bright and die bundle Thanksgiving card- and option treat


This was a total CASE from Tami white I saw on Youtube using the Merry and Bright bulbs for feathers and the lady bug for the body.

Merry and Bright and die bundle Thanksgiving card- and option treat

-Stampset:  Merry and Bright and Fruitful Blessing for sentiment
-Tools: Merry and Bright Dies, Scalloped contours dies, Lady bug punch, feet is from another set I am not sure where it came from.
 1/2 inch and 1/8 inch circle dies- or 6mm googly eyes if you have them.
-cardstock: Very Vanilla thick cardstock , Crushed curry, pumpkin pie and real red, and early expresso 
if you have a Ferrero Rocher candy - or a round truffle in a papercup  you have the supplies to make a second turkey (without feet)