Tuesday, February 28, 2023

Taco Fiesta four panel popup


this card ideas is from Dawn's stamping thoughts- love the pop up and I had to case it.

the base card is 4 1/2 x 11 cardstock scored in half fold to the left.
use strips of 
celebrate eveything DSP 
Basic borders die to make the zigzag border with pacific point 
cardstock strips of crushed curry, granny apple green, pumpkin pie
to color in - need same colors and a red for all the different panels you want to color in. Stamp the pinata on a scrap piece of white and border with pumpkin pie 
stamp the sentiment on a 1/2 inch strip of white and add with dimensionals.

mechanism is a strip 11 inches wide by 2 inches scored at 2 1/4, 5 1/2, and 8 1/4. fold it into a W and glue down the far left and far right panel onto the base card as shown. Glue one side down with the panels folded and then glue the other side down and close the card to make sure it fits. 
you will need four- 2 1/4 inch square solid color cardstock for the accent squares for each of the 4 panels 
 you need four 2 inch square white pieces for the inside of the accent squares as shown below

stamp 4 different images onto each of the 4 2 inch squares and color in.


I cut  the chips and placed them around the guacamole and cut the bottom of the chip in a round pattern so it looks like it is stuck in the guacamole.


this is another case but I put it on the backgraound of the sweet citrus embossing folder to simulate the limes and I love it - just a little extra card I made with the set this month playing around
enjoy!


Tuesday, February 21, 2023

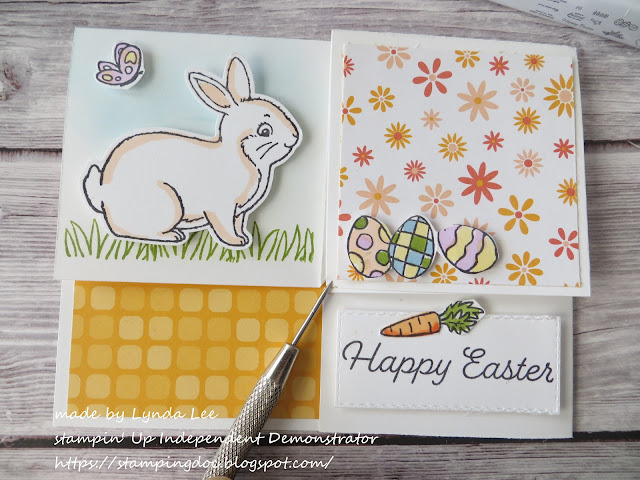
Easter Bunny Corner explosion card


February Stampin' wtih Lynda was all about explosion cards- they are so much fun.
Depending on how you fold it you can have the explosion on the right side, left side top of the portrait card or a landscape shape card as this one was.


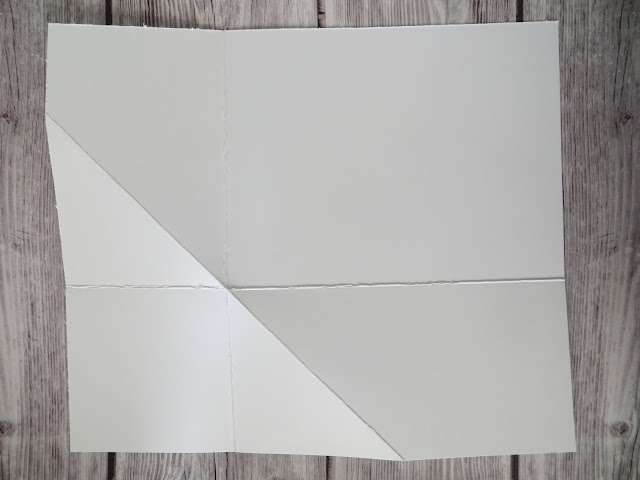
use thinner white cardstock or designer paper for the explosion base so it folds easier.   I wanted the card to be A2 size so this is what it needs: 
card base is 8 1/4 x 7 scored at 2 3/4 along each side 
make a mark at 5 1/2 inch on each side to make a diagonal  (it's 2 3/4 " further in )  as shown above.  you can use this format for any size card. 


 I used the Dandy designs DSP for the inside panel and the outside panels.
I stamped the bunny and bunch of other images on a scrap - punched out the bunny and fussy cut the other items  to decorate- including the carrot for the inside. 
Use the Blender brush and ink for sky- balmy blue or pool party would be good.
stamp the grass on the left upper panel ; granny apple green was used for the grass. 

stampin blends I used to color : pale papaya, calypso coral, fresh freesia, granny apple green, petal pink

stamp the sentiment on panels diecut from rectangle stitched dies.

the square s on the right were 2 1/2 inch squares. 


Tuesday, February 14, 2023

Petal Park Faux side and center step card.


The side step and center step cards are fun to make but cutting the center line or trhe sides and putting score lines all different was really confusing to a lot of people including me- so I just love this fun fold that requires none of the center cutting.  

For this cardbase you need a 8 1/2 x 5 1/2" cardstock- basically a half sheet- hwere it was mango melody
-score along the 8 1/2 inch side at 3, 6 and 7 1/4".   Fold to create 2 mountains as shown.  
Cut another piece of matching cardstock 6 x 2 7/8 but you can make it wider if you want and score along the 6 inch side at 4 1/4. 
I put a layer of Dandy Design DSP on the middle panel as shown
 5 1/4 x  2 3/4. 
stamp the leaves on t piece of white cardstock 4 x 2 3/4 (here with another strip of DSP on the bottom_ but you can make it 4 1/8x 2 3/4 if you want it to cover the whole front.  
stamp the flowers on a sheet of scrap paper and punch it out and mount using dimensionals- I stamped it using Calypso coral and mango melody for the solid part
Stamp the sentiment on a scrap piece of piece 


if youwant to mount it in the center it looks like this.


You just tape it in the front panel and on the back panel as shown and you can put it anywhere on the card- left middle or on the far right. 

I punched extra flowers to put them on each side of the sentiment and the sentiment was mounted on diecut oval and scalloped oval dies.  Set some pearl jewesl in the center of the flowers to add some dimension.  So easy!  


Tuesday, February 7, 2023

Thanks a Bunch


Is this not a super cute card?  When I saw this carrot set in Sale-a-bration it was on my first order- I just LOOOVE it- carrots in 3 different sizes-  I am sure you can tell I am also in love with this cane weave embossing folder since I am using it for absolutely everything!  Basecard is whisper white with a layer of another white embossed with the Cane Weave embossing folder.  Add 2 strips of Celebrate everything DSP (back of it has halloween images but the yellow stripes are so spring!) with the green DSP from Dandy Designer DSP from Sale-a-bration.  


I stamped a bunch of carrots on a scrap piece of whisper white using so Saffron- stamped the accent then stamped the solid image after to layer it easily and although it is the same color it just works adding a subtle accent.  the reddish carrots are suing the poppy Parade.  The orange ones used Pumpkin pie with cajun craze as accent.  I don't have it here but Rich Razzleberry works for purple carrots too.

The leaves are using the Pear Pizazz for the solid leaves and the parsley like leaves are using Old Olive. It is not that difficult to cut out because the leave are big. layer them as shown.  Diceut the circle fom Stalish Shapes die and stamp the sentiment from the set in Old Olive.  Mount the carrots and the circle with dimensionals and add some fine sparkle adhesive gems and such a cute card!

Enjoy.