Sunday, November 29, 2020

Gorgeous Posies

 
There are some images that pull at me and I somehow just love it although I don't know why - that is how it is with this set- There were a lot of kits in the new Stampin' Up catalog this year and the Simply Citrus and the Boho Indigo really spoke to me so they were on my list of things to get- if I had unlimited funds I would love it all but we all have a budget you have to stick to.  My friends told me they got the Gorgeous Posies project kit and how they LOVED it and yes they were quite beautiful but i think the color scheme was not "me" so I resisted. And although I have gazillion flower stamps I kept seeing this stamp and really liking it.  So I finally broke down and bought it and this is the card I mad with it using my favorite colors.  
Base card is Daffodil delight with a layer of Flirty Flamingo.  Same colors used for the flower and the 3 round berry things.  Pear Pizazz was used for the sentiment and the leaves. 
 
The sentiment was diecut with whisper white and Flirty Flamingo using the Tasteful Labels die - the die has an impression around the margins so I fussy cut it so it would be layered- I wish the designers would make layers that are closer- the 1/4 inch layers look clunky and old fashioned sometimes.  1/16 to 1/8 layers would be nice- I hope someone is listening.  I put rhinestone basic jewels but i colored it first with soft suede stampin' blends to darken it a bit- i know it is hard to see but it does make a difference.
I punched some flowers using an old martha stewart flower punch but it looks Stampin Up is coming out with something similar for the spring for their Hydrangea Haven- which cuts out a bunch at one time which should be great- anyhow i colored the center with Flirty Flamingo. Used an old Calypso Coral ombre ribbon which seems to work here and I think this card screams Me! 

you know my rule- I have to be able to use a stampset in at least 3 different ways so I can justify buying it so I will have to work on some more ways to use this set! 


Sunday, November 22, 2020

poinsettia tag card


I think I have every poinsettia die manufactured- I can't help myself- and this one from Stampin' Up is quite beautiful - great size and I like the leaves and ball like things that add that little something.  the coordinating papers are quite gorgeous as well.  
Anyhow, this month's Stamp n' Chat challenge was to make tags so I did - this has been rummaging around my brain and it worked out almost exactly how I pictured it in my head.

I had a bunch of tags i got eons ago just for this purpose from Tim Holtz or somebody I cannot recall - no label on box either. I stamped it with some christmas musical note background stamp- again not sure the source as I've had it forever (and back then things were not as well labeled)

I stamped the most wonderful time of the year from the Stampin' Up Festive Corners set - I'll be using this for my Christmas card this year as well- I really love it.


Diecut the poinsettia in real red , leaves from Mossy meadow and the ball things (anyone know what this is called?) in expresso and layered it as shown. the center is Daffodil delight.


Added some stars from Snowflake sequins

You can use the tag as is - really pretty or mount it on a red cardstock as I did here and use it as a card.


Saturday, October 31, 2020

Have a Hoot on Halloween


Gayle suggested that we use this layout for our October Stamp n Chat so this was my take on it.

I used the stitches square die to cut out the openings and embossed the early expresso cardstock with the woodgrain embossing folder (sadly retired- but wood planks would work also beautifully.)

stamped the owls from Have a Hoot stampset set and colored it in water stampin' blends and watercolored the background

It's funny but the branches look like they connect -and they re looking at each other!


These owls are just so super cute!

the label die is the small one from "Hippo Happiness" die set. 

Happy Sheltering Halloween!

I bought some Halloween candy for my staff treats and for the trick or treaters just in case but I don't foresee any kiddie coming by with this pandemic-

Stay Safe everyone! 

Sunday, October 25, 2020

Fall Updates


I have a hoard- and I mean a HOARD of cards from years past - some were swaps I made, some fronts only swaps, some were ATC's and not ready for sending out to people but still.....   So I brought them all down from top of my bookshelves with the intention that i will use it to make a full card or something more usable to someone.  So this is an example of such card- the base was solid but the center image was somewhat lackluster so I stamped this jack o' lantern from Everything Essential set from the Fall Winter catalog 2020-2021 and it just brightens the whole card and updates it and now I would be proud to send it out- and I did!


I got a cardfront as a swap that had this pumpkin and the acorn strip which was super cute but it was a bit plain.  I embossed the base mustard cardstock with the Meadow Moments embossing folder along the top ( sorry that it is hard to see) .  I then punched the pumpkin accent with the Rectangular Postage Stamp pumch.   With the large sentiment form Country Home set stamped in black and the acorns and leaves from Beautiful Autumn - with the coordinating punches- which I Love Love Love! it makes embellishing this card and bringing it up a notch super easy. So I took these updated cards and some other cards I've made to my office with a bunch of envelopes and asked my staff  to take the cards with promise to send it to people and they were practically all gone by the end of the day which makes me very happy that these cards will make it home to some happy receiver instead of sitting in a box collecting dust on top of my shelves!
 Taking something old and trying to make it new again with what I have - it is totally fun and great brain exercise!  Try it for yourself.  Hugs, Lynda


Friday, October 16, 2020

Mama Elephant /MFT Slimline Cards for my twins


Splitcoast Stampers Challenge for today was for slimline cards and I have been working on cards for my boys so I thought I would share it with you.

This template is from Mama  Elephant Slimline basics die - oh so cute! The stamps are from Bobo Tea and Zodiac Monkey- but the tiny Bobo Tea is from Zodiac Tiger set that I had to get just for that stamp. but it is a cute set anyway and I was born under the Tiger zodiac so I guess it is ok. 

Base card is white 8 1/2x 7 scored down to  81/2 x 3 1/2. THe scallop is with Sahara Sand and I put the soft sky CS behind the openings which were all mounted with dimensionals.  I did but a balloon image and stamped the inside with sentiment from the Happiest of Birthdays set from Stampin' Up.


Kyle loves his pigs so I used the Slim Woodland die from Mama Elephant and colored it with variety of techniques and mounted onto a 8 1/2x 7inch CS folded to 8 1/2x 3 1/2.  Stamped the Farmland background from Hello Bluebird and extended the image with the black markers and colored it in. 
the animals are from MFT The Whole Herd set. the chicken with the balloons are from Party Animals.
They are mounted using dimensionals of course.
These are perfect for adding money because they are nice and long. 
Enjoy!  Lynda


Saturday, October 10, 2020

Paper Pumpkin June 2020- box of sunshine to give away


I have a whole mess of the paper pumpkin boxes as they are perfect for giving away but it is so plain and I love how the June package had a vibrant color and came with a label we could use to make the box decorative with extra embellishments.  I did add a small flower with a crystal jewel colored with a sof t suede blender marker to add some brownish hue. 

I am going through  my hoard of cards-  and trying to give it away to someone who I hope will use it with some small bits of treats.  This was for my dental hygienist Faye who is moving to Santa Barbara after taking care of me for several decades - I will miss her so much- she really is a gem!

I have plans to make more of these to give away given there are so many people I need to thank - and what better way to clean out your stash than to give it to people who may actually use it?


Enjoy!

Lynda
 

Tuesday, August 18, 2020

Bojo Indigo Carved wood TLC 808


Technique Challenge at Splitcoast stampers was something I have not tried before called Carved Wood and I thought it was pretty cool - the sample used a stencil to create an embossed image but I thought why not an embossing folder itself? and ti works just great.
I took a piece of whisper white CS about 3 1/2 x 5 1/2 inches, scored it every 3/4 inches to create planks, then embossed it using the Greenery EF.  I took the Misty Moonlight pad to color the raised images. then used a sponge dauber with Soft Suede to color in the planks to create the carved wood look.   I mounted the piece onto a folded A2 Night of Navy cardstock after putting the blue ribbon from Bojo Indigo kit. 
I took a piece of stitched circle stamped with sentiment from the same kit in Misty Moonlight 
stamp the vase with midnight Muse, the leaves and flowers in white scraps and stamp the flowers using Melon Mambo and color in the center of flowers with Magenta Madness- i did fussy cut it more so it would be individual and used aqua brush to color the leaves with old olive.

mount the flowers and leaves with dimensionals.  added some crystal jewels for some added sparkle. 
Kind of an old fashioned look but I love it.
Enjoy.


Saturday, August 15, 2020

Boho Indigo Thanks

I saw this in the catalog and just fell in love with this kit.  Love the DSP, love the stampset,  love the colors that remind me of the Japanese Blue Indigo Shibori fabric that we use for quilting and other fabric crafts.

I used the Papertrey cover plate: horizontal strips to diecut a whisper white CS and layered it over the Misty Moonlight base card.  Stamped the sentiment using Misty Moonlight ink and same for the vase and diecut.  Stamped the flowers with Melon Mambo ink then using the aquabrush and Magenta Madness added some extra color around the center to make it pop a bit. I did fussy cut the flowers after diecutting it out.

diecut the leaves with Old Olive CS and layer as shown.  I alway wanted to learn Ikebana.

Mount the flowers and the vase using dimensionals. 

 Enjoy!

Lynda

Friday, August 14, 2020

MFT Farmer Girl/ Hello Bluebird Farmland- splitcoast challenge F4A547


This was fun- I love farm and animal images and when I saw this MFT- PI farmer girl I ordered it- then I saw this  Farmland background stamp from Hello Bluebird so I had to have it.  I have barn dies and fence dies but it is a lot of work - this was just so easy- perfect neutral background- just coloring it and put what you want in front of it to create the perfect farmscape.  
This card is for a friend- thus the challenge F4A547.
The stampset did come with Hay there stamp but I used  the sentient from SU Beautiful Autumn in black. 
Used stampin Blends and some Copics to color.
Stamped the imaged, colored it , die cut it out, mounted with dimensionals and a really quickie card to send to a friend.

Thursday, August 13, 2020

Blossoms in Bloom Cling Wrap WT805 card


When I want to be distracted from work I have to do I love going to Splitcoast stampers and browse through their challenges.  This week WT805 was to use the Cling wrap technique which I never tried - it looked easy and fun so I tried it and this is the result.

I took a piece of clingwrap and used daffodil delight, flirty flamingo and granny apple pads to dab some colors on it and then spritzed it with water, stuck a piece of whisper white cardstock, smooshed the wrap a bit on top of it and let it dry and voila - a cool background piece of paper. 

I love the streaky patches and the watercolor look.

I diecut the Blossoms in Bloom in Flirty flamingo for the bottom and whisper white on the top.  I did color the leaves a bit and edges with more melon mambo because it washed out on top of the Flirty Flamingo background.  I also added a little yellow to the center of the flowers on top layer.

wrapped a piece of green ribbon from Ornate Garden ribbon pak and stamped the sentiment onto black CS and heat embossed with white EP and mounted it with dimensionals.

I had some crystals from a Paperpumpking project and spread a few around for a little sparkle.
These streaky lines made by the cling wrap is so cool and each piece you make is unique and hard to reproduce and that is the fun of it. 


Enjoy!


Tuesday, August 11, 2020

Prized Peony Birthday

A little Birthday card for a friend-  Basecard is Pink Pirouette- I love this color so I bought several packs when I knew it was going to be retired. Layer a whisper white diecut with Many Medallions die .

Diecut Whisper White and Magenta Madness CS with Tasteful Labels dies for the sentiment and banner. Stamp the sentiment with the words from Prized Peony in Memento Tuxedo black.  I stamped the flower in Magenta Madness and glorious green using little cubes of color and used aqua blender to spread the ink more around in the flower and the old olive Stampin Blends to add more color to the leaves.  Diecut and mount with dimensionasl to pop it up.  I did use the Old Olive stampin blend to add a little border to the label 

 The sequins are self adhesive ones left over from Paper Pumpkin kit 


Saturday, August 8, 2020

All Things Fabulous


My Yahoo stamping group was challenged with a sketch so this is the card I made for it.

Basecard is Daffodil delight. Take a quarter sheet of whisper white and diecut with Papertrey coverplate horizontal diecut to create the stripes.

The rose is from the ALl Things Fabulous set from 2020-2021 catalog.  it is s 3 step stamp- the base is Melon Mambo stamped off with the next layer using Melon Mambo straight.  The top layer is stamped using the new Magenta Madness.   The leaves were stamped using Pear Pizazz and diecut all and layer using the dimensionals. 

The sentiment is from Very Versaille set- partial stamp- that is the beauty of cling stamps- you can cut and use parts of it which is great without destroying the integrity of the whole stamp. 

  clean and simple.  This one I tired lower down and it was fine too.   I just love the color combo.

Enjoy

Lynda

Saturday, August 1, 2020

Fashion for 2020


I am a paper doll hound- I can't help buying any die that I can use for paper dolls. This die is an example- it came with no face but hair-  but I thought the face stamp that came with the HeroArts April 2017 kit was proportioned pretty well for it.  I don't have it because it sold out before I was able to buy it but my dear friend Annette was kind enough to stamp a bunch of them so that I could fussy cut it and attach it to the body.

I took a soft sky cardstock and embossed it with the new Stampin' Up Dainty Diamonds 3D embossing folder and layered it with the black cardstock behind it.
I printed the sentiment on my computer and layered it with whisper white cardstock behind it to add a little stiffness to it

The dress was diecut from a page in the medical magazine- I thought it looked like little viral particles so fit for this card. 

Shoes were colored with a Real Red Stampin' Blends.
the doll was attached to the card using dimensionals. 

Tuesday, July 28, 2020

Spellbinders Stay Wild May 2019 kit


 I've been a bit stir crazy- I miss my old haunts and strolls through the Michael's aisles leisurely looking at new products to make cards and scrapbook - and going though my local scrapbook at different manufacturers tools and samples dreaming of how I would use them.  So while they were closed I did a lot of on- line shopping and I found many different monthly kits including this one at Spellbinders. It's an old kit from May 2019 but it was a fantastic price with dies for flowers and leaves, embellishments of 3D butterflies, ephemera, cardstock including a brassy metal
 cardbase- 10 of them with matching envelopes. there were cardstock frames, a pack of 6x6 designer paper and a stampset that is really darling.

It kept me busy the whole day and I loved it!
And I still have a mound of ephemera, butterflies, and designer paper to use later.

Since I have not been having any parties at home I've essentially moved by stamping room out to the dining room table and vowed to use all of my kits to make cards and send to all of my friends.  I hope you like some of my effort.

The card above was made using nothing but the ephemera from the kit except for the embossing folder on the green background is from Stampin' Up called Greenery from the new 2020-2021 catalog.   It comes in a set of two and it is a little smaller than a full sheet- you cut the cardstock and place the die on one corner, put it through the diemachine at an angle halfway then take it out, turn around and do it again with the folder moved to the corner and it looks great. I love the embossed look on this carstock and it gave it a little extra something I  liked.         
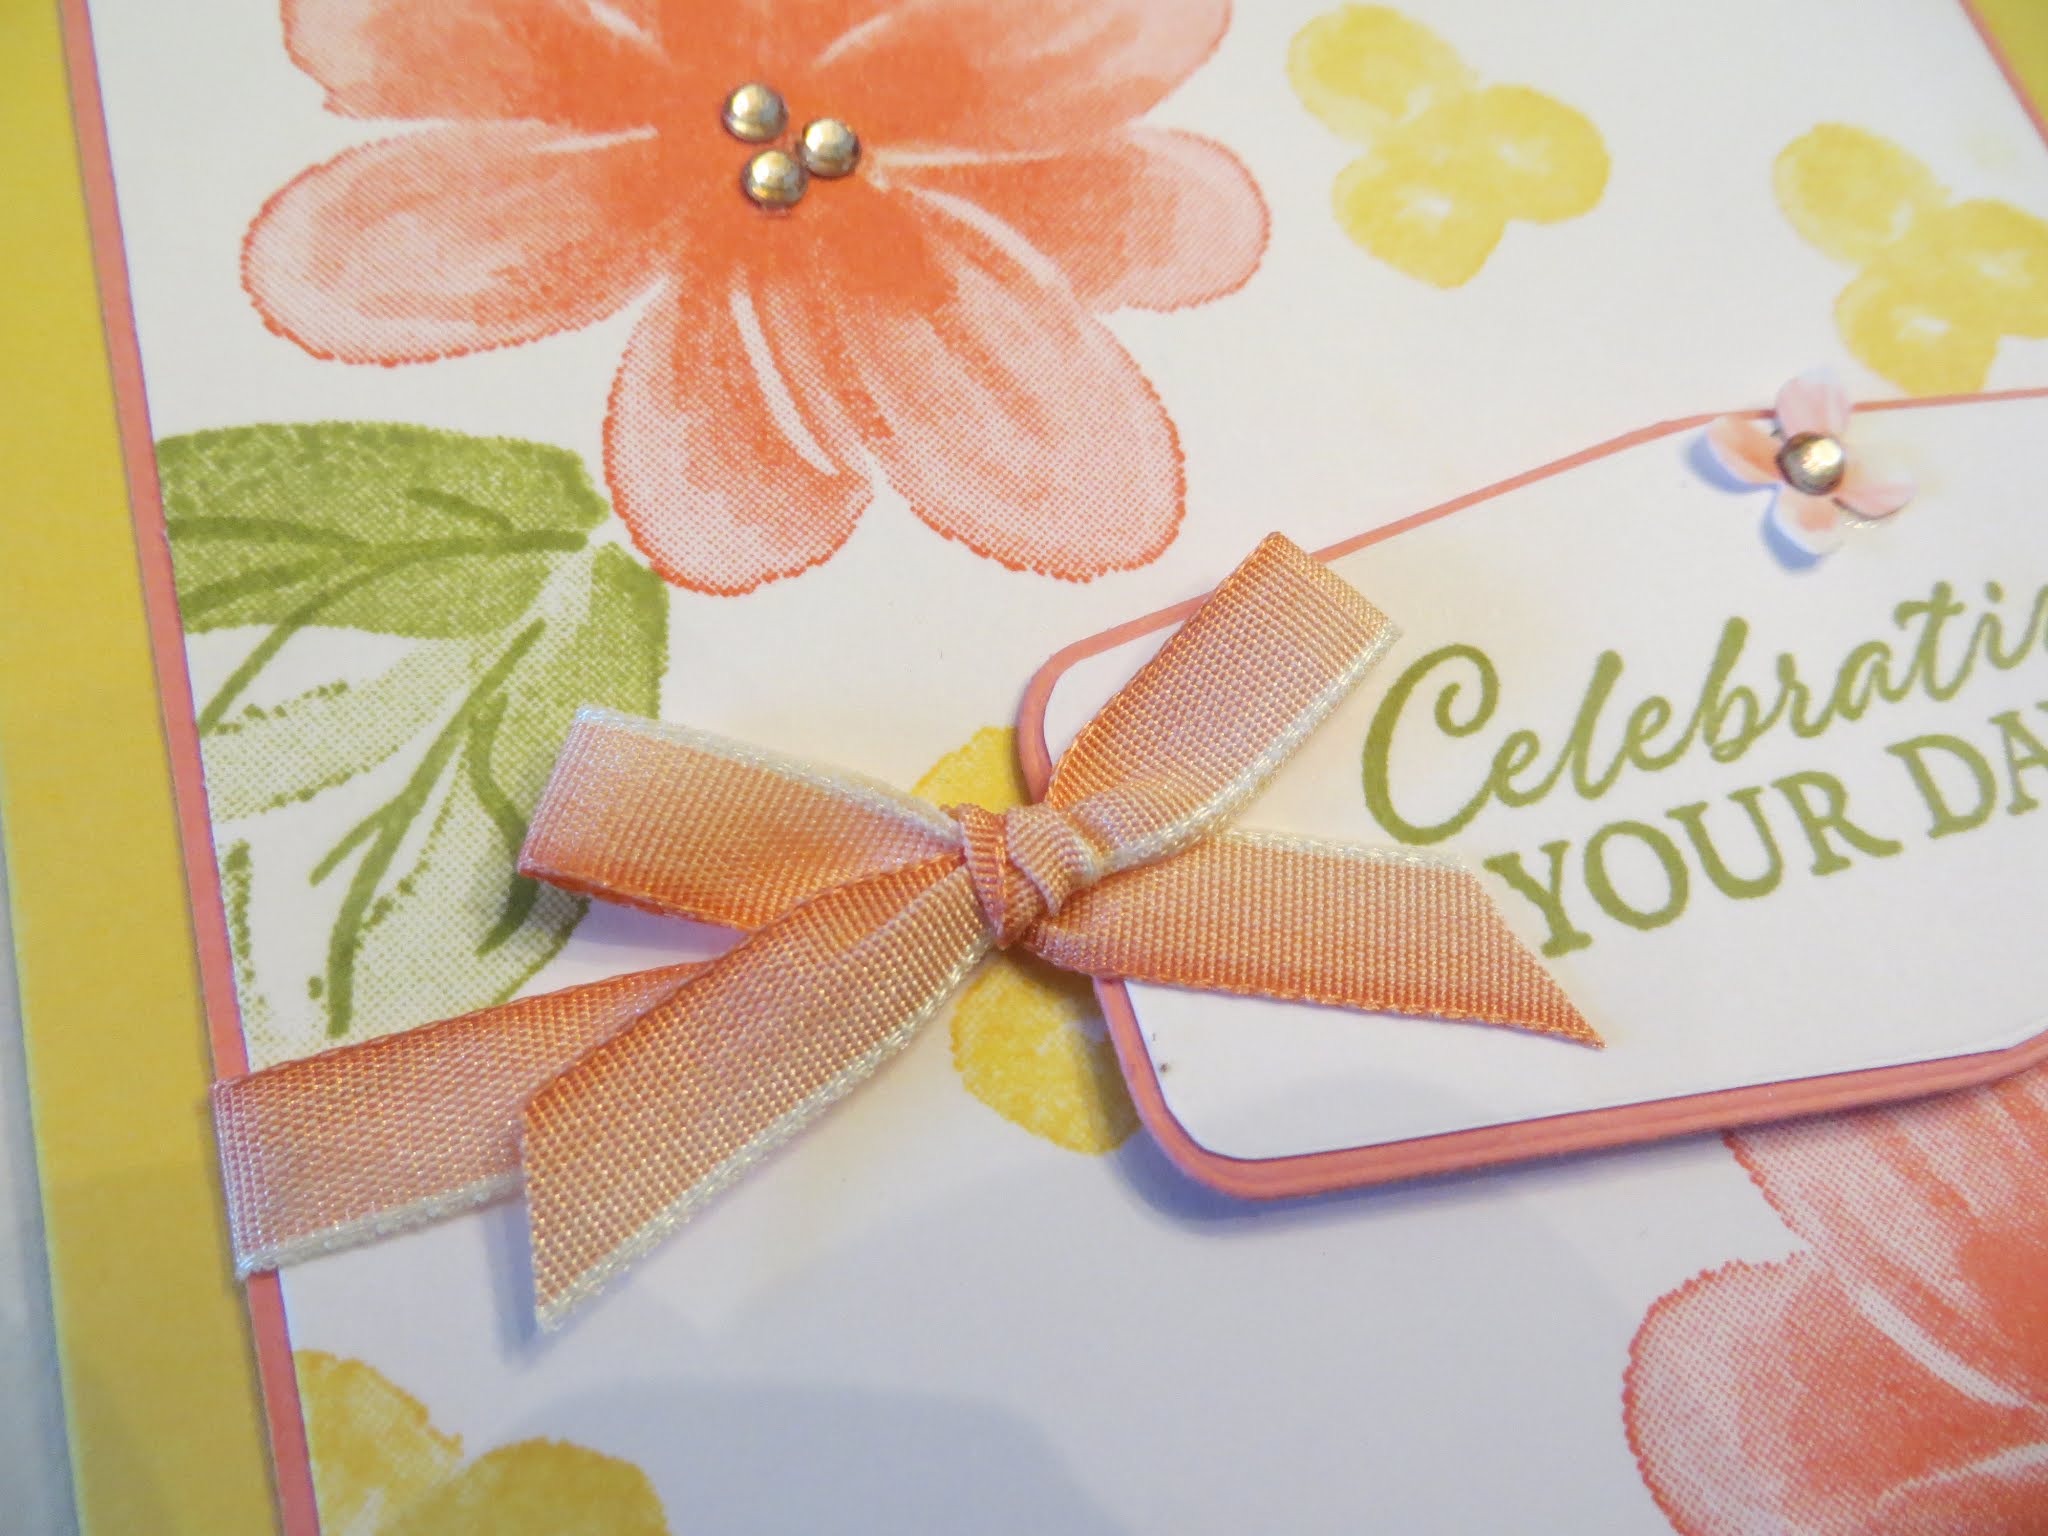
This one above here is mostly using the Designer paper and  ephemera that came with the kit.  I love the saying so stamped it in black and I did turn a ephemera around to use it as a blank because the print on it did not fit the card theme.
I did fussy cut the butterfly and the leaves because I don't like so much white border  and cut the word strips to make it seem more me. 
I stamped the bear on this one, the balloons and the banner from the set and cut it out.  Put the DSP down, then the big giant flower behind the frame.
Added the ephemera using dimensionals.
Thought I would send it off as a more masculine birthday card for someone.


the set comes with this 2 set flower die that I am absolutely in love with- yes yes- I did end the sentence in a preposition but this blog is primarily my thought in free form - so there!

I took the base card layered it with the soft green embossed with Greenery embossing folder from Stampin' Up again. Layered a black behind the saying ephemera then layered a few tickets with the sweet words and flower,  cut out the 2 layer flower and some leaves.  I used some watercolor - using flamingo reinker and using a aqua brush just smeared it around and it still looked fantastic - I thought- and it matched the butterfly - I did the same with the diecut leaves in whisper white, brushed some old olive diluted and made such a beautiful leaves with variegations that you don't get from diecutting from colored cardstock.
Even though it is just two layers it gives the most 3D flower look- amazing - whoever designed it at Spellbinders should pat themselves on the back!
I was not so sure of this card - seemed a bit muted but still a nice card. diecut leaves in white and water colored it with old olive diluted, layered the ephemera and butterfly as shown. Fussycut the word ephemera a bit.added the wonderful and amazing with dimensionals.  the sequins come with the kit but I did not use much of it. I am sure I'll find other places to use it.
 I had the hardest time with this one- I really liked the wreath but it looked unbalanced when I tried to put a big butterfly on it so I nixed that idea.

I embossed the Greenery embossing folder onto the soft green cardstock - as I explained before offset the die so it would cover both corners by embossing on an angle halfway.  All the ephemera come in pairs so I cannibalized one of them - it's hard to see but cut out the flowers and some of the leaves to add dimension to the first wreath and mounted with dimensionals. I stamped the sentiment from the same set onto and banner diecut - not sure who the manufacturer is since I have them all in a folder- but I think it is Lawnfawn (sorry if it is in error).

I added the other ephemera as shown and done.
I have a weakness for black and white stripes-
Love this one with the ephemera in the center with the number strip border.  I want more borders like this!  diecut flowers in white then used some diluted Soft Suede ink smeared around with the aqua brush to mimic the flower colors on the ephemera and this time used a more concentrated Old Olive ink on the leaves and I love the look. I did fussy cut the butterfly more and used a dimensional to mount it only in the center so you can pop out the wings a ibt more for a realistic look.  Did I tell you I love this flower and leaves die?  Yes I did.....

 My favorite card is above.  The designer paper is from Park Lane from Joann's - beautiful cardstock and great price- better if you use a coupon. Used the ephemera center, ticket and 3D butterfly- die cut the flower and leaves in whisper white and watercolored it - again just SMEARING the diluted ink refill onto the cardstock and the flower look totally 3D- Love the colors- I want to send this to my bestie Julia who is an optometrist- thought she would get a kick out of it.


Love this one to the left although I screwed up and put the number on the right thinking it was the fold but I had it upside down but it still worked out.
Placed a 3D butterfly on the designer paper- isn't it gorgeous? wish I had a few more sheets of that one. the sentiment and the words mounted with dimensionals and the leaves already in the kit I fussy cut more to removed the white border and mounted with dimensionals as well.
Last but not least- this is closest to the sample that came with the kit- base designer paper on the white card, layered the center ephemera on the brassy metal cardstock for that extra shine. THe 3 D butterfly and the Hey from the center of the wreath ephemera used above.  This time I diecut the flowers and did not touch it and diecut the leaves in Old Olive Cardstock and as you can see still absolutely gorgeous.  Layered the brassy smile for the sentiment and still love it.

It has everything you need for 10 most gorgeous cards ever and you are left with the stampset, diecuts and so much extra to make lots more. 

It's really a gorgeous set and on sale last time I checked .