Monday, November 14, 2011

A princess birthday card


One of my twins' friends were having a birthday party and I needed a card to hold the gift card so here it is. She is turning six and pink is her favorite color.

Base card is melon mambo with pink textured CS - with a layer of textured pink pirouette CS on top- then another layer of melon and whisper white stamped with Happiest Birthday Ever- hostess set- colored in with markers and embellished with crystal jewels.


This is the inside- I had another layer of pink pirouette that I cut little slits to make tabs that fold out to stand the little castle and the princess (not SU- Lizzie Anne Designs) colored in with markers and cut out.


This is how it looks from the side. I added a lot of crystal jewels on the dragon's wand and her crown to make it sparkle even more. I punched 2 little circles on the side of where I wante to slide inthe gift card then used my craft knife to cut an arch to slide in the card. I then taped the inside pink sheet well -be sure not to tape areas that need to be kept open- behind the gift card pocket and the fold outs for the pop ups.


Finally the detail on the princess.

May all you princess wishes come true. You know me, all boys- I really LOVE making girlie cards sometimes....


Lynda

Thursday, November 10, 2011

Spotlighting with Up Up & Away


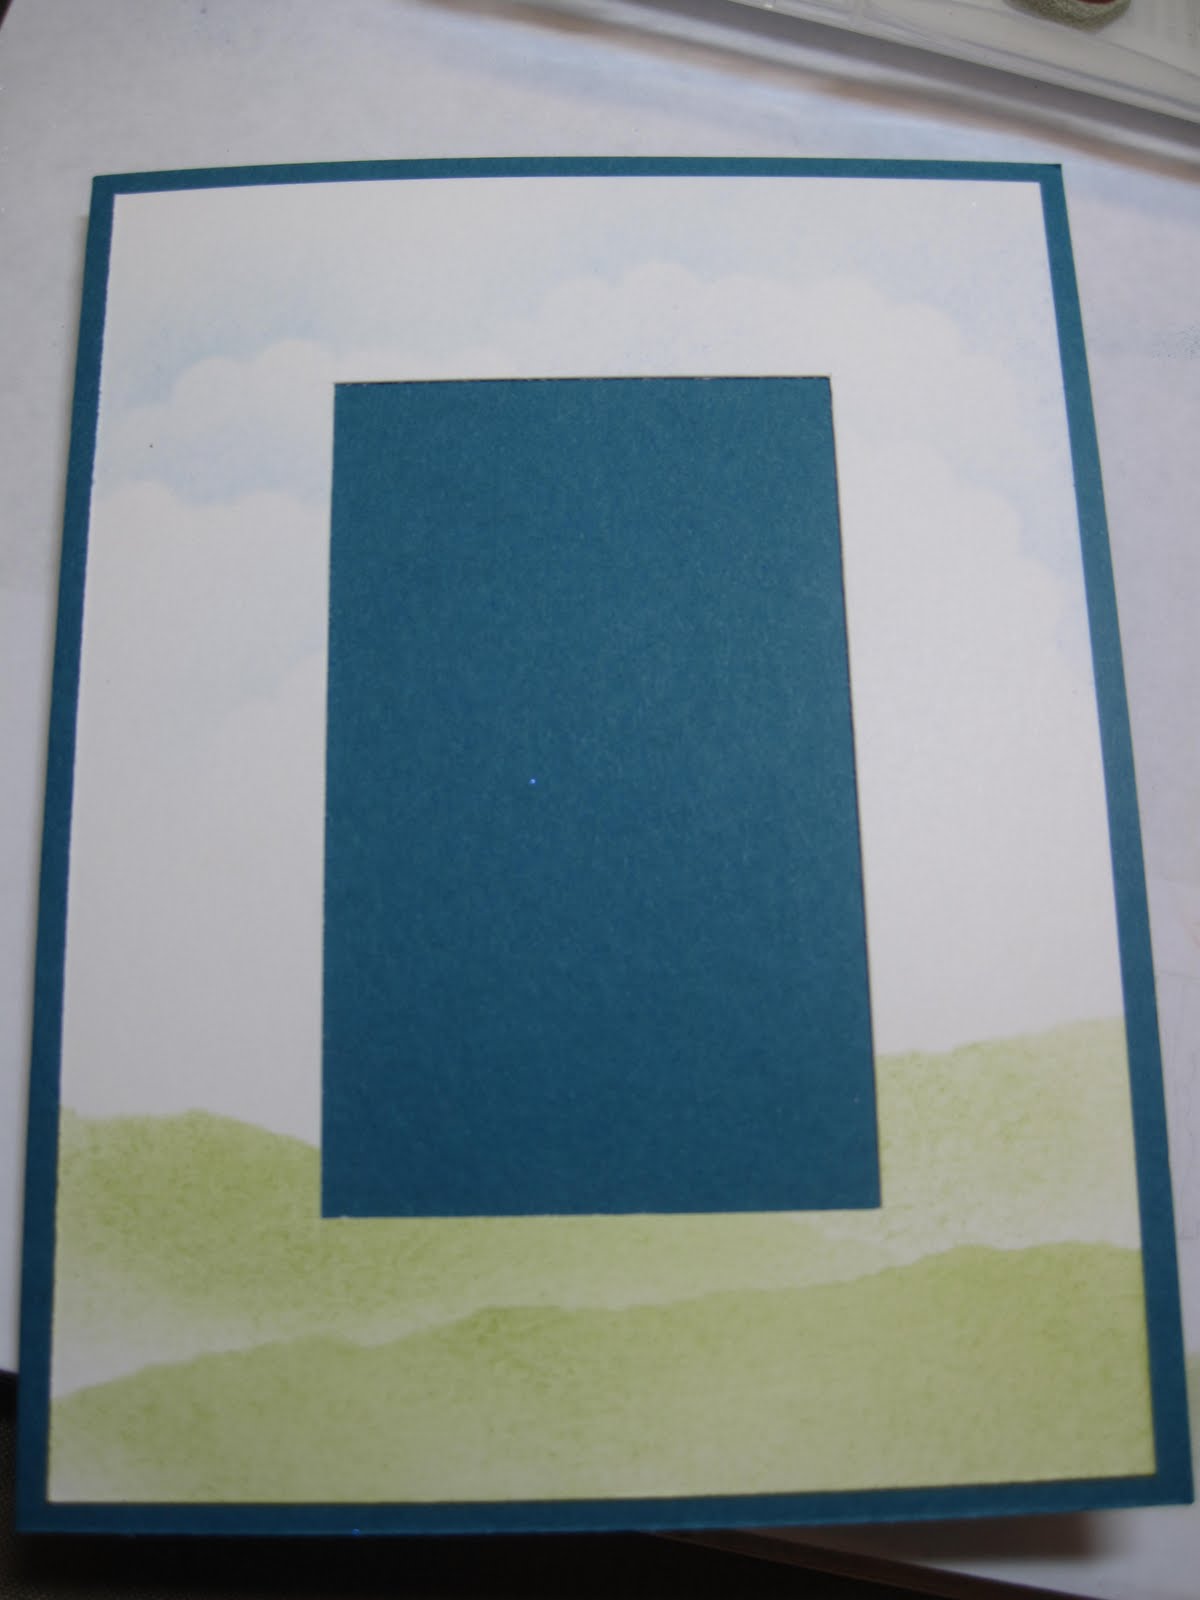
This is one of the cards I will be demonstrating tonight at my workshop. It is spotlighting in a bigger way. The base card is Island Indigo.
1. Take a piece of whisper white CS.
2. Sponge the sky using Bashful Blue classic pad and a sponge using a scallop circle -I put two taped together to make a more irregular shape that I like.
3. Sponge the ground using Lucky Limeade using a ripped piece of Cardstock. (Put the template on top and sponge below it)


4. Using the Cutter/scorer cut down one inch inside the border of the white piece as shown.


5. Stamp 3 balloons-

More mustard ink on Daffodil CS

Island Indigo onto Bashful Blue CS

Lucky Limeade onto whisper white CS.

Cut out the balloons and Sponge the edges- this is important to make it more 3D

6. Figure out where you want the balloons to be and stamp the basket below the area in black.

7. Stamp the sentiment in black

8. Add a crystal jewel on the O of the YOU to add a little something.

9. Stamp the bird in flight using Island Indigo on the outside panel.

10. Mount the balloons with dimensionals. then mount the whole inside panel with dimensionals.

Hope your day is uplifting!

Lynda


Thursday, October 27, 2011

a simple thank you


I love to make a little thank you cards but it needs to be relatively easy to make since I don't have a whole lot of time and this was it- Base card is melon mambo. white cardstock with sentiment from Lighthearted set (in the holiday mini) in Old Olive. I punched the 4 sided flower from the itty bitty shapes punch then cut the 2 sides out to make a smaller heart to fit with the red glimmer paper (don't you just love the sparkle? I want to make a Judy Garland Wizard of Oz shoe with them! I saw a template for the shoes on line someplace....)


Stamp the flower from Simply Soft (hostess set) in black then with pretty in pink with the coordinating flower stamp then used regal rose and melon mambo marker to quickly add a spot of accent color (same technique we used before - pointed out to me by Marisa, thanks!) then lucky limeade and olive for the leaves and really quick but sweet thank you cards that I hope they willl regift. (I usually put a white cs or a stampin up post it so the receiver can reuse it.)

Wednesday, October 26, 2011

CAS141 sketch challenge


My wednesday morning quickie version for the Splitcoast challenge for sketch here: http://www.splitcoaststampers.com/gallery/photo/2018072?cat=500&ppuser=9306 Base card is real red with white on top stamped with balloons and sentiment from Crazy for cupcakes, color the balloons in then take a small square of red stamped with dot dot dot with versamark then tied up with the daffodil 1/8 inch ribbon mounted with dimensionals. Really simple card but I thought sweet.


Lynda

Tuesday, October 25, 2011

Jungle thank you


I needed a thank you card for the my two monkeys to send out and
searched through all my monkey stamps (and believe me I have quite a collection) but decided the SU ones really had the best expression so here it is.


The base card is whisper white with poppy red layer stamped with versamark using animal stripe stamp from Cornish Heritage Farms that I got before they closed- with sentiment from A note of thanks - a simply sent kit -retired - layered with chocolate chip then white - stamped the monkey twice using chocolate chip - stamped the bellies with simple alphabet from PTI and the branch from the Bird Builder punch.


Super easy card- I wanted a "swingin' by to say HI" or THANKS or something like that but couldn't find an appropriate sentiment- I'll just have to keep looking for next time.....


Lynda

Monday, October 24, 2011

Jungle Party Favors


My twins wanted to have their party at the Jungle- a indoor playground of mazes and tunnels- I asked them what kind of theme they wanted and I expected Lego or pirate or something but not no response instead- so I decided to just go with the name- the Jungle- I had these grass strip dies from Sizzix- which I initially complained had blades that were too tall but worked out better for the jungle feeling. The animal diecuts are from Spellbinders that I got years ago on sale that I diecut with close to cocoa CS (retired, sadly) and embossed and colored in with chocolate chip die ink for the animals- Zebra was black on whisper white CS.

I diecut fancy favor boxes in real red, stamped the sentiment from Friendly Phrases set, stamped my kids' names with simple alphabet from PTI, assembled the box, wrapped the grass and used dimensionals to attach the animal diecuts, then added a chocolate chip textured CS strip with brads for handles. Filled them with jungle theme pencils, erasers, bracelets, a packet of tropical flavored starburst and a Lego minifigure- one of which was a zookeeper with a gorilla and a banana- very apropos.


Lynda


Sunday, October 23, 2011

Altered milk carton


Halloween is a-coming! A little project I had at my workshop last month using the milk carton die- to make a hexagon box. Diecut 2 milkcartons with 3 panels from the side of and including the connecting tab. Tape the 2 panels together on just one side so that is still lays flat. Wheel the image (or stamp and decorate as you wish) while it is flat. Here I used the Haunting Hill jumbo wheel - it goes aroung once over the 5 panels and the last panel starts to repeat the image so that's where I put the large tag punched out in black with the cat from Batty for you set punched out with 1 1/4" circle punch layered over 1 3/8" old olive circle. Score the triangle on top that is not scored automatically by the die. It is important to make the score symmetrical. (Once you assemble the box whether the triangle goes to the way top or to the score line below is not noticeable.) Then assemble the box . You may need to cut the bottom panels to about 1 1/2 inches so they will tape together. then punch holes into the top panel on either side of the triangle and run ribbon through.


Hardest part was runnning the ribbon through!


Lynda


Saturday, October 22, 2011

Life keeps getting in the way of my stampin!


Every day I wake up, do some work, feed my kids, get them to school, go to work, get home, make dinner, wash dishes, fold laundry, try to get the kids to do homework and piano practice, read them to bed and do some more work and the cycle starts all over again- don't you just love the glamorous life of a doctor? - Once a month on a friday night, I have a workshop that I just love but posting on my blog and Stamping in general just took the backseat to everyday life.
I got an email from Mary R whose words of concern really touched me and let me know that this is a community from which I had fallen out. I really needed her words to kick me back into the reality I want to make for myself - I know I am happier when I am being creative and that reflects on how I deal with everything else so thank you Mary from the bottom of my heart!

This is a little something I had for my workshop this month inspired by the owl I cased from Michelle Suit from Stampin connections- Demo only website from SU.
1. Diecut Fancy Favor box from 1/2 sheet 12x12 black cardstock
2. Stamp happy halloween from teeny tiny wishes set in versamark (white craft works too) and heat emboss using the Tangering Tango embossing powder.
3. punch out 2 1/2 inch circle in daffodil and stamp the branch from Out on a limb (the cute set with the little witch in the holiday mini) in black. Punch an owl and a large oval from black cardstock. Cut the oval in half and then holding the cut side, slide the half oval into a 1 1/4 circle punch from the punch opening to get the nice rounded edge. Hope this makes sense to you.
4. Sponge the edge of owl and wings with white craft and make the face with white gelpen and add white eyeballs and black pupils.
5. I cut 3/4 inch strips of tangering tango textured CS and attached it with brads to secure.

It is a easy and darling project that my class (and kids) loved!
Enjoy!

Lynda

Friday, September 23, 2011

A monochromatic GIve thanks


I wanted to make a card to show my appreciation - something different, not too hard to make- I saw an envelope in the mini with the wreath from Bright Hopes set that I thought looked more graphic and not so christmas-y -is that a word?


The base is crumbcake with a layer of whisper white with right upper corner rounded- just adds a tiny bit more interest in that corner doesn't it? I initially stamped the wreaths in versamark but when I tried to stamp the sentiment, the embossing powder stuck all over it - so I just did it in Sahara Sand onto Sahara Sand Cardstock 3 times as shown then used embossing buddy to make sure everything was dry then Hand Stamped Sentiment- don't you just love the beautiful penmenship? using versamark and heat embossed it after sprinkling pewter EP- It is really subtley beautiful- not so blatant as silver - LOVE IT! I tried to add a white ribbon but it seemed to ruin the effect so I left it out. Round the corner and voila- I thought it would make a beautiful wedding card if I had the right sentiment in the same style- hear that Stampin up?


Happy Friday!

Saturday, September 10, 2011

On the Grow


Just a little project we worked on last month at my workshop. Scooter image from On the Grow- from the Stampin Up summer mini- stamped with staz-On and colored in with markers. Layered it onto pacific blue CS then onto Melon mambo. The strips of DSP is Beyond the Garden. The flower was punched using Blossom Bouquet triple layer punch with daffodil, melon and the leaves were made by folding it in half and running it through the crimper.
Accent with a crystal jewel center to add a little sparkle.