Friday, May 31, 2013

New Catalogue Launch with a great sale on Greeting stampsets

 The New Stampin Up catalogue is ready for orders starting TODAY and to top it off they are offering a really super deals on some greeting sets that I have been eyeing- and at these prices, I am ordering ALL THREE!  So Get them while they are HOT!
 Click on the catalog photo on the right to peruse the catalog and shop anytime...


Grab Your Greetings Promotion


Sale: 25 percent off three of our greeting sets!
Dates: May 31-June 30, 2013
Sale Price Retail Price Description Item
$17.96 $23.95 Sassy Salutations Wood-Mount Stamp Set 132070
$13.46 $17.95 Sassy Salutations Clear-Mount Stamp Set 126707
$14.96 $19.95 Sweet Essentials Wood-Mount Stamp Set 132085
$11.21 $14.95 Sweet Essentials Clear-Mount Stamp Set 126457
$21.71 $28.95 Petite Pairs Wood-Mount Stamp Set 128706
$15.71 $20.95 Petite Pairs Clear-Mount Stamp Set 122497

By the Tide

I can't resist  beautiful seashells and the lobster and the coral is so gorgeous- I knew I could use it for so many different applications I had to have this. The base card is primrose petal with images stamped in summer starfruit, primrose, crumbcake and bashful blue to add more subtle colors.  Diecut white CS with apothecary accents and then use the outline of the die to pencil in the semicircle and handcut - perfect each time. Stamp you;re from Oh, Hello set and Wondeful from Loving thoughts.  I am normally using Evite or some such for invitations so stamped You're invited gets very little use anymore- Now you can use at the top half for Lots of things- You're Cool, Hot, Dynamite, Greatest, lots of Cool Font words to use with it.  I punched the hole through the tag and the base card and tied the ribbon just half way which saves some ribbon as well.  enjoy!

Sunday, May 26, 2013

Paper Pumpkin- Hey There Try It Kit Variations

 Ever since I signed up with Paper Pumpkin- the monthly paper craft club delivered to your door- I have been patiently waiting for the box.

 The first box everyone starts with is this Hey There Try It Kit.  It comes with a clear D block- $8.50 value alone- 2 clingmount stamps- The sentiment and the distressing splotchies, 4 basic grey cardbase, 4 sheets of precut DSP to layer and a sheet of adhesive diecut elements enough to make 4 cards, 4 white envelopes and 4 turquoise buttons, and a Basic Grey Stampin' Spot pad. All in all not a bad deal and I love the surprise element of it.

The kit comes with enough supplies to make four of the card shown on the left but you know me- Variety is the spice of life! and I had to use the supplies to make something different. 
I did make a rule for myself that I was going to try and only use the  supplies it came with- I did however use some tools I had on hand to spice it up a bit and 2 sheets of So Saffron Cardstock to make 4 extra cardbases.

This card was made with the So Saffron base. I cut the Basic Grey Cardstock and the DSP to put on top of the So Saffron base.  I put a dot where I thought the center of the green starburst would be with a pencil and then punched it to make a ring to put through the ribbon and embossed the Basic Grey CS with honeycomb to make variation #1.
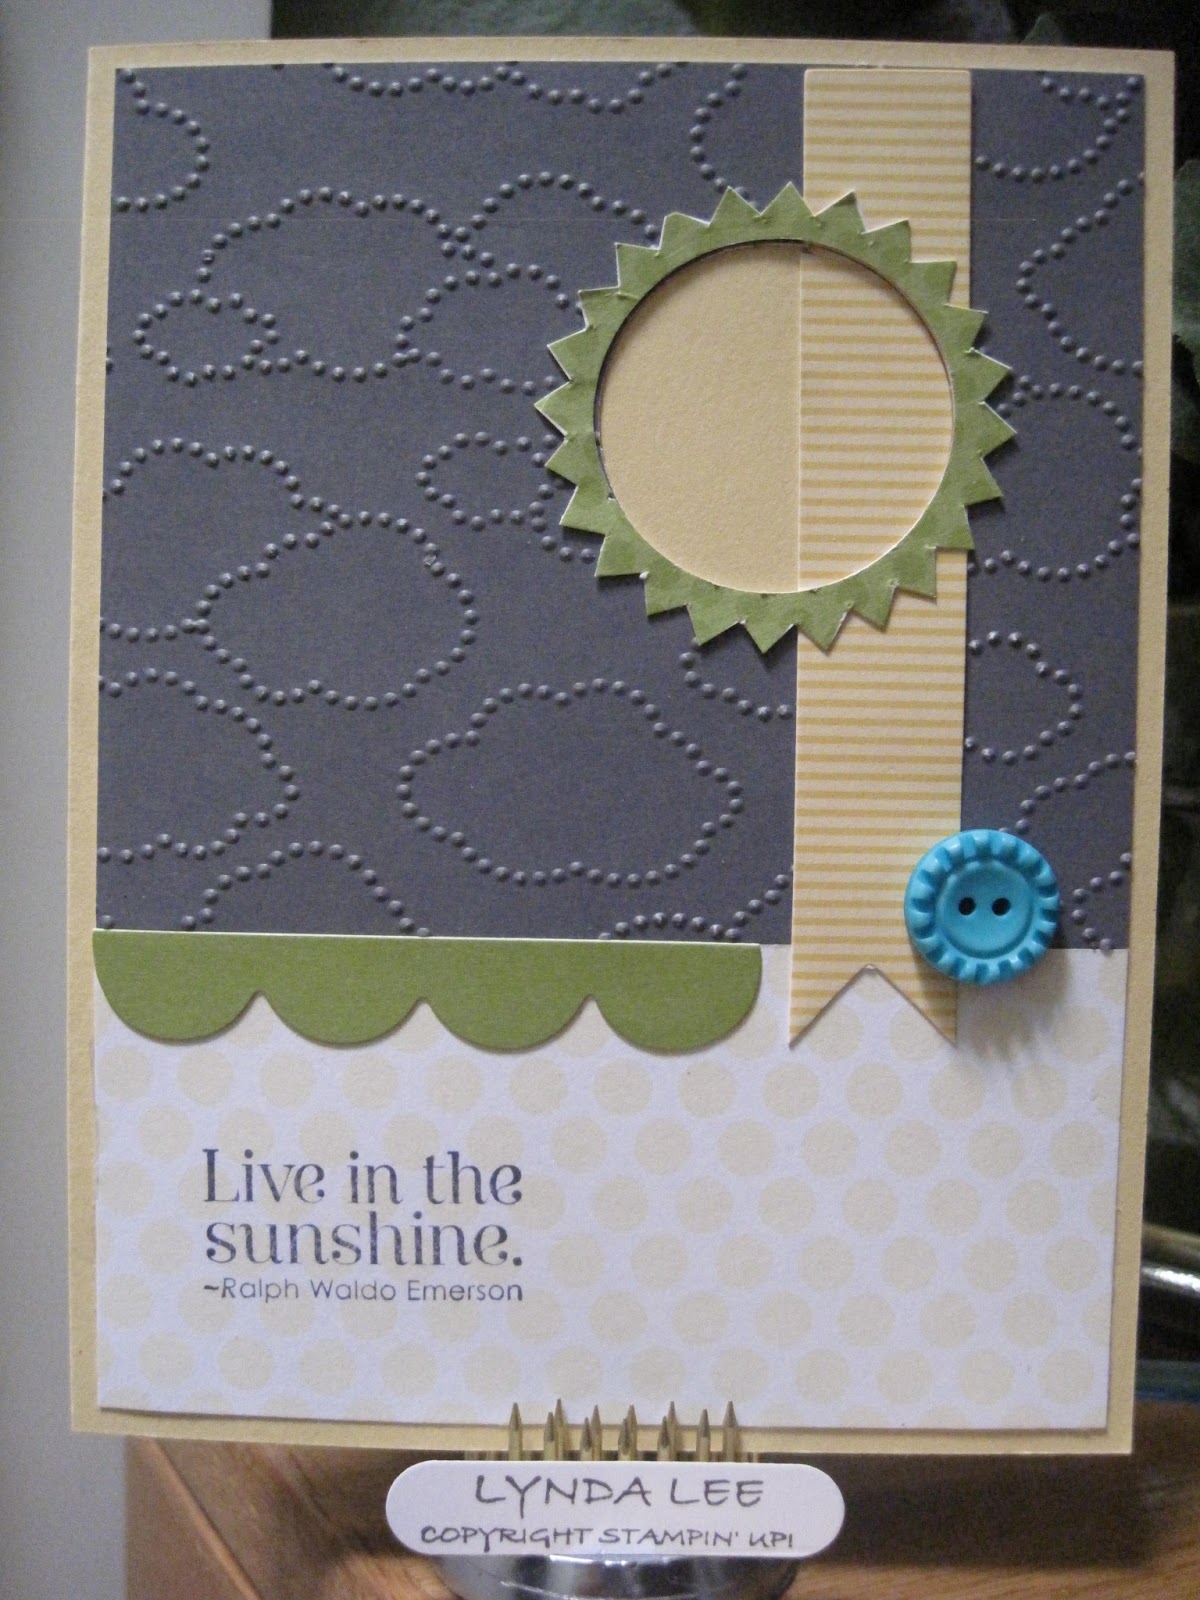
 I was looking at the left over piece after I removed the center green starburst and it looked like the radius of the sun.  I took the Basic Grey and DSP I had left over from the above card and punched a circle from the basic grey piece to show the so saffron color below that looked like the sun. I embossed it with cloudy day.  I  layered the yellow banner.  I used the same circle punch to get rid of the center jagged edge before peeling the back and sticking it over the circle.  Add the green scallop and the button.  Stamp the sentiment- from the Pursuit of Happiness set - one of my favorites!- soon to retire -in Basic Grey to finish the variation #2.
This is the one I thought was closest to the original.  When I trimmed the one Basic Grey Basecard to layer over the so saffron cardbase, I had to trim 1/4 inch from each side to fit so I used it as an extra layer.   This time I cut the outside zigzag  circle to add some interest.  Took very little time with my extra sharp paper snips.
  This is variation #4.  The left over pieces from here are used for cards #6 and #7.
Stamp the splotches and the sentiment in basic grey.  Use a butterfly punch to punch out the yellow DSP right behind the green circle- it will hide it.
The basic grey CS is embossed with honeycomb EF and sanded to add some distress and show some white beneath. Add a strip of yellow band- left over from outside the banner. Adhere the green medallion, then butterfly with taper just down the center.  Add a small basic jewel to accent.
 Before I unstuck the medallion from the backing, I put a little dot in the center to figure out where I wanted to punch the butterfly.  I added the splotches, and sentiment as shown, added the green scallops and strip of left over strip from the banner as shown, add the button.
I used a brush and cornstarch to make the wings not sticky as more but left the center sticky so it would add some dimension.  Add a small jewel and variation #5.
 I cut the 3 inch piece of DSP left over from card #4 into 1" strips before adding the rest of the embellishments and stamping.
This is the most hodgepodge of them all.  I was just trying to figure out how I was going to make a card from the left over pieces.  I had centered the medallion in the first card using a pencil, then punched it with the little flower first, then a circle, then the small scallop before peeling it to make these pieces.
I stamped the sentiment from a Round Array in Basic Grey onto the DSP and put the scallop around it to fit.  Added strips left over from the banner around the center panel, added the scallop and used the left over circle of Basic Grey CS from card #2 to make the sun- and punched out the little butterfly again adn left over pieces of grey to make the stems.  Add some jewels and layer over so saffron card with left over piece of basic grey - embossed together.

Limiting your supplies really forces your creative juices and I thought it was really fun!
Enjoy!

Lynda

Sunday, May 19, 2013

Dress Up Birthday

This was a make and take we did a few months back- I just didn't get a chance to post it- It is so much easier than it looks.  I took 1" strips of Summer Smooches DSP and used the Dotted Scallop ribbon punch and cut them in half down the middle to make the scallop to mimic frosting.

I put sticky strips on the mannekin part of the diecut to adhere the cake layers.  It is important to overlap the layers a bit so that the top does not stick too far up above the diecut- otherwise it may stick out of the card when you close it.

The cover is self explanatory. Quarter sheet of Only Orange CS scored at 1" embossed with polka dot and layered as shown.
The candles are stamped with versamark onto the same color cardstock as the pop n cut basecard so it "disappears" into the background.
You could use alcohol ink or orange sharpie to color in the flames to make it even more realistic.  I've made a bunch of these for birthdays this season.  My kids just love it and it is easy to slide some money behind the stand or a gift card behind the cake. I also stamped the flag banner using the clear stamps and stamped name behind the cake for some. 

Looks complicated but not.

Friday, May 17, 2013

Secret garden with Beyond

This was another make and take for my class using some retired sets. THe base card is Daffodil delight with a layer of whisper white stamped with retiring Beyond plaid using daffodil as well. I stamped the flower from Secret Garden with versamark and embossed it using white EP onto Shimmering white CS then used Aqua brush to brush on the water and used the Rose Red ink pad lid to pick up some color to add shadow as shown.  Diecut two leaves with secret garden with Wild Wasabi CS. Sentiment is one of my favorites- Friendly Verses- also retiring- this is a big BOOHOO! - in black. A clean and simple card.
Lynda

Thursday, May 16, 2013

Buttons and Blossoms Simply Pressed Clay molded flowers


When I saw these on the sneak peek I knew I had to have them. I have been playing with fimo and other clays for years but the molds were not that pretty but these were wow!  I was inspired by a sample from Stampin' Success, a demo only magazine.  The base is a new In-color called Baked Brown Sugar. I embossed it with Needlepoint border folder twice. I laid down a diecut Delicate Doilies that I pierced. I wanted to use DSP but did not have the new gingham paper so I used the new Gingham wheel in Strawberry Slush and I think it is so pretty.
The flowers were SO EASY!  I took the package of paper clay and divided it into chunks and added some refill colors- daffodil , pool party and it is the exact color when it dries.  Start with just a couple of drops and decide how saturated you want it.  I forgot to get Strawberry Slush refill so I used Melon Mambo instead and OMG it was dayglow pink - so fluorescent I could not use it next to the other two.  So I added some real red and it did tone it down a bit.  So heed my warning- try a little sample first to see what you think before you mix the whole batch!  Keep it dry in the sealed bag or tupperware.  You need tiny bits of clay to make the flowers- my son counted 350 out of one bag which is not bad at all.  I put the flowers in the mold into the freezer for 5-7 minutes then you can pop them out without distorting them and then let them dry over night for perfect flowers.  I made gazillion of them while watching a movie- I had a big tray and I would pop them out, put new ones in, put them back in the freezer blah blah blah.   The banner is a new hostess set called Banner Greetings stamped with Coastal Cabana.  Funny but it would not stamp well on the whisper white so I had to use a different white cardstock.  I had heard there was some quality control issues but it was weird.  I stuck the flowers with multimono and oh so pretty!  This was easy enough to make for my make and take this month.  I will be ordering more paper clay to make more of these!

FYI- the paperclay molds come in  a set of two - one with 3 flowers as shown and another with 3 different buttons- available after May 31st- check out my online store for all the new goodies!
Enjoy!
Lynda

Wednesday, May 15, 2013

Retiring stamp challenge with Elements of Style and Pursuit of Happiness

I find it easier to answer to a challenge than to come up with a brand spanking card idea myself- this week's sketch and color challenge from splitcoast was a good one for me so I thought I would use it to come up with this card- Elements of Style is one of my favorite sets with this beautiful flower that I love to use for backgrounds- I love to have it cascading down from the top of a card with a little Asian girl below it for example.

The color challenge was for bermuda bay, certainly celery and regal rose. The celery and Regal Rose is retiring and I could not get refill inks before it disappeared sadly-  I used a white basecard and stamped the sentiment from Pursuit of Happiness using Bermuda and Regal Rose markers.  I stamped the image in Memento black and colored it in with celery, pink pirouette and then regal rose markers. It was layered with bermuda bay and then celery.  I stamped another scrap piece of white with the flowers and cut some of them out and added them with dimensionals to add some dimension and a clean and simple card.

Enjoy.
Lynda

Thursday, May 2, 2013

This and That - my version

I spent the whole morning playing with my This and That book and my Epic day kit.  The papers are gorgeous and I wanted to cover the whole front so I drew a line and where the holes were and just glued it in place with the lovely blue DSP with all those lovely saying on it.  I did want to use some left flower over from Artisan embellishments kit and the metal frame to frame the word creative on the DSP but it was a tad small so I put the sticker "for the record" inside and put the ribbons, flowers and pearl .  I just love it.   The DSp is gorge! and the stickers are really fun! I just got the package because you get a deal on it and all the coordinating products made it really easy to put it together.

I took some 5 1/2 x 4 inch sheets from several different papers and folded 1/4 inch on 3 of the sides to make a pocket to fit inside some of the pages. I wanted to make 12 pockets for each month of the year- to add receipts for that month- but it could hold cards for the birthdays on that month etc.  You get the idea.
I used round tab punch to punch out labels using the same blue DSP as the front cover that was left over and added the number stickers to make it easier to flip to what I wanted.
I added some punched butterflies, stickers etc to decorate some of the pockets and pages.
I added little round circles using brads and linen thread to make closures for the 2 envies that came with the book. I thought  I could store postage stamps and address labels.

I had so much fun playing with this I hope you do too.