Wednesday, May 30, 2012

My tulip- Lily of the Valley

My favorite flower is Lily of the Valley.  The house I grew up in Ohio had fields of it that my mom planted that just smelled amazing and the delicate little flowers were so beautiful.  When my parents sold their house I had only one wish. I wanted a few pips of the flowers so that I could grow it myself.  My mom packed the pips in wet newspaper and hand carried it to me 7 years and ago and I planted it in a pot and now it packs the pot and I get a handful of stems with the fragrant flowers just for a few weeks every year and I just love it.
 It brings back the memory of that old house with the pink and red flower wallpaper in the bedroom and you can't do anything but smile.
I have been looking for a die that would make this but could not find one until I saw this tulip and thought it could work so I tried it and think it does.  What do you think?  Base is lucky limeade with a flower from Mixed bunch stamped on it with craft white ( I had it left over from another project but I thought it still worked.  Stamped the sentiment (Full of Life- retired)  in black. The flowers just looked very dramatic with the black background so I kept it but did the tulip EF around it to frame it a bit then layered it with white before layering on to the base card.  I could add some more flowers but ran out of time. oh well.


Tuesday, May 29, 2012

Betsy's Blossoms CAS

You know you have a vision of what you're gonna make and it just doesn't work out?  This is one of those cards.  I loved the color combo from Splitcoast Color Challenge CC377 was for Blushing Bride (so sad that it is retiring) and celery and soft suede. I also wanted to do the LOVE challenge CAS172 but I had envisioned Two birds in mirror images but when I tried the mirror image technique it just did not look sharp enough to be a true mirror no matter what I used- mirror stamp, acetate so this is the revised version of it.
Base is soft suede with a layer of celery and whisper white.  I stamped the stem from Language of Friendship that I got from Sale-a-brationin limeade then stamped the bird from Betsy's blossoms in blushing bride.  I stamped the bird twice more on a scrap piece of whie and cut it out. Stamped the Big flower from Betsy's blossom and punched it out with the heart punch and stamped it with the leaf on it as well to look like the bird was carrying the leaf in its beak. 
Layer the crumbcake seambinding ribbon as shown. then the heart using dimensionals to line up with the leaf already stamped.  then the bird and the wing using dimensionals. Stamp love from Tiny tags with soft suede and punch it out with a jewerly tag punch.  Mount it with dimensional and put a dot with the limeade marker where the hole would have been for it to attach to the stem.    It was more complicated than I envisioned.  Oh, well, it has been that kind of a week. 

Saturday, May 19, 2012

A simple thanks

 The new Stampin Up colors are growing on me.  As a demonstrator I was able to get some new preview stampsets from the new catalogue before every one else but I really want the new butterfly set and punch but I will have to be patient like everyone else until June 1st to order it.  We have been in serious need of a good butterfly.   Thankfully the Papaya Collage Set has a darling butterfly with a center that has been left open that I just adore and perfect for embellishing. 
So for my friends who placed an order this month will get this simple hand stamped thank you in their bag. 

It uses all the new colors 2012-2014 ( the new foam pads are amazing- so juicy with an even center so no tapping gazillion times to get really well inked!)  with rhinestone jewels in center- it looked great with just one but I thought it looked better with 2 each - with 150 per pack you can really go crazy with those.  Pretty with pearls too. 
The thank you is form the Everyday wishes set that matched with the simply sent kits.  I am so sad because it is the same font as the Friendly Phrases set that I adore and I use this all the time for my thank you but this one is retiring end of this month- I reckon I will keep this little gem for my own use. 

This idea is really simple.  Take any stamp you like and repeat it multiple times using different color stamppad and you can get myriad of different cards with the same idea.  Easy make and take and demo card

Thursday, May 17, 2012

Baby Bundle bib variations

 I have gotten a few requests for baby cards but since I often don't know whether it is for a boy or girl, I like to give people options.  So when I was coming up with this card, I chose yellow (of course) as a neutral to play off the pink or the blue colors. 
Super easy and people seemed to really like it at my make and take.

Take So Saffron base card.  Take a whisper white CS and stamp congratulations on it from Friendly phrases.  Punch out the white circle ( 1 3/8) from the part that will be hidden behind the colored squares. Stamp the duck from Baby bundle on the bottom of the circle. Color the duck with so saffron watercolor crayon directly onto the paper.  color the beak with pumpkin marker.  Take either the Pink pirouette or Bashful blue and punch the little scallop circle from the part that will be hidden.  
 Layer the stamped white circle onto the colored scallop. Then using 3/4 inch cicle punch, cut out what would be neck of the bib.  Used a paper piercer to make 2 little holes ( I tried a whole bunch of ribbons and threads, and none of it worked.  This gave the Impression of the a tie without actually having a tie, and it was even more simple!)

Use dimensionals to attach the bib.  Layer the So Saffron DSP onto your color choice cardstock then use dimenstionals again to raise the colored cardstock on top of the whisper white.
details of the bib.  So simple, so super easy and still so CUTE!

I thought it would be really cute gift to make a bunch of these with Thanks so much stamped on it from Every Wishes Simply Sent with the similar font style  to give to an expected mother so she would have a bunch of cute thank you's she can send out for the gifts whe may have gotten. 

Tie it with a sweet color coordinated ribbon and easy peasy cards that I am sure she will appreciate!

Wednesday, May 16, 2012

Papaya Collage

 Some birds on some stampsets freak me out but some I don't mind so much and this one from the new Papaya Collage set is one of the latter.  Splitcoast challenge for color was pumpkin, Night of Navy and bashful blue and I thought of the Travel Journal DSP that I was hoarding from several seasons ago. I have promised myself not to be afraid to use some of my stash so here it is.  The sketch challenge for today was really amazing adn WT374 was to use birds so here is my triple challenge card.  Basecard is very vanilla with a layer of bashful with the travel journal DSP on top with rounded corners.

 I punched 1/8 inch holes to thread the 1/8 in navy taffeta ribbon and tied a knot.
Then I stamped the frame in navy, made another for masking and used the opening in the mask to stamp the bird in navy too and then masked the bird to stamp the leaves.  I stamped the leaves in limeade then did rock and roll around it with pumpkin to give it a fall feeling.  I thought it added additional depth. The whole thing was mounted on navy then pumpkin then I stamped the butterfly in pumpkin then edged it with the navy marker.  Cut the butterfly out and add little pearls to the
center as shown.

Happy Hump Day!
Lynda

Monday, May 14, 2012

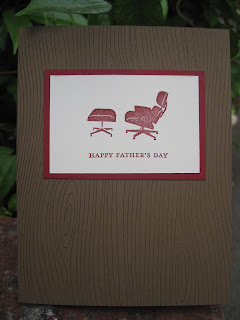
My obsession with chairs

 I have a giant poster that I have in my workroom that I have had since I was in residency (over 25 years now!)  of the chairs in Vitra Design Museum collection that I still love.  I have a limited collection stampset of Eames chairs that I HAD to have and of course when SU came out with Have a Seat set I had to have it too.  It's an obsession I can't explain and I don't even try to make excuses any more.  I love it, I want it, I'm gonna get it.   I am not much of a jewerly or fancy clothes kind of gal. So - what else can give me so much joy for only 11.95?  It's cheaper than 5 minutes of psychiatric help and I will have it forever...

I used it for this card that we made at my stamping party this weekend.  I got a lot of request for more 'manly' cards so I had to use my woodgrain background.  Very simple.  I got color combo from the color coach.  Soft suede base stamped with woodgrain using expresso pad.  Used Cherry Cobbler ink to stamp the chairs and sentiment.  lined with another cherry behind the very vanilla CS.
  
The thank you was stamped then punched out with word window punch then wrapped with linen thread to add some interest then glued down then snipped off to line it up.
I made the card stock big enough for people to choose what image they wanted to use.  Tool time is going away as well so this was an option I had people use.
This is one of my Eames Chair stamps in Cherry Cobbler with sentiment from Teeny Tiny wishes.  I thought it would be perfect for my father in law who has this EXACT chair in his study.
Another stamp from the same set with sentiment from Teeny Tiny wishes.  Don't they just go perfectly together?    Very clean and simple and you can rip out a dozen of these with different images and sentiment in no time.  and think what a lovely gift set it would make, eh?
Hugs to you all, Lynda

Sunday, May 13, 2012

Under the Big Top- Celebrate

There are some stamps that I just can't resist- sewing stamps, furniture stamps and circus stamps.  I don't know why but I swear I have every sewing body mannequin stamp and die manufactured.  So when SU came out with Under the Big Top and Big Top Birthday DSP I had to have it.  I just love it- I think it is the little kid in me and fascination with all the amazing things that go on and things the human body is capable of- Love Circ de Soleil, Pickle family circus, need I go on?

I was sad to hear that this cute little set was retiring so I had to make a card with it to show people what a cute set it is....   The color combo came from the DSP itself (as usual- the thinking has been done FOR you!)  Take a base of whisper white.  Add the 2" strip of Big Top Birthday DSP on top. Take 2" wide real red CS and run it through the stripe EF. Because I wanted the stripes to go up and down in this orientation, I had to run it through twice but because the stripes line up so easy, was no big deal even at my workshop.  Run tempting turquoise and shimmer white through the framelit die to fit your image.  I then stamped the elephant and colored him with watercolor crayon in sahara sand and used markers, daffodil, turquoise and real red to color in the rest.  I had separated the words from the image and used a black marker to stamp just the 'celebrate' from the words and used a 1 1/4" circle punch to punch it out and then tuck it under the yellow scallop edge.   Mount  the framelit die cuts with dimensionals to raise it up.  I will probably have to wait couple of years for the next set of clown stamps, oh well.  They seem to come out with one every 2-3 years. I have the old Clowining Around set that I unmounted now in the same stamp case. 
I thought this would make such a fun birthday or any fun occasion card for any young boy or man.  Enjoy!

Lynda

Thursday, May 10, 2012

Everything Eleanor Masked


A project for my stamping party this month.  It's about getting back to basics-remember  Masking?  Base card is Wisteria with middle size flower from Everything Eleanor stamped in Wisteria.  Mask it using  post it note and stamp words from Daring Adventure over it . 
Take whisper white CS and stamp the flowers in Wisteria and the label in pool party.  Mask the flowers and the label and stamp the swirls in Lucky Limeade.  Add the pearl jewels and stamp the sentiment in Island Indigo onto the pool party label.  Tear the right upper hand corner to
reveal the stamped image below and distress the edges a little.   This is pretty easy once you make the masks (I made label, big flower and 2 each of the medium and small flowers) 

Wednesday, May 9, 2012

An Angry Bird Birthday

I was a tad busy this weekend- 3 birthday parties back to back for the twins to attend then Tyler was having his birthday party with his friends. He kept the cake identity well hidden until the day of the party and everyone was really excited to see the angry bird cake- it was lemon cake with lemon pudding/curd fillling inside. 

So for thank you card it was appropriate to use the same theme. I went on line to see what this bird looked like and saw some samples of cards made
 with it and saw many variations of this one. Not sure who originated it but thank you to all.  The one I chose to emulate was one by Maria Cameron on Stampin Connections- the online demo only site-  The bird is made of 1 1/2 inch circle.  The eys are 5/8 inch circle with 1/8 inch pupil.  The eyebrows are retired SU horizontal slot and the tail is made of Spring flower bouquet punch.  The headfeathers are made of 1/2 of the small heart and the tip of the retired leaf punch from eons ago. 
the beak is made of little summer sun (also retired) triangles.  I raised the whole thing on dimensionals.
 The sling is made of 3 word window punched out of chocolate chip and stamped with woodgrain with expresso. Used left over 1/4 inch strips of crumbcake to make the sling. I also used left over green CS embossed it with sentiment (not SU).  Used some cloud cutouts and used them as stencils to make the clouds and I am now totally exhausted- from making a gazillion of these cards.
This is the cake Tyler chose for his birthday! 

Sunday, May 6, 2012

Birthday Cards for triplets


There are a bunch of twins and a set of triplets in my kids' class and we were invited to a birthday party celebrating their birthday.  I wanted to make sure I wanted to make a card that was different for each of them but did not want to have to come up with  all different designs.  I thought doing their names would be fun so these are my cards for them.

Took a base card in Wisteria, real red and melon mambo and added a whisper white layer and stamped it with the flourish from Everything Eleanor in Lucky Limeade.  Stamped the Boho Blossoms from the Language of Friendship stampset in melon on regal rose and and then razzleberry on Melon mambo CS- punched it out (I tell you these Stampin Up folk coordinating everything--- I JUST LOVE THAT!)  I used dimensionals to raise each layer up and added a rhinestone jewel in the center of each.  Diecut the names using different CS using the Timeless Type Junior (Soon to retire- I am so sad, it was one of my favorite fonts and perfect size for cardmaking...) , added a little strip of jewels on the first initial and easy cards that looks special.  This would be a really easy card if you are using 3 initials of a person and making a bunch of it.  The longest it took for me was diecutting the individual letters for each girl....

Saturday, May 5, 2012

Blushing Bride flower bag

I was perusing through splitcoast newsletter- I do this whenever I have a minute to spare- and their Inspiration challenge today was for Vintage Trading company- and this cloche hat http://www.victoriantradingco.com/store/catalogimages/1a/i21266.html caught my eye- and of course I had to make a (sort of)matching purse. 
Took Blushing bride CS (to retire next month, sadly so I am stocking up) diecut the petite purse then embossed it with the snowburst EF (carried over so still available)- thought it looked  'basket weave'-y. Chopped off the top and the rounded corners of the side to make an open purse.

I diecut 2 handles in crubcake and attached it with mini brads and cut another scrap piece to make a band around the middle.

I also punched some leaves from the Bird Builder punch in greens and flowers with the 4 sided flower from the Itty bitty punches set in  regal rose and melon mambo. I took a large flower from the Boho blossoms punche out in the middle and put a dimensional in the center.  Use the scorer with the ball end to push down on the flowers on a mousepad to create some dimension and squish them in and put some more around the edges with tombow multimono liquid glue to set some more around the edges to create a round mound of flowers.   Set smallest pearls in the center of every flower.  I love this die so much~ my kids better have some girl grandbabies some day who I hope will love this stuff that I keep accumulating!

Thursday, May 3, 2012

Everything Eleanor

 Splitcoast color challenge this week was for Wild Wasabi, Pumpkin Pie and Bashful blue.  Not my favorite combination but I love a good challenge. I had gotten this Everything Eleanor set for free while I was at Stampin Up leadership and had not actually used it but it is coming out in the new catalogue to debut next month s I wanted to use it for this challenge too, so here is my sample.

I took a wild wasabi but cut it 8x 7 and folded at 3 1/2 to make a long card.  Took a bashful blue, embossed the flourish with wild wasabi embossing powder to give it a good pop of color on the blue (regular stamping does not do it justice so I am so happy to have matching embossing powders!)

Embossed the sentiment in black (I had the versamark pad out anyway....)  from Perfectly penned set.  Destress the edges and mount on Pumpkin Pie- also distressed. 
 I stamped a bunch of the flowers on a scrap piece of whisper white in pumpkin and cut them out quickly, mounted them with dimensionals, added some pearls, tied a ribbon and a reasonaby quick card that does not look it!

Enjoy!
Lynda