Tuesday, June 10, 2025

You are remarkable card


-you need 5 1/2x 11 white cardbase-
 with 11inch across the top score at 3 1/2  and 6 inches

-turn it around to 5 1/2 on top and cut between 1 3/4 to 5 1/4 inches 1 1/4 inches from both sides

-turn it around back to original position and score at 1 3/4 and 5 1/4 inches on the top and bottom panel only  to the cut line and not inbetween

fold as instructed 
stamp flower or some image on a scrap piece of paper and fussy cut it out
you need a color panel 2 1/2x 2 7/8 and white 2 1/4x 2 5/8 for inside that
color the image as desired
stamped the leaves in lemon lime twist 


Tuesday, June 3, 2025

peekaboo forest card


base card (the back panel is White A2 cardstock 5 1/4 x 4 1/4- 
with 5 1/4 on top, score 3/4 on both left and right sides
sponge dauber or using blending brushes to create the blue sky in the back ground.
In the video I forgot to do this step until after the front was attached which made it a bit difficult...


front top is extra thick white cardstock 6 1/2 x 1
front bottom is extra thick white cardstock 6 1/2 x 3/4
score both at 3/4, 1 3/4. 3 3/4 and 4 3/4 
that's the white layer under the green leaves and grass you can see above. 

glue both sides to the base panel with the flaps on each side- make sure it lays flat when you move the card to the left or to the right


old olive cardstock for grass and treetop 5 1/2x 2v 1/4 diecut the grass die between and 1 1/2 inch area ; use leaf dies to pop it up at the same time. cut the edges to separate the pieces and glue down the flaps on each side - (only glue onto the white pieces and not the entire back of the green panel so it does not stick to the back of the card) 

stamp wood pieces (tree truck and branch) and critters on white scarp piece
color in as desired- some brown- pecan pie, bronze etc
critters in crumbcake, penca pie etc. diecut out and attach to the front as desired. 
make sure when flat it will fit inside an A2 envelope.- you can have one side or the other pop out but not both if you want it to fit. 


Tuesday, May 27, 2025

thankful gardens card


basecard is 4 1/4x 11 folded in half to make portrait A2 
take another white cardstock 4x 5 1/4 and use mini corrugated embossing folder to create texture and adhere on top of basecard. 

diecut sentiment panel from textureded note die using a scrap piece of white cardstock 
stamp sentiment in tuxedo black memento ink and mount with dimensionals with the ribbon behind it .  Accent with the sheer ribbon combo pack 

stamp flower on a scrap piece of white in black and color in as desired using stampin blends, watercolor -(here using sponge daubers and strawberry slush)  the set comes with matching stencils which make it super easy to color in 

diecut extra leaves using lemon lime twist
using strawberry slush and stencils- lemon lime and granny apple green for leaves


using freesia, highland heather and gorgeous grape.


Tuesday, May 20, 2025

Pretty Florals card


base card is white A2 cardstock embossed with Pressed flowers embossing folder 
stamp sentiment from blooming phrases in tuxedo black memento inkpad on right top where it was not embossed.

stamp flowers in black on scrap pieces of paper and color in first in you can with stamp or stampin' blends or watercolor ( however you wish) and die cut out
stamp leaves in lemon lime twist and die cut out 
 layer flowers and leaves on top of embossed base card using dimensionals as desired
add adhesive backed dragon flies 


Saturday, May 10, 2025

birthday card for a music lover


 Kyle was going to a birthday party for his BFF and he likes classic rock- Led Zepplin I am told so I thought perfect opportunity to bring out my vinyl record stamps to make him a birthday card.


record die from Concord and 9th "Greatest Hits"
stampset from Team JB Hobbies

"Classic Vinyl Music Record Cutting Dies with Coordinating Stamp Set"

I couldn't find my die so I just stamped the image of the tonearm and cut it out (badly as you can see)

Saturday, May 3, 2025

pop up cross card tweaked instructions.


1. Basecard is top folded 11 x 3 3/4 scored to make 3 3/4x 5 1/2 inch base card 
( I used thick white cardstock)( i made it so when flattened out will still fit into a A2 envelope)

DSP- ( you need a DSP 5 x 3 3/4 and another piece 1 x 2 7/8)

2. Choose a color cardstock to coordinate with the DSP  3 5/8 x 5 3/8 to layer on front top of the basecard.  (here I used daffodil delight)  ( paper saver hack: if you want, you can punch out a 1 3/4 inch circle before you mount it since it is hidden and you need it for the front decoration)
 
3. Body of the cross is white cardstock 5 x 5 1/4 (here I used thick white cardstock but regular ones work too) 
With 5 inches across the top score down at 1, 1 7/8, 3 1/8, and 4 inches
this is the whole mechanism. 
flatten out to glue onto the color cardstock - with glue or tape on the far left and far right sections 
 
4. take the DSP 5 x 3 3/4 and with 3 3/4 across the top cut down along 5/8, 5/8,3/4, 3/4 and 1 inch to makes strips 5 inch long pieces. this will decorate the body of the cross. ( 1x5 ipiece in the center top, 3/4 x 5 inch pieces for the side back and 5x 5/8 inches for the side body of the cross.
5 Cross piece- make a white cardstock 1 1/4x 3 1/8 to layer behind the 1 x 2 7/8 inch DSP for the piece to put across the cross and glue only behind where it will sit on top of the cross.
.
6 stamp sentiment on white cardstock and punch out with 1 1/2 inch circle punch
stamp and punch out leaves using Granny apple green ink and layering leaves punch (retiring!  _crying emoji!)) or whatever leaves dies you may have to accent the front circle panel. Layer on top or the 1 3/4 inch circle you punched out 
 
 I've put heart shaped wreath decorations, you can do flowers whatever you want for the front center to accent.  make it for sympathy, Easter, commnunion, whatever you want to say - it is so simple to make but looks complicated - I've seen a lot of complicated instructions but this is as easy as I could make it. 

Lynda


Saturday, April 26, 2025

watercolored Happy Hibiscus card


base card is white A2 cardstock embossed with happy hibiscus embossing folder 
diecut a small white piece using textured notes die
use a small shy shamrock piece to outline the white piece to accent the center panel
 
emboss the flowers and leave in white using peach pie and lemon lime twist cardstock.and diecut
diecut the 2 shaped leaves from the Thankful Gardens set from lemon lime twist
using melon membo, real red, garden green or whatever colors you have use watercolor brush and refills (put a drop or two in the lid of the stampin' pads)  to color the leaves and flowers.
Die cut the little flowers in daffodil delight and real red and color in using watercolor brushes and mount as desired.
use tissue paper to wipe the color from the embossed areas to show more of the white embossing. 
sentiment stamped in memento toxedo black from Notes and totes stampset.
mount the flowers as desired using dimensionals - 

enjoy!


Sunday, April 20, 2025

easter treats


I made these Easter treats for my staff and family -  it was really big and i had to use my spellbinder Platinum to cut it with extra thick cardstock  it took some doing- I found this little rabbit die so I used him to peek over the front - so cute- filled it with lots of chocolate eggs, , jelly beans and asoorted chocolates to make s sweet little treat for everyone in my office for Easter


Saturday, April 19, 2025

all zipped up card


White A2 cardstock side folded portrait 
Bloom Impression DSP 4 1/4 x 5 1/ 2 - cut the neck line  behind the zipper and flip over
punch the neck line with circle punch or another punch
glue down the background and neck line onto base white card.
diecut brushed silver cardstock for the zipper and the pull and place in the midline as shown.
zipper pull mounted with a small dimensional
diecut melon mambo strips for the side pieces over the zipper.
sentiment stamped with blackberry ink and mounted with dimensionals

You can do the zipper in 2 steps - die cut the V part and then put the straight part below to continue - - it does click into place where the zippers go- or cut the V part, then cut the straight part and glue it together and hide it with the zipper pull - either way works. 


Saturday, April 12, 2025

framed scene cards

this was the clean and simple coloring project we did this month


base card portrait folded A2card in thick white Cardstock
layer of lost lagoon cardstock embossed with Soft Waves embossing folder
stamp the sentiment in lost lagoon
stampin blends to color in the image using pool party, crumb cake, old olive, poppy parade, pecan pie

enjoy!


Saturday, April 5, 2025

One More Year


White cardstock scored to make 4 1/4 x 5 1/2 A2 size card
take a piece of DSP  2 x 4 1/4 for bottom of card
layer a piece of Pool party 3 1/2 x 4 1/4 
take the tag die from Greetings of the season 
stamp the dog and sentiment on it and color in as desired
sponge a little pool party around the dog image
tie ribbon through hole if desired
on another piece of white cardstock stamp the cake and sentiment and color in as desired.
mount to the inside panel of the card. 
sponge a little pool party around the cake image to accent
 

Saturday, March 29, 2025

Otterly Amazing


Otterly amazing set 
base white cardstock
Pool party embossed with soft wave embossing folder 
and bottom panel with bloom impressions DSP (sale-abration retired)
 label die from Thoughtful expression  inked with pool party with cloud stencil as shown below
 stamp the fishes on the DSP and sentiment inside in Azure afternoon
stamp the otters and plant with memento tuxedo black and color in the otters 9crumbcake and pecan pie and plants (in old olive) 
diecut leaves 
arrange the plants (azure afternoon) and rocks (crumbcake) and log (early expresso) as desired as shown using dimensionals


Saturday, March 22, 2025

Easy Peasy Cake celebration card.- turned front panel


Happy Birthday Chris!


hard to see the sentiment embossed in gold on the other pictures.


open card standing


Cake celebration card.- turned front panel 

base card is Flirty flamingo  11x 4 1/4 scored in half to make top folding card.
cut 1 1/4 inch from the front panel from bottom and from the top fold 
use the cut panel turned 90 degrees and glue or tape to the top and bottom to fit the A2 size- align with back basecard panel to fit .

take 2 3/4 x 4 inch white panel and decorate as shown
stamp the image as desired:
the cake base was pecan pie
base cake was pretty in pink with accent of flirty flamingo 
frosting diecut in white (don't you LOVE this die?)

stamp flowers in pretty in pink and leaves in granny apple green on scrap paper and diecut 
and decorate the cake as shown

sentiment strip in pecan pie cardstock and embossed with sentiment in gold embossing powder and mount to front panel so the base of cake has something it is resting on- I don't like to see cake and plates "floating!"

Saturday, March 15, 2025

Delightful Wishes card


take the outside frame of the DSP from the Delightful wishes die cut with Textured note dies 
save the center panel for another project or use it on the inside of the card.
the sentiment in Coastal cabana and wishes in early expresso and diecut
diecut the branch in early expresso
leaves in old olive
flowers in lemon lolly and daffodil delight  (easier if you stamp the accent image in darker color then color the base color)
mount the center white panel in the middle of the card and frame and arrange the branch flowers leaves and sentiment as desired.

Saturday, March 8, 2025

Hello, Ocean Friends


White cardstock scored to make 4 1/4 x 5 1/2 A2 size card
take a layer of shy shamrock and diecut the coral before mounting to the basecard
take a piece of Coastal Cabana and emboss the so Swirly embossing folder  (soft waves EF available in the spring mini catalog would be perfect here)
DSP New Horizons 1 1/2x 4 for the base 
take the Changing Leaves Dies for the oval sentiment die- stamp the sentiment in Shy Shamrock and mount with dimensionals
Stamp the crab with Calypso coral and accent with Cajun Craze
Mount the  diecut coral and the crab using dimensionals
color the starfish in color of your choice and adhere to the card as desired.


Saturday, March 1, 2025

Memorable Blooms Z fold card


• White cardstock 5 1/2 x 8 1/2 scored to make side folding 4 1/4 x 5 1/2  A2 size card. The stamped flower will on the back inside of card.
score the front panel vertically at 2 1/8" to create the z-fold.
• add a designer paper to add interest to the left front panel (1 7/8 x 5 1/4")
• take the white panel 2 3/4 x 4 and stamp the center image from memorable blooms and color as desired.
• Take the little scrap of white with flowers color in and cut it out and mount to the front panel stamped image with dimensionals and tombow multipurpose glue to add a little dimension. 
• Mount the stamped white panel onto a layer of Melon mambo 3x4 1/4. 
• use glue or tape to the back of the left side of the melon mambo panel to mount to the left side of the base card only to make the Z 
• stamp the image in the center in the back  behind the melon mambo panel  or write a personal message 

Saturday, February 22, 2025

Friendly Seagulls flip card.


#3.   (free sale-a-bration set with $60 purchase)
take 2 White cardstock scored to make side folding 4 1/4 x 5 1/2 A2 size card.(DO NOT use thick cardstock for this project)
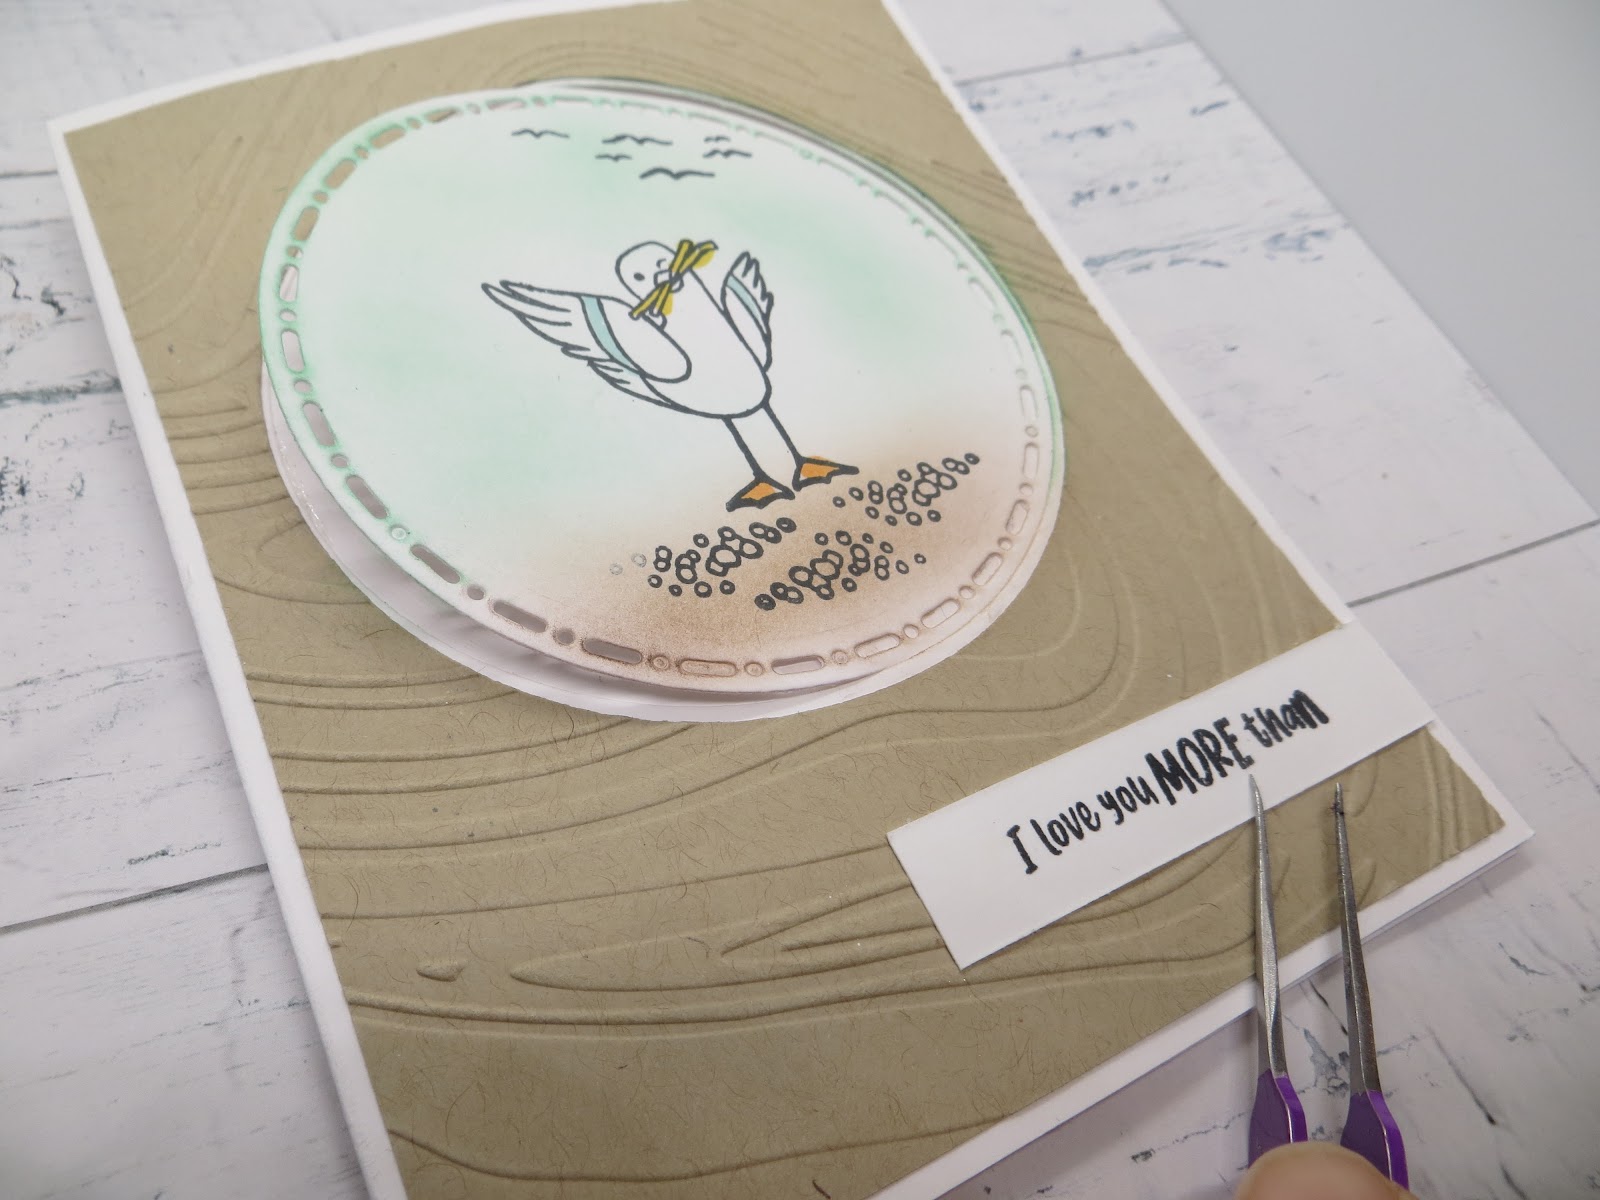
with one add a 4x 5 1/4 piece of crumbcake and mount using tape to the outside margins only and diecut a circle from the white and crumbcake panels. - Here I used Spotlight on Nature dies (but any simple shape die will work- even if irregular will work too for this project) 
emboss the crumbcake panel after cutting with So Swirly but Soft Waves embossing folder would be really great for this.
stamp the seagull with french fries, the distant seagulls and gravel onto the white circle panel you diecut (keept the crumbcake piece for another project)  use blender brush to add some color to the sky - here I used pool party and crumbcake for the sand) 
Stamp I love you more than sentiment on a 1/2 inch strip of white cardstock..  stamp French fries on another piece and the french fry image on a scrap piece of white cardstock and color in.
 
take the second white cardstock and score in between the center fold 2 1/8 inch from each end. 
Glue the left panel of the second white basecard to the the right half of the back of the white panel with the circle diecut out ( from the scored center to the half way out) - make sure to put the glue only on the back panel with the circle cut out and no glue on the open area..
the far right panel of the second white cardstock will be glued to the inside far right side of the first panel with the circle diecut.
so when you open the card there will be the circle opening on the left and a W fold in the center.
close the card and glue the circle panel to the RIGHT HALF ONLY in the opening so that it will flip when your card opens. 
attach the sentiment to the front and inside as desired. 
 

Saturday, February 15, 2025

Corner in Bloom Easel card\ and variations


Corner in Bloom stamp set (Saleabration free item for $120 purchase)
take White base card to fold  4 1/4x11 and score at 2 3/4 and at 5/12 inches 
layer of Poppy parade 5 1/2 x 4 1/4 
take a layer of white cardstock 5 1/4x 4 inches and stamp the poppy flower corner image twice one on each corner
color the flower - we used poppy parade and leaves with Granny Apple Green stampin Blends.
stamp the little piece of flower with same colors and fussy cut out. mount with dimensional on the inside to create an easel card. 
if you have time if you time a few minutes to fussy cut the outside of the frame image it makes for a more interesting card. 
or try mounting it on basic black cardstock instead of Poppy parade for a dramatic looking card


another color variation with checked embossing folder background in a landscape shaped easel card.