This was one of the make and takes from my February Stampin' with Lynda.
The base card is whisper white diecut with Sending flowers die. I tried a variety of different ways to do this cutting it out of old olive cs and pasting it behind, but what turned out to be the easiest is to leave the white flowers as they are and color the stems with Old Olive and Mossy Meadow markers, die cut the flowers and glue it on top. the flowers were Daffodil, pumpkin Pie and the tulips were colored in with Melon Mambo pen. My marker is getting a little dry and it caused some streaks which I actually liked- mad it more realistic.
Used the Layers 3D EF behind it using soft sky CS (retired) mounted with dimensional as well as dimensionals behind some of the flowers to pop it up.
Diecut the banner- Love the little holes on the banner and stamped the sentiment from the December 2019 PaperPumpkin in Melon Mambo. Used a strip of 1/2 inch melon mambo to make the whole pop a bit. Add the pearl basic jewels to accent.
If you use a curved tweezers to make the little cuts around the circle pop up it is super cute!
Enjoy
Lynda
Tuesday, February 18, 2020
Monday, February 10, 2020
Botanical prints thank you
I love the botanical prints stamps - it seemed a bit pricey but it comes with the stampset, coordinating dies including 2 triangular corner dies that are the bomb- do you not agree?
coordinating pack of paper, ribbon, diecut images, labels, and a bunch of these cute little metal bees.
I always hoard these but they are so cute and I really wanted to use them for these thank you cards for my January customers.
the base card is Calypso Coral embossed with Tin Tile 3D embossing folder.
Take a 4x4 piece of DSP- it is not colored in so you can choose your own colors- I used so saffron to color the flowers and olive for the leaves and calypso coral of course for the fruit images using water colot technique with aqua painters.
take 3 3/8 inch square piece of whisper white CS and mount it using dimensionals.
Cut 4 decorative triangles (the set comes with 2 dies so it goes pretty fast) and glue onto the whisper white. stamp the flower image on a scrap whisper white piece and color that in. mount using dimensionals.
Stamp the sentiment on a 1/2 strip of whisper white and mount using dimensionals. Mount the bee on the label using a mini gluedot. This is such a gorgeous set, anything you do with it will look good!
Lynda
Wednesday, February 5, 2020
Sending a Bouquet of Flowers
Isn't this the sweetest thing?
The die is from the Coordination Product Release available now through Stampin' Up.
The base card is whisper white with a layer of Soft Sky CS (retired) embossed with Scripty 3D folder. layer of whisper white diecut with Stitched so Sweetly die (in the Jan to June 2020 Mini Catalog) I sponged some soft sky color behind the bouquet for a subtle color.
Take a 2 1/4 inch square whisper white cs and score it diagonally to one corner to make the
paper bundle.
stamp the script from Very Versaille stampset. The Thinking of you is from the same set with the Always cut out. Sentiment was stamped with tuxedo black memento ink on whisper white and mounted with dimensionals
Position the linen thread where you think it will need to be on the rectangle and put tape on it so it won't move around. I put the stamped paper bundle but leave it open so you can position the flowers.
Diecut the circle flower die from Sending
Flowers Die out of old olive CS. I find it best to color the leaves while they are all still attached.
 Color some of the leaves with Mossy Meadow.
Diecut the flowers in daffodil, pumpkin and melon mambo and red and adhere to the stems as shown.
Put some mini dimensionals behind some of the flowers and tie the bouquet and make the bow then adhere the bouqet down. Attach the sentiment with dimensionals - on the right side I put on double layers of dimensionals so it would lay flat.
Enjoy.
Lynda
Monday, February 3, 2020
Sale-a-bration Thoughtful Blooms
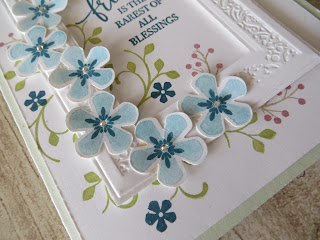
One of the cards from Stampin' with Lynda January. Basecard is Soft Sea Foam.
Diecut the rectangular Heirloom Frames and emboss it- ( I have the middle piece permanently mounted on the embossing folder with a piece of tape so that it is always perfectly centered)
Take piece of whisper white CS and stamp the sentiment- using the frame to center the sentiment in Pretty Peacock then the vines Thoughtful Blossoms in Old Olive. Stamp the small branch in soft Suede and the berries in Rococco Rose. ( I love how they separated the stamp so we can use multiple colors- They are finally getting it! ) stamp the little flowers in Pretty Peacock. Stamp a bunch of solid flowers in Balmy Blue - STAMP OFF otherwise it is a bit too dark. Stamp the center in Pretty Peacock- use the Small blossom punch to punch it all out. - i had 7. Mount the frame with dimensionals and mount the flowers either flat or with dimensionals.
add the smallest of the rhinestone basic jewels in the center of each flower to make it sparkle.
Subscribe to:
Comments (Atom)


