Showing posts sorted by relevance for query bat. Sort by date Show all posts

Saturday, October 9, 2010

I'm BA-ACK!


I now physically feeling the pressure from the last few months finally lift from me. The old office is completely closed- I turned in my key after spending 2 weekends from dawn to dusk, started at the new work- and the people have been super supportive, and my computer system maybe up and coming soon.
My parents flew in from Florida to watch my kids- which I really appreciate.
Life is Good.
And despite it all I wanted to make sure I held my monthly workshop for my loyal friends and customers. Stamping keeps me sane and a vital part of my mental health care. This is something I came up with to show faux letterpress technique although it was a bit messy. Base is basic black. I took the spider embossing folder and used the versamark to LIGHTLY ink the raised portion of the spider web. Embossed the paper, then into the impressed area I sprinkled some silver embossing powder, brushing off any excess.( you could use the brayer but do not press too hard or you will get a lot of silver on the non-web areas as well- although with the things on top it matters little.) (You could emboss with the folder, then wipe the versamark pad over the raised area then use the EP as a variation of this as well)
I punched an owl and a bat in basic grey, cut the bat in half and stuck the wings on the back to make the bat owl.
I started out with intention to make EEK but the letters were too big to fit. The BOO using all caps did not fit either. So I diecut the letter B from serif essentials, then took 1 1/4 inch circles and they fit the space better especially with the bat on top. I liked 3/4x15/16 oval punch from the holiday mini so I used that to punch the center of the circles- but it is much easier if you punch the small ovals first before you punch it out with the 1 1/4 circle punch.
Added a white circle from the itty bitty shape punch for the eyeballs and a fun little halloween card!
I sincerely appreciate all your encouraging words and support during these trying times.
Thank you all!
Lynda

Sunday, September 16, 2012

Googly Ghouls trifold


I thought my camera died.  It's really old and then one of the screws fell off the side and the side panel kept falling off, I used some packing tape to keep it on for a while now but last week the lens cover would not open all the way and kept taking pictures with shadows all around so I could not post any pictures.  But yesterday, as I was showing someone how it stopped working, it started opening up all the way- what do you know? But guess what is on my list for my birthday?

Anyhow, is this not the cutest fold?  I saw a trifold card like this while visiting amazingly talented Elizabeth Price and had to make one for myself using the design.

The basecard is basic black- I took a 4 1/4 x 11 cardstock and scored it at 4 1/8 then 8 1/2 then punched a 1 3/4 inch hole centered on the 8 1/2 score line as shown.
 I stamped the BOOOO and the bat from the same set with versamark and embossed it using black EP (but you could use clear).  Kyle told me I needed to put some white on the eyes of the bat so I did do that after which I thought was cute.
I punched dotted scallop ribbon in pumpkin pie and attached it to the back of the front flap to add a skinnhy scallop.
 Attach a 1 3/8 inch pumpkin pie circle - centering it on the punched out circle. Make sure to put tape only on the bottom half of the circle.  Stamp the mummy on a scrap piece of white CS then punch out with 1 1/4 inch circle punch.  Add  googly eye as shown. 
I took a piece of bold brights DSP in pumpkin, stamped spider webs from wicked cool then stamped the sentiment from Border Banter in versamark and then embossed with black embossing powder.  I took the little spider from the witch in the Googly Ghoul set and colored it with the black marker and stamped it  below the spiderweb on the left. It just adds that little something that makes me smile.

You could stamp a message under the cover and then add another message on the inside. 
Enjoy! Lynda

Thursday, October 30, 2008

Halloween school gifts

Halloween is fast coming upon us and my kids always look forward to this time of the year. Costumes.... candy.....jack o Lanterns.... It's kid's dream. I really try to teach my kids about healthy eating and try to discourage candy giving since everyone gets so much of it- I tried the toy and playdoh route although it was not popular at Halloween- I keep trying!

For school I made a little thank you gift for the teachers- a little magnetic notepad I picked up at the local store, with a matching pencil, I placed the bat topper- directions given previously and put it in a halloween bag and tied it with SU's gorgeous ribbon and with a llittle tag. a simple but hopefully useful gift. We have such great teachers at our school- with the budget cuts in the california state, they really are getting shafted and we need to really show our support and write to Arnold and tell him to stop cutting our school budget!


These are 20 pencils and bat toppers for Tyler's class- better for their teeth than candy! - stick the bats on with sticky tape- everything else came undone! The container held some candy from someone I am recycling.

Thursday, September 27, 2012

Ghoulish Googlies Designer kit extras


The Ghoulish Googlies designer kit comes with 10 glassine bags and twines but 20 yes, 20! preprinted tags.  Umm.  What to do with the extra tags?  Why of course make some cards.  Is this not the cutest?

Take a basic black CS and emboss with spider web folder. All the color inspiration came from the tag.   Take (I think this is pear DSP- retired) but any green would work.  Cut the corner on the green strip using the square punch to make it look like a banner or ribbon.  Diecut the zigzag from finishing touches edgelets- fast becoming my go to die for borders- so fast and you get two pieces with one cut! LOOOOVE IT! 

Versamark the mummy and the bat using a scrap piece of white CS and heat emboss using black EP and cut out.  Mount with dimensionals.  Stamp Boooo with versamark and emboss with black EP and color in the eyes with signo gel white pen then die cut with banner die.  Add googly eye. 

Mount it all as shown.  I am having so much fun with this set! Easy card- hardest part is hand cutting the bat and the mummy- you know how much I hate cutting with scissors!  When I did it flat against the tag it looked a bit boring.  It is worth the 1 minute of effort to cut it out I think.   Enjoy!

Tuesday, October 14, 2008

Bat Pencil topper


This is a little treat I am making for my son's class for Halloween - the bat was CASED from http://www.splitcoaststampers.com/gallery/photo/1054178

I did change the ears a bit because I wanted it to stand up and stay that way.

This starts with the scallop square punch using black CS.


score the center diagonally.


fold diagonally as shown.


cut little angles using scissors- you may have to play around- different cuts will give you different head and ear sizes. I thought cutting about a quarter inch in like this looked well proprtioned.


fold the ears back as shown. Now this is how the original looked complete but the ear sometimes flipped out so I changed it up a bit. You should do it however you like.


I unfolded the square and then turned the ears up and then refolded it like this.


You may have to tweak the ears a bit but it will stay as you make it.


decorate the face with white gel pen.


and place on top of a pencil- I stuck the wings down with the dimensionals- using the half size they have at the margins and it will stay on the pencils pretty tight.

Enjoy and thanks for looking!


Friday, February 22, 2013

Easy punched candy wrappers


 Wanna see a cool trick?  I hate wrapping something and then having to stick something on top and I figured out how to make a cute little candy wrapper using any punch.

These measurements are for the Hershey's nuggets.  I took a piece of DSP 4 1/2 inches wide.  Fold in half so it is 2 1/4 inch wide- in this picture, the fold is on the left.  The height of each piece is 1 1/4 inches.  Cut to the dimensions shown later here.  (picture order got screwed up- sorry!)

The width of the band depends on the height of the punch because you have to slide it in to punch it out.
 This is what it looks like after you cut the corners. I took a long piece and cut a bunch of them at the same time to save time making multiples.
Slide the folded band sideways into the punch the pull out the band through the punch as shown.   If the belly band is too fat, it is hard to pull through the other side of the punch like this.
 Then punch the butterfly using only one side of the punch.  It is better to to the right of the fold than to the left- if it is too tight, it will tear as you try to put it together. 
 When you unfold it should look like this.    Now the mechanism:  Cut a slit on one of the butterflies from the top half way, and the other one from the bottom half way as shown with the pencil mark.
 So you slide the one butterfly over the other as shown.
 Here is the completed band- or a little ring- or whatever.
 Slide in the nugget and a cute little party favor!   This is the dimension of the folded piece with the fold to the right.  If you are using thicker cardstock, leave a smidgeon more room because it will not bend as well.
T
 You can do the same with any punch. This was the bat punch using the same idea. Thinner belly band to squeeze into the punch as shown.

 When you unfold and put a little slit halfway - one from the top, another from the bottom and voila! a bat candy treat!
 I was trying to make a point about how easy this was so I used a copy paper with the blossom punch.  Folded it in half to figure out the diameter of item you want to wrap and the left over becomes the part that you punch.
Used the Blossom punch to punch the flower, cut slits on opposite ends to tie it on.  It thought it would make a lovely disposable napkin rings for a wedding or any event.  What do you think?

Lynda

Tuesday, August 3, 2010

Owl Week- Superheroes

Jumping Jellybeans, Batman, It's your birthday!

I was inspired by this picture for my last in the owl week installation for you. It was my twin boys' first halloween and I had all these fantasies to dress them all cute with this and that but they thought it was pure torture- trying to get the mask on was quite an ordeal. Now I know I will never have another opportunity to dress them like this, sigh... they grow up so fast....they are now only interested in being cool.


So, this may not be as cute but it was fun to make. I was inspired by the count dracu-owl's cape to try making the cape crusaders. the eyes are blue underneath the masks. the city scape is from starving artists and BATDAY sentiment is made from an alphabet set from PTI. The bat on the chest of the batman is from Pink Cat Studios Billie superhero set and the R is an alphabet set from a long retired Buttons alphabet set from PSX. The chest pattern on Robin's chest if half a dog bone cut lengthwise. His hair and mask is freehand cut. Well, at least the owl punch was from Stampin Up.
I hope you all enjoyed this run. I hope to make some more in the future for you but this is all I had time to make to show you from this twisted mind of mine....... Thanks for visiting!
Lynda

Friday, September 3, 2010

Makani's chain gang Halloween


Another card Makani made during our little stint was this one- We just LOVE Halloween! funny though- as many cards as I make for Halloween, none of them seem to ever leave my home! She xxxxxxxxxxxxxxxxx
made the base card in lilac, then layered a DSP. She punched the MS halloween fence then cut out all the dillibobbers on top and the bat wings from the bottom to create a clean lined fence ( I thought maybe the guys should be behind the bars but it did not look as good- I am playing with a owl behind bars ideas as well so come back soon to check it out as soon as I get it done! ) She die cut the tag from Cuttleb*g in black and used this awesome white marker to letter it in and then diecut another in orange and colored it in with Cop*cs to layer on the pumpkin.


Stamped the jailbirds in white and colored them in as well before cutting them out and mounting them on the card using dimensionals.


These guys crack me up 'cuz they remind me of my 3 little rascals.

Well, you know what they say- If you obey all the rules, you miss all the fun!
Raise some ruckus this long weekend!
Lynda

Thursday, October 26, 2017

Spooky Cat Center Step Card with flying Bats


This is a variation on the Center Step Card by Kelly Acheson - how to on her blog http://astampabove.typepad.com/my-blog/2017/09/feature-friday-center-step-fun-fold-video.html
The spooky night DSP was designed to get multiple pieces out of one sheet which I think was brilliant - perfect for workshops.

Take 8 1/2x 5 1/2 inch sheet of Pumpkin Pie and cut slits 1" from bothsides from 2 1/4 to 7 1/4 then turn sideways then score on the long side at 4-1/4 across the whole card - then score the following just between the side slits at 2 1/4, 5-1/4, 6-1/4 & 7-1/4.  I used a ruler with the scoring tool so I could tell where I was scoring (between the slits)  as shown on the left.

I stamped the owl in basic grey, beak and toes in pumpkin and the eyes in black.
 I attached 3/4 inch x 4" strips of DSP on the side panela.  (I cut 4 inch strip horizontally and cut 3/4 inch strips for multiple cards. )  I stamped the hat in black onto the base card - so I can see the spider and web without having to cut it out, then stamped another hat on a pumpkin pie scrap and cut it out and mounted it on top.  Punch the cat in basic black and a piece of Very vanilla with  the Everyday Label punch , stamped the "happy OWL oween" on it and cut off the bottom to make it look like a tombstone- I think that was my coolest idea for this card.  It was still a bit flat and I wanted some bats flying around. All the ones I had were too small  so I used my old Martha Stewart Bat punch from eons ago, stuck it on little clear plastic strips I cut out from packaging (you need something with some stiffness to hold the bats up) and used glue dots to attach them to the card as shown.  It was so much fun to make this card.  Enjoy!

Thursday, October 11, 2012

Googly Ghouls October make and take and Lin's card


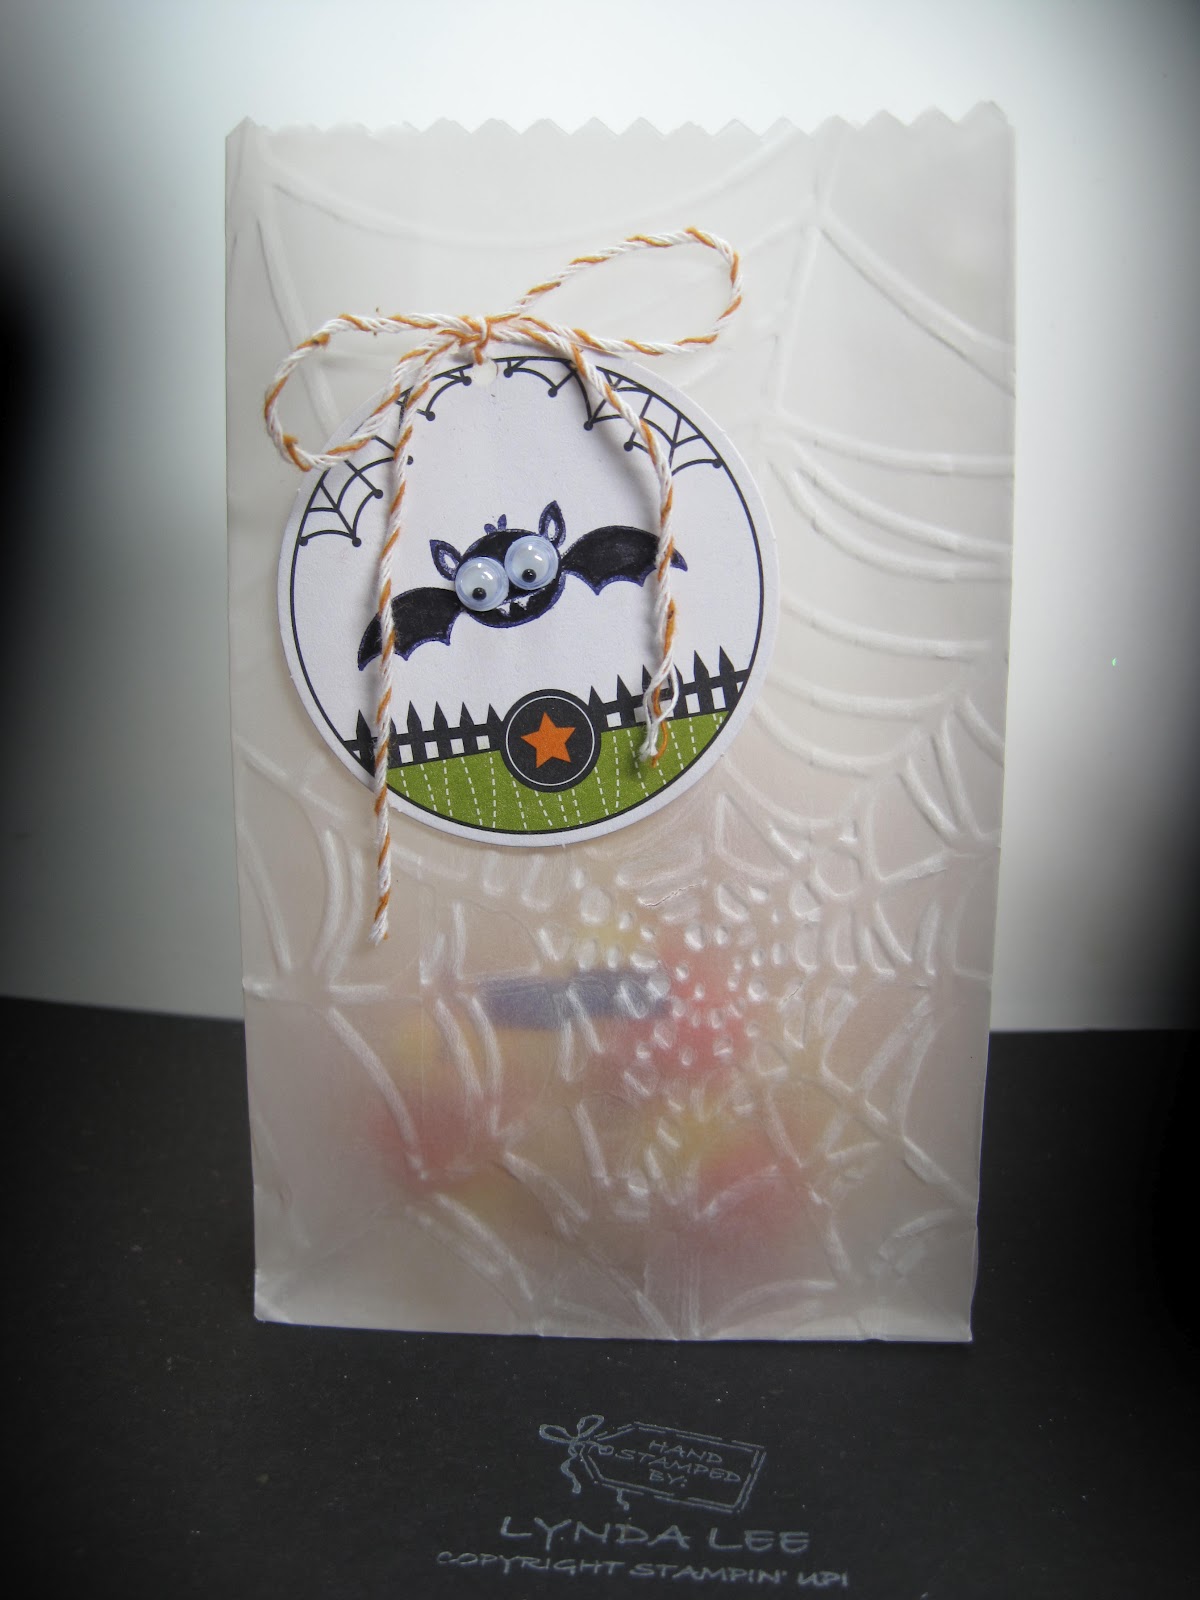
   Because I became a doctor in 1987 and finished my training 5 years later I missed the window to be grandfather'd in for a never ending license and have to take an exam every 10 years (which I think is a GOOD THING!) but it does take a toll on the family and my extracurricular activities as I have to prepare for it.  So my projects for my workshop this month is really pretty simple.  This is one of the projects we will be making this week.  Take the Ghoulish Ghouls desinger kit (it comes with 10 glassine bags, 10 pieces of pumpkin pie twine and 20 preprinted tags you can embellish how you wish and a package of googly eyes-- so FUN!).  Emboss the bag with the spider web embossing folder.  Stamp the bat on the preprinted tag and add googly eyes. Put the twine through the hole on top of the tag and then make a bow from the twine and glue dot the whole thing in place. Fill the bag with candy of your choice.  You can also fold over the top and staple or punch 2 holes to loop the tag through as well.  Whatever suits your fancy.


I have downline friends that are amazingly talented. 
Lin Tsai made this card and we were all WOW'd at my last stamping party.  Love the layout, simplicity, really works well.  Thank you, Lin for sharing it with us!

Monday, September 16, 2013

Circle Card thinlit Die Trick or Treat

I have been making these type of spin cards for a long time using dies and figuring out where to put the crease, blah blah blah, but when you make multiples of it - as I did for our monthly stamp-n-chat, it was so great to have a die that did it all for you in just one fell swoop, I love it!

The base card is a half sheet of Summer Starfruit 8 1/2 x 5 1/2 diecut with the circle card thinlit die.
pull the right side of the card over the die so that it does not get diecut to create an extension to the card.  There are lots of how-to's on the internet on this. DO stamping shows it here: http://www.youtube.com/watch?v=nwedAASXzok    Emboss using the Houndstooth textured impressions folder just over the front flap. 

Punch 2 3/8 scallop (similar to die in the set) in pumpkin pie and black and overlap as shown and glue onto the front part of the circle.  Attach the Tags-4-you trick or treat after stamping in basic black and punching with coordinating punch using dimensionals.  tape 2 inch strip of Witch's brew DSP on the right side. 

Stamp toil and trouble in pumpkin onto a 2 1/2 circle in vanilla and stamp the raven in black.
Stamp the bat oval and cut away a little setionon the left to make it flush. 
Stamp the sentiment on the right side bottom and your card is all done!   I love the extended space for message writing,,,,,,,

Saturday, September 11, 2010

What a week!
I hadn't had a moment's time to stamp with just goings on of everyday life and Friday I have had it- there was an incident that tip me over the edge and I came home all boiling over mad - I knew I had to enter the Zen stamping Zone- does it ever work! I was thinking about this layout and that layout and soon, I felt so much more peaceful. How can you be mad when you are creating something so cute?

The challenge on splitcoast for Friday Free for all:
http://www.splitcoaststampers.com/forums/free-all-f45/f4a29-circles-rectangles-09-10-10-a-t505497.html was this layout so I changed up the card I designed for my workshop and you know what? I think I may like it even better!

The base card is Pumpkin Pie which I stamped the bats from Wicked Cool set at the top.

The center image is from Greeting Card Kids stamped in stazon black onto shimmer paper (although hard to see here- takes color better than whisper white for watercolor or Cop*c type applications) then colored in with concord, pumpkin pie and various greens using blender pen with the ink lids. I punched it out with the new 2 1/2 inch circle punch then used the number 2 scallop bigshot die to cut a large scallop in Crumbcake.

I used the 2 way glue pen to add the champagne glass glitter around the edges. A layer of Crushed Concord, embossed with the spider web folder - the coolest!- followed by a piece of whisper white that I wheeled the Stripe builder wheel in celery twice, added Raven 1/2 inch lace trim in the middle.

The center image was layered using dimensionals to make it pop then added few bats punched out with the new bat punch that I added using the stcky stip but just along the core leaving the wings to flap up and down.


This is the deatil on the bats, glitter and the ribbon.


This is the detail on the spider web.


This is the original card that I had people make at my workshop - same idea but turned around and added a strip of dotted scalloped ribbon punched in celery which I thought was darling as well.
Enjoy!
Lynda