Wednesday, April 28, 2010

SCS CC268 Old Banana Ballet


I had a load of work to do but this card kept creeping up on my dream last night and I had to whip it up this morning to post it.
It is the SU Sizzix Daisy diecut- the smallest of the 3 flowers diecut 6 times in white- I did it 3 layers at a time so it went really fast. The old olive leaves- another one of my favorites- I think I will have to buy one as spare in case this wears out in the future- The center of the flower is my old friend Liquid Applique in yellow gobbed on and heated with my heat gun to create the raised center like a really flower after raising them up on dimensionals. I actually had a big giant hole inside the flowers and stuck the dimensional underneath with the sticky showing but the liquid applique will cover it all up with no indication of what is underneath so don't worry about that.
The sentiment is from the Everything nice SU set- I LOVE this set- it is so sweet!- the banana oval cut with my old Coluzzle, mounted on the BAllet blue cs and thne on whisper white base card. It just calls out to me and makes me smile. With the mountain of work I have to do today, I need that! Have a happy hump day!
Lynda

CSC CAS64 and TLC270


This is a little challenge to ramp it up- I made the card on the left for Tyler's signature thank you card in yoyo yellow. The clean and simple card challenge was to make an orange card- here Only Orange- yes another retiring color with yoyo yellow, green galore and real red blocks- the block size had to be changed a bit to allow it to stack- 1 3/8 by 11/16 - which is one notch shy of 3/4- thus the card to the right- The card on the right uses a sentiment from a little birthday cheer set.
There are so many variations on this card that I sketched up but not enough time to make it all!
Make a little boy happy with a Lego card!
Lynda

Tuesday, April 27, 2010

Tyler's Lego Thank you


This is a simple Lego thank you card I made for Tyler- He wants them now in orange, green galore and brilliant blue- all the colors that are retiring- I guess I am going to have to order a bunch more- the twins wants their own after seeing this.
This is pretty straight forward- I started using the 1 3/8 inch square punch then trimmed it down to 3/4 inches to make 2 rectangles. The circles are made with 1/4 inch circle punch.
I tried different ways to add the dots but the easiest was to put mono multi glue in 8 dots as shown then add the circle using tweezers and to dab lightly and position them - I eyeballed them and that was just fine-


This is what it should look like- the card stock add just enough shadow to look 3 D.


I added half of a dimensional on each side to lift it up and make it look like a low profile Lego.

It raises it up just enough to make it look like a Lego. I may have to make a Lego stamp if they don't come out with one. Maybe some company will look at this and take me up on it?
Thank you sentiment is from the retired Take Three Set.
This was made with real red on Yoyo yellow- but it would be pretty on Green Galore, Brilliant Blue or Only orange given their bright colors and match to the Lego blocks.
Lynda


Monday, April 26, 2010

Tyler's 9th Birthday party favors


Tyler said he wanted his birthday party at a miniature golf course but then he wanted a lego theme. Then he went and picked out a army tank and little men cake after we decided that we were going to send out Blast off cards with rockets for invitation- to say the least I was a bit confused about the theme. But I guess the little guy has a right to pick whatever he wants for his birthday.


Anyhow, my DH found little Lego figurine keychains - which was not cheap mind you- so it was hard to stay within budget for favors, so I added little Lego candies I found at D*ddums and a space pencil I had planned after he picked the space theme at the beginning- I guess it could be construded as a Star Wars, Lego theme, eh?


Well, after he said he wanted a lego theme, I looked high and low for any Lego stamps that I could use to no avail. So I took one of their Lego plates that are made for a base of a building to see if I could get an impression. I tried paper and although this was the thinnest Lego plate I could find, it CS went to shreds no matter what paper I used and even when I wet it. So I gave up on that idea and just tried some heavy duty aluminum foil that comes with food delivery for the metal lego blocks accent I have to use a empressor to make the bumps look more like the lego bumps but I did not think it looked too bad. You can even see the name Lego on the bumps if you look close enough. But the layers through the big shot has to be done carefully so it is not such a hard impression that it will cut through the bumps.


This is a detail of the favor- The stamps are from Her* arts I got many years ago.


My little take on the thank you cards tomorrow.


Lynda

Saturday, April 24, 2010

frost white shimmered fancy flower card


This is a very simple card I had at my workshop to show how simple it is to use the frost white shimmer paint. You know me- can't stand to make too much of a mess- I get enough of that from my three active boys-
Take a whisper white CS and stamp the small flowers and stem on the top using so saffron. I did not even stamp off to make the flowers, I just stamped it straight and it still looked fine. Take Sahara Sand CS strip and run through big shot using perfect polka dot folder ( I can't get away from this folder- I love it so )


The accent flower piece is made by inking the solid flower image with the So saffron classic pad and then BEFORE you stamp, take a dauber, take the frost white paint, shake it up then take the lid and dab a little bit of paint off the LID using the dauber and using the dauber to dab some shimmer directly onto the rubber with the saffron color underneath it to add a subtle shimmer then stamp on the whisper white cardstock. Stamp the outline with so saffron as usual and cut the flower out.


The ribbon is a stay put ribbon, punch a hole where you want the ribbon to come out and tie it- the ribbon will not move, no need to glue it in place and you use less ribbon to boot!


Mount the flower with dimensionals. It is a subtle card and it is hard to see the shimmer here but I thought it was lovely.
I like this technique because you don't have all the little pans of color laying about and you can make ANY color pad into a shimmer pad with no mess. Make sure to wash off the stamp between inking to not contaminate your classic pads though- I used a baby wipe in my class between inkings and it worked great. The daubers can be rinsed off to use with another color as well.
Lynda

Friday, April 23, 2010

5 circle paper flower


Another paper flower idea I used for my workshop.
The flowers are made with 5- 1 inch circles - here with raspberry lemonade DSP but any double sided DSP you like will do. The base card is melon mambo with whisper white cardstock on top, that has been run through the big shot with the perfect polkadot folder but with a frame with an oval opening on top of the folder for selective embossing- (the frame is made of wood I bought at local *chaels for less than one buck), corners rounded.
The flowers are pretty easy. You can measure out 1/5 of 360 degrees and fold it - or take any perfect 5 sided star- here I used the SU star punch- cut off the arms as shown- 2 on one and 1 on the other- I used the one arm sticking out to tape the two together to create the perfect angle


use the template, place the corner on the edge of the circle with the sides showing pretty even- the fold the edges over-


like this- make 5 circles and voila- easy peasy 5 leaf flower with any size circle punch.
I used 1/4 old olive strip for the stem and used a folded olive cardstock put only partially into the same circle punch to create the leaf, ran it through the crimper with it still folded to make the leaf. Tape down the flower leaving the flaps alone for added dimension. Place a rhinestone brad to match in the center and a cute flower you can mail!


Add a 1/2 inch strip banner in so saffron with sentiment of your choice- attached with dimensionals to add some curve and lift and another easy peasy card you can easily show in your workshop.
enjoy!
Lynda


Thursday, April 22, 2010

SCS CAS63 challenge and variations

I posted this card here http://stampingdoc.blogspot.com/2009/06/easy-thank-you-card.html
many moons ago as a simple thank you card and it is still my favorite quick go to cards for a simple thank you.

Then recently I saw a card by simplicity here: http://simplicitybylateblossom.blogspot.com/2010/04/colors-i-will-miss-part-1.html and just loved it and wanted to play with the idea of smaller pinwheels in different variations.


This card is a more straight forward case of hers using the colors in reverse. these are also some of my favorite colors that will retire from Stampin Up after June this year- Gable Green and Green Galore and Brocade Blue and Ballet Blue.
They are cut 3/4 inch square the corners rounded off using an old SU scallop scissors. The sentiment is stamped in ballet blue with Three Little words set that I earned during sale-a -bration, soon becoming my favorite for their perfect sized font and saying.
This is a vertical variation using Barely Banana CS as base ( sigh, another one of my favorite go to colors- to go)


This is the variation I posted for the CAS63 challenge using ballet blue CS partially embossed using the perfect polka dot embossing folder and the same sentiment below the accent piece heat embossed in white.
The center pieces are made taking the a little crystal out of the rhinestone brads and attaching them with the little glue dot. You could use any self adhesive crystals in a size you like.


This is grouped into a square with the eat cake sentiment (from Everything Nice stamp set) stamped in Ballet blue with eat cake wiped off with blender pen and then reinked with melon mambo marker. The Melon Mambo base is stamped with polkadots and a loop of ribbon tied with a crystal brad.


This is the same square pattern with the Ballet Blue base card with polka dots embossed on the bottom.
I would like to think that I was taking it up another notch but I guess others could think that I was making things more complicated. But this was just an exercise in different ways to set up an accent piece in 2 different colors. This is so much fun, you should try it with different combinations of 2 contrasting colors and see what combinations you can come up with! ( My English teachers would be horrified at my grammar but what are you going to do? I just write the way I talk.... )
Lynda


Wednesday, April 21, 2010

SCS TLC269, CC267 F4A8 challenge


Sometimes you get in a rut and you get a challenge and you really WANT to rise up to it and I think I overdid it. I had to make invitations for Tyler's birthday party, have a mess of meetings and overload of work to do stuff and the blog gets neglected- but I have a whole bunch of stuff I have been working on that I will post over the next couple of weeks so hang on your seats!
These challenges incorporated several things- the first was the color combo CC267 Basic gray, apricot and sage with a neutral and with option of using lace.
The base card is Basic gray with apricot layer that was embossed partially with perfect polka dot then grooves added with a scorer, pierced the area in between ( TLC269 challenge for piercing), then the edge punched with the eyelet lace border.
The center image was stamped in black then oval cut with Spellb*nders classic oval die after cutting out the feet (F4A8 challenge for out of the box technique) and colored in with c*pics and stampin up markers using apricot, sage gray and some other colors. The leaf was die cut with sage CS using little leaves sizzlet from SU. Sentiment is from three little words set that I got from Sale-a-bration for free (yippee!) and voila, my little card.
Lynda

Wednesday, April 14, 2010

SCS challenge CC266


The color challenge this week is
Blush Blossom, Cameo coral, Ruby Red and a neutral with Caramel/Close to cocoa as bonus- all the colors that will be retired as of end of June.
I thought I would pair it up with Flower Fancy that is on sale this month with SU and this is what I came up with.
Take Flower from Flower Fancy, ink it up with Blush blossom pad, then used cameo coral marker around the center edge and ruby red in the center and sponged it before I stamped it on very vanilla CS. Then stamped the border flower with ruby red, cut it out, put two way glue on the flower and added dazzling diamonds to add a gorgeous sparkle- hard to see in the picture I know - but it is gorgeous! Stamped the leaf in close to cocoa after stamping off to get a lighter shade then stamped the accent border with close to cocoa straight. Diecut vanilla CS using top note die then used perfect pollka dots to create texture only on one half of it, layered it on blush blossom, then cameo coral, tied a cocoa 1/4 inch grosgrain and the whole thing on ruby red.
Not bad for 7 in the morning!
Lynda

Monday, April 12, 2010

SCS challenges F4A7 and WT265


SCS has a really fun challenge for me- being a quilter and all- love the challenge (SCS- F4A7) to make a quilt card from scraps and (SCS- WT265) to make a card with angled interest so here it is: a 9 patch on an angle using Razzleberry Lemonade. The base CS is Melon Mambo textured with perfect polka dot.
The half square triangles in the corner are cut using a square exact same size as the square in the center cut on a diagonal into 4 triangles so no measurement are needed!
The 9 patch is paper pierced around the edges and the entire card edge is paper pierced and faux stitched with white pen. The sentiment banner is made with 1/2 inch strip of yellow and 3/4 inch strip left over and corner cut with a pair of scissors and button threaded with linen thread attached with glue dot.
Happy Tuesday!
Lynda

Wednesday, April 7, 2010

Stampin' Up is renovating their colors!


Have you heard? Stampin Up is revamping their color pallette with some great new colors being added and some old ones retiring starting with the new catalogue in July.
Some of my all time favorites are coming back - River Rock and Pink pirouette, Wild Wasabi and Ridinghood red. They are keeping the Melon Mambo and Soft Suede - my current go to colors- as well as rich Razzleberry.
I know a lot of people are upset about change but I have to say that there are these 48 colors and I have many that I hardly EVER use- try to match up yoyo yello with anything other than kid's cards with brilliant blue or orange and even then you need sunglasses, they are so bright. Ever since pumpkin pie came out, I rarely use only orange either so I can see that these new set of colors cover the rainbow spectrum and are really good colors for many applications. I love certainly celery so much that it covers my family room! My kids' bedroom is so saffron and rich razzleberry and Tyler's room is pretty close to Baja breeze. I am really looking forward to the new colors coming out and can't wait to have pink pirouette come back.
There will also be 5 new in-colors per year and they will be around for 2 years each so any one year after next will have 10 in colors to pick from which would be fun too.
I will miss creamy caramel and green galore, pixie pink, to name a few. I think I will stock up on some of my favorite color items before they disappear for good.
Current Colors that will Retire in June:
glorious green
green galore
gable green
yoyo yellow
only orange
pink passion
pixie pink
orchid opulence
lovely lilac
brilliant blue
close to cocoa
creamy caramel
really rust
ruby red
cameo coral
summer sun
bordering blue
brocade blue
ballet blue
taken with teal
handsome hunter
pale plum
blush blossom
apricot appeal
barely banana
mellow moss
sage shadow
almost amethyst
lavender lace
basic brown
going gray
Tell me what you think of it.
Lynda

Tuesday, April 6, 2010

Sweetchild challenge WT264


This was a little card I made for the SCS challenge WT264 using a sweet child image. Unfortunately the site won't let me upload my cards right now for some technical glitch since they changed their server few weeks ago- They are trying to sort it out but sigh, you can only see this here......
Anyhow, I have been dying to use this Pure inn*cence image from Heather Elis who has an on line store selling downloadable digital images - she now also sells things through MFT in clear stamps- is she not the sweetest thing?
Base card is Real Red. The paper is something I picked up at Paper S*urce eons ago- not sure the name. I paper pieced it for the dress as well.
The white CS was run through Bigshot using the perfect polkadot with a oval frame on top to leave the center open then I scored it using the frame itself- a little trick I am showing at my workshop this Friday. Stamped the image in center and colored with Cop*cs.
Have a blooming good day!
Lynda

Sunday, April 4, 2010

Happy Easter!


I've seen several versions of this idea and thought it was funny and wanted to make one for my in-laws for Easter.
With hearing aids in use with all my relatives on both sides of the family, this is a common conversation.
The base card is barely banana. The chocolate chip cardstock is punched with the pinking hearts border and corner punch. The pretty in pink CS is embossed with the perfect polka dots embossing folder. the chocolate bunny is stamped with versamark and heat embossed with clear embossing powder and areas punched with the scallop circle punch. The sentiment was stamped with simple alphabet from Papertr*y in chocolate chip, punched out with word window and the retired SU DSP from last year's sale-a-bration punched with modern label. It still makes me chuckle.
Lynda

Easter baskets


I have 3 boys and a DH who loves nothing more than chocolate.


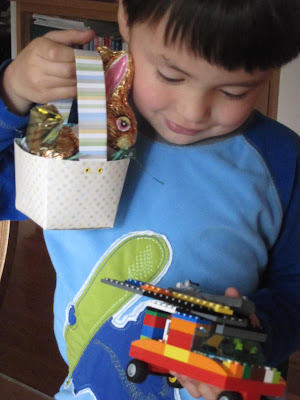
so for Easter I made these little Easter baskets using the take out box die cut from Sizzix without the top closure. The handle is 2x12 inch strip, scored at 1/2 and 1 1/2 inche long folded. I used 2 eyelets on each corner to secure it in place.
It was filled with a mild chocolate bunny from See's and some little milk eggs and a butterscotch lollipop that they really love. Not so much candy to make them sick sick but enough to keep them happy for this special day.


You think they like, eh?
Happy Easter!
Lynda

Thursday, April 1, 2010

Flower hairclips for Gabrielle

Keeping with the flower theme, I wanted to make some hairclips for a little girl in my sister's
life and I remembered little hairclips made with the crocheted flowers. I've made plenty myself but love the flourette's from Stampin Up. She wanted the pink ones and as I already had the ones from last year already in the soft pink, I used them instead of having to dye the white flourettes in the current catalogue which would have been just a pretty.
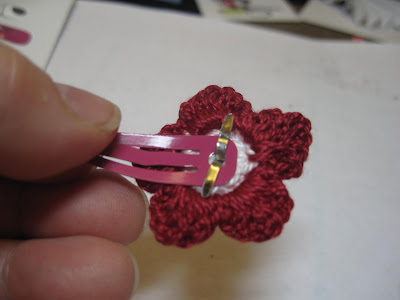
I purchased a set of hairclips from Targ*t in assorted colors and punched a hole in it as shown using the crop-a-dile smaller holepunch.

It punches not quite like butter but pretty easily.


Take a flower- here I used flourettes I ( but you could use felt flowers just as well) and put a circle fire rhinestone brad in the center.

Put the brad through the hole you just punched and splay it open as shown. I tried it on and you can't really feel the brad "legs" at all. and that's it!


Aren't these cute? I am sending two of the pink ones for Gabs - I hope she likes it. She is so sweet- she asks my little sis when I am coming out to visit and stamp with her again- If only I could but NYC is on the other side of the continent....
sigh.

It would be so nice to visit everyone more than just on holidays....
Lynda