Christmas countdown starts tomorrow! Happy December!
Sunday, November 30, 2008
Billy & Lilly Winter Snow Angels
Friday, November 28, 2008
My new Stampin' caddy
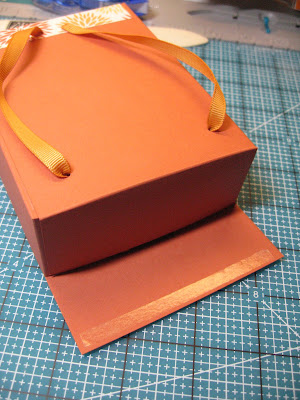
So with a little piece of Stampin' Up Haiku DD paperit is now transformed into my little stampin' caddy- I was looking for my coordinating rub-ons to use on the handle but in my disaster of an office I can't find it right now. You'll have to wait until my next stamp camp to see it in its full glory.
Thursday, November 27, 2008
Cuttlebug Embossing - Tweaked a bit
I thought it would be fun to do a how to for those of us who are visual and like things perfectly lined up- how to make the stacks so that you get the best view of what you are cutting and embossing.
Here is my little card sample of the card embossed with one of the cutting dies.
Here's the how:
I stamped a Cardinal Christmas in Staz-on black.
from bottom up-
A plate
B plate
3 pieces of CS for shim
tan mat
CS to emboss
Die facing cut side UP
B plate
by doing it this way, you can see where the die lays on the paper.
This is what it looks like from the other side. If you like the raised edge look, just flip the paper to the other side when you make the stack. You will probably need to look at the image with the die on the back with a light source to make sure you like the placement and use a very thin repositionable tape to keep it in place. (If too thick it will emboss onto the paper too). the other idea is to emboss first and then stamp on it then you don't have to worry about embossing blind.
spellbinder's label die was used to cut and emboss the sentiment on Certainly Celery CS after I stamped it with Always artichoke- tied with kiwi taffeta ribbon and adhere with dimensionals and mount on red ridinghood red CS and another card ready for Christmas!
Happy Thanksgiving, everyone!
Lynda
Monday, November 24, 2008
The Backpack- my version
There has been a lots of different back packs running around on the stamping blogs but I wanted a version using just one sheet of CS and the scallop envelope for the pocket and so this is what I came up with. ( I know I should not end the sentence in a preposition but hey this is the way I talk- so this is the way I am going to write here anyway)
So here is the front, back and side view of my little backpack.
I had this at my last stamp camp and it was a slightly higher level of difficulty but most people did fine with it and was the hit of the party.
First take your CS- Here I used really rust CS- long ways on the top and score at 1/2, then at 2" from the left, if using a scor-pal. Then off set the paper 1/4 inch from the left and score at 6 inch mark, then 7 1/2.
Rotate the paper clockwise and with left side flush and score 1 1/2 from the left and 2 inches from the right. (It doesn't matter which side you do what but the pictures may confuse you if you don't)
These are the dimensions of the each of the sections. If you are compusive you can score a little the two side sections about 1 1/2 in from the top as shown to make cresing easier (or do it by hand later eyeballing- both works fine). Cut out the sections on the top leaving just one of the 2x 3 3/4 on the top- that will be the top of the back pack. cut the little piece to the left and cut the bottom 1 1/2 inch sections as shown.
Round out the top of the CS and a piece of the coordinating designer paper- here I used Haiku- it's about 3 1/2 x 3 inches- actually I picked out the paper first and then used the colors from the paper to decide what CS I was going to use for the back and the pocket. No need to think at all- all the work has been done for you.... the attach it as shown. Punch out 1/8 inch holes to thread the 1/4 inch grosgrain.
then 2 more on the bottom as shown. the template above has larger holes so you can see where the holes are supposed to be.
Thread the More mustard ribbon
through the holes and tie it on the inside- believe me it is much easier to do this before you tape the bag up- ask me how I know this-
Tie across the top or bottom- I thought bottom looked neater and can't be seen when the bag is open after it is finished.
This is what it should look like from the inside. Place sticky strips as shown. You will close it up first on the side, then peel the corner strips to tape down the bottom.
this is how it should look.
Finally the te long strip across the bottom and seal it. It makes for a neat pack as all the seams are in the back.
Fold the sides at the top of the bag in a valley fold and see how it looks with the cover over it.
punch a hole and put a decorative brad on the cover, then put a piece of self stick velcro- here is a piece about 3/8 x 3/8 inch piece I cut. Put it on the cover side like this then peel the bottom and stick it closed- You should have a perfectly placed velcro closure.
Die cut a scallop envelope and attach to the back pack as shown at the beginning of this tutorial. It makes for a perfect place for a little stamped 2x3 card. Wouldn't a little girl love this with a set of earrings or other jewerly inside or a little notebook and pen or other little goodies?
Enjoy!
Sunday, November 23, 2008
Rambutan
The one that we had was kind of reddish with these spiny " hairs" on the outside. We carefully cut down the center.
and inside was this sweet juicy fruit- which Tyler describes as " a cross between a jelly fish and a grape"- he says this because we actually picked up a small jelly fish on the beach and it had a similar feel on the surface.
The fruit easily pops out and it reminded me of a fresh lychee. Inside was a nut that had the texture of a almond but slightly bitter- I wonder what it would have been like to roast it but alas, I ate it.
(IPA: [ramˈbu.t̪ɑn], Nephelium lappaceum) is a medium-sized tropical tree in the family Sapindaceae, and is the fruit of this tree. It is probably native to Southeast Asia, although its precise natural distribution is unknown. It is closely related to several other edible tropical fruits including ( as I thought) the Lychee, Longan and Mamoncillo. It is believed to be native to the Malay Archipelago. Rambutan in Indonesian or Malay literally means hairy caused by the 'hair' that covers this fruit. In Panama, Costa Rica, and Nicaragua, it is known as mamón chino. There is a second species regularly for sale at Malay markets which is known as "wild" rambutan. It is a little smaller than the usual red variety and is colored yellow.
I am always trying to get my kids to try new things and I am always excited to learn something new- In all of my 40 plus years this WAS totally new to me- I hope when you find these things ar the market that you give it a try- you may like it. Thanks Julie!
Saturday, November 22, 2008
Lovely Letters Monogram
Wednesday, November 19, 2008
Wedding anyone?
This is a card I CASE'd from Debbie Olson for a wedding. It uses Fabulous Flowers stampset- one of my all time favorites. Stamp on whisper white in Blush Blossom 5 times and cut out 3 layers for the large flower image and 2 for the little flowers on the side. Cut out each layer smaller so there is depth. The smaller flowers have the center stamped in mellow moss. I added the white half back pearls from the pretties kit. Take white Cardstock base and mount blush blossom CS stamped with canvas in blush blossom. Mount a white piece of white CS stamped with swirl from Baroque Motifs in moss then punch the corners with ticket corner punch- mount on mellow moss paper with corner also punched. Use Round tab punch to punch out the tab- stamp with baroque motif in blush blossom and stamp love from everyday flexible phrases stamp set in chocolate. Tie white taffeta ribbon with little piece of stringed pearl- I got it at Joanne's one dollar bin in a roll for my lifetime supply- I love the color and the elegance.
Monday, November 17, 2008
scallop envelope boxes
This was the original cute little box done with Autumn Harvest and Define your life stamp sets.
How to: Take 2 diecut scallop envelopes in ridinghood red.
Tape the bottoms together. Definitely recommend the sticky tape for this one- if you want the box to hold.
cut a 1 1/2x 7 3/4 inch piece of paper in same color and score at 2 1/4 " from both ends to make the middle band.
This is how you make the four sided box. This requires no other pieces besides the 4 scallop envelopes. 
Other papers or cardstock may need less or more depending on their thickness.
ADd another side and another to make the four sided box.
If you are a neat freak like me, you can make your bottom into a pinwheel which makes it a little more sturdy.
And this is the finished box- before the embellishment. From just one sheet of CS and a strip of DD paper! It would make a easy little gift box for a small gift- glitter, glue, brads, or cookies or other edibles, or a box for a chocolate easter bunny and little eggs strewn about come spring? all wrapped up in clear cellophane and tied with ribbon?
How to: Take 2 diecut scallop envelopes in ridinghood red.
cut a 1 1/2x 7 3/4 inch piece of paper in same color and score at 2 1/4 " from both ends to make the middle band.
Decorate with a strip of decorative paper and embellish as you wish. endless varieties and color choices are possible. I think that little stip of DD paper adds so much!
I started using the premium cutting pad with these dies and find that the sides are scored better without cutting throught like it used to with my acrylic plates- so if you use a lot of this die with the Big Shot, look into it. You will have to play with the shims though to get the right depth of cut. I tried cutting it with the shims that came with it and found that another sheet of SU cardstock worked the best when cutting SU cardstock.
Other papers or cardstock may need less or more depending on their thickness.
ADd another side and another to make the four sided box.
If you are a neat freak like me, you can make your bottom into a pinwheel which makes it a little more sturdy.
And this is the finished box- before the embellishment. From just one sheet of CS and a strip of DD paper! It would make a easy little gift box for a small gift- glitter, glue, brads, or cookies or other edibles, or a box for a chocolate easter bunny and little eggs strewn about come spring? all wrapped up in clear cellophane and tied with ribbon?
Sunday, November 16, 2008
Deer Friends swap Card
I think the snowman circle must have been run into a stickermaker to get an even coating of adhesive then sprinkled with dazzling diamonds. It is really pretty IRL.
My kids are already counting down to when Santa is coming- Is there an advent calendar going out 40 days?
Wednesday, November 12, 2008
Easy Rub On Holiday Card idea
Add metal edged tags- the circle punches 1 1/4 and 1 3/4 will fit perfectly! and each pack comes with both sizes. The circle shaped rub ons will also fit inside the tags if you wish. Add some ribbons tied with a glue dot and place inside small open end envelopes and Bob's your'e uncle! ( as Jamie Oliver would say... those brits have such cute sayings ) You can make a whole gob of hoiday cards using some textured paper, Designer paper and a pack of rub ons and some tags. I thought it was really cool and thought maybe it'll help some of you looking for holiday card ideas!
Monday, November 10, 2008
Asian Fish Card
I've got this stamp from a little stamp shop in Seattle on Pioneer Square years ago and to this day is still one of my favorites. It's PSX and the Asian words from the left from Kodomo. Stamp fish in black on white CS then SU watercolor crayon to color it and and the water in. Mount on black CS. Stamp words in versamark on not quite navy cardstock and glue on small pieces of paper. These are handmade paper from Japan my DH brought me on one of his many trips. I really waste nothing on these type of papers. Even a little tiny piece can be used as an embellishment- see the little tiny peice of gold paper on the right side top. I've even used the words and the seal separately for other Asian cards. Mount the whole thing on a white cardbase and you are done!
Have a nice week!
Lynda
Saturday, November 8, 2008
Christmas Book Box
http://nancykstamps.blogspot.com/2008_10_12_archive.html and asked if I had a template for it and I did not but it looked pretty straight forward so I decide to come up with a template for it and had it for my swap at our last stamp and chat. The cover shows Home for Christmas stamped in black ink pad on 4x4 white CS and colored with SU watercolor crayons in old olive, artichoke for the rocks, garden green, apricot for the lamp, cocoa and chocolate chip then red marker for all the red spots. A little 2 way glue pen and then dazzling diamond glitter. A 1 1/4x 4 inch strip of DD paper from I wish scrapping kit- "LOVE this PAPER!" and wide red grosgrain ribbon over quarter sheet of certainly celery CS.
This is what it looks like from the side.
It looks like a book and will hold at least 4- 8 A2 cards and envelopes. It would make a lovely gift for someone.
Use any color you like for base- here is real red cardstock 8 1/2 by 11. turn it longways across and using scor-pal place left margin at 1/4 inch and score at 5 and 6 1/2. so each "page" is 4 3/4in and middle is 1 1/2 in in width.
Trim away the the 2 1/2 in below left side page and the center. The section below the right side will form the bottom of the box and part of the front to which you will tape the front panel.
Place sticky tape along the front of the piece- on the underside of where the finger is in the picture.
Take another 8 1/2 x 3inch piece of red CS. Using Scor-pal, place left margin at 1/8" from the edge and score at 1/2" and 2". Flip it over and do the same on the other side. Turn it long ways and score 1/2 inch from the edge.
Labels:
Holiday- Christmas,
Stampin' Up,
Tutorial
Subscribe to:
Posts (Atom)