Wednesday, December 30, 2009

Altered Card


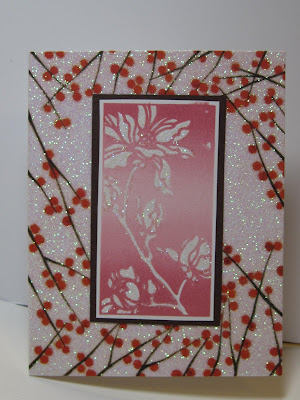
I had a little time to shop after Christmas and saw this glittery card at Papyrus and just loved it except I always make my own Holiday card and did not need to buy a Christmas card but still bought it just the same with the intention of using the glittery part for a slightly altered card and here it is.
I have also been cleaning out my supplies and decided to unmount a couple of my old Stampin' Up sets- this is called Botanical Gardens, retired now but still lovely. Stamped in Cotton Candy- also retired spectrum pad from SU - it has gradations of color that I love. the blank spaces are glittered with dazzling diamonds and it is subtly pretty although the glitter is again hard to see in a photgraph. Mounted on Chocolate chip and just let the background be the star of the card.

This is what the card looked like originally on the outside.


and on the inside.

I put a blank sheet of paper and stamped it with a sentiment from Well Scripted, one of the new sets available from Stampin' Up after January 5th in clingmount or wood! Hooray!
It is such a lovely font...... I put a fine line of glue around the edge of the paper and put some glitter on it to create a little definition.


This is the final card. I am making a gift set for some special people in my life and I will be including this in the set. Pretty easy to make. So if there is a ready made card you see that you like but make it your own, it is pretty easy to do as you can see. Try it out!
Lynda


Monday, December 28, 2009

Something Sweet Gumball Card


I love the concept of Sweet Treat Cups. Although mailing them requires a special envelope, it is such a fun card that I love using them for birthday cards, especially for little kids. They love finding the trap door in the back them opens to let them sneak a treat.

This card uses the Big Shot with the Curly Label Movers and Shapers Die to fit the Holiday Window and the Punch windows die that matches some of the punches exactly.

The base card is Rich Razzleberry. I layered it with pumpkin and white on the front using the Dotto (so I can peel it back up to put the Sweet Treat cup between the layers) then used the Circle Holiday Window die with the Big Shot to cut through all 3 layers. I also used the Punch Windows Die that matched the modern label punch to diecut the base card with the Razzleberry Lemonade on the bottom. The trick with this part is that the die is too high up on the Movers and Shapers die even if it is flush up against the die. ( If you have one of these dies and you try to die cut the card you will know what I mean. ) You will need to put the bottom of the card up a bit from the edge where you want it cut, lining up the sides that have already been cut, then diecut the Modern Window then roll back over to get the card out so you don't crease and cut the card again.

I stamped the gumball machine in Melon Mambo and some gumballs as well as in Green Galore and so saffron. Some Gumballs were stamped in scrap white CS and cut out-- If Stampin' Up is reading this, I NEED a 3/8 inch circle punch for this!- -I also stamped it on the piece of CS on both sides that I used to close the trap door so that when all the candy is gone, you still see the gumballs through the window.

I punched a round tab out of pumpkin CS to attach to the trapdoor to make it easier to pull out.

Stamp white CS with sentiment and use the real modern label punch to punch it out. It will fit perfectly inside the window. Tie a little melon mambo polka dot ribbon and Bob's your uncle!

OOOOH, I can't wait to show you all the goodies in the Occasions Mini Catalogue and the Sale-a-Bration!

Lynda
Sunday, December 27, 2009

Money or Check Holder by Mom


The talented ladies at my local stampgroup had a holiday cardswap and dessert party (YUM, YUM YUM!) and Annette showed one of her holiday gift card holder which my mom thought was a great idea as she had some people she wanted to thank for taking care of my 96 year old grandmother who has dementia.


She asked to see the sample and came home and asked if she can use some paper from my monstrous stash of Stampin' Up DD and cardstocks and just whipped these out. She had to add a little of her signature which is punched flowers and I thought these were great and she gave me permission to show them to you.


I love this Autumn Meadows DD paper from the Holiday Mini and she used the last bit to make an accent strip on the belly band and the flower.


She loves the sparkly of the St*ckles in the centers of her flowers.


Sigh! It would be SO much fun if she lived nearby. My mom is so cute! whenever I show her a simple technique or something, she runs off and does amazing things with it and then I get inspired by what she does and want to do better.


Check out Annette's blog here at: http://stampinwithannette.blogspot.com/


The holidays have been so crazy with making cards, gifts for family, cookies, and still working full schedule that I had not had time to do much blogging or creative cardmaking so I am happy to have a few moments to blog for you. My mom suggested that maybe next year I send out New Year cards instead of christmas cards but then I am not sure I would enjoy these few days of break between Christmas and New Year as I am sure I would procrastinate and be stressed all through the holiday. what do you think?


Lynda


Saturday, December 26, 2009

Golfball Gift for my DH

My husband does nothing half way. When he got laid off and had some time on his hands he decided to take up golfing and he does it like he does everything else, with detailed study with a goal of complete mastery. He had asked me to
mark some golfballs with his insignia but I had been so busy I never got around to it.

Now that the holidays are over I think I can devote a little time to him and here was my little card to tell him so. I found the golf club pen at a dollar store and the tees at another. I used the golfbag image from the package that the pen came in as well. The old olive CS was given a diamond texture using the texsture plates for the Big Shot and I tied the golf club onto the olive cardstock from the back using hemp twine.


Inside the card I took some 1 1/4 inch circles in white CS that I ran through a CB embossing folder turned bubble side down to simulate golf ball indentations then used dimensionals to attach it. the tee stamp is an old one from my stash from Mostly An*mals. Coupon for you is retired from SU with some images I thought he may like on his golf balls.
The balls were easy to make and would be a fun addition on a card for any golf lover.
Lynda

Friday, December 25, 2009

Merry Christmas 2009


Now that most of my cards have gone out, I wanted to wish all of you a Merry Christmas and show you my Christmas card this year.
I searched high and low for the sleigh die as I did not wish to cut one hundred of them as I did the popout house last year and I found one on sale from Spellbinders. I found one from Sizzix after that but I love the detail from the embossing after cutting. It has a dazzling diamond glitter detail on the Santa and reindeer (from Wandering Words set) as well as on the trees and snow and around the greeting although hard to see here.
It is an easel card as you can see from the side.
Inside I stamped the top sentiment from the Scenic season in night of navy then the seaon's greetings in real red. Our name was a custom stamp from Stampin' Up. The snow flakes were punched by my poor mother who probably got carpal tunnel from it.
The picture of the kids on the front was what came out of over 500 pictures taken from me, my DH and my FIL and some serious photoshop merging of 3 different photos. All my friends with grown up children keep telling me that it will get easier but it's hard to believe when you are living it.

Instead of Christmas Pudding with brandy butter, my MIL brought this delectable tray of goodies- Marzipan fruits, petit fours, jelly fruits and chocolate mousse in chocolate cups to name a few-which we devoured with abandon after a hearty prime rib dinner my DH cooked to perfection. Truly Happy Holidays!
Lynda


Sunday, December 13, 2009

My mom's card


My mom who lives in Florida, is an avid crafter and she called me one day and said that she wanted to see if I could find her this stamp with a butterfly in the middle of a box from Stampin' Up- I knew exactly what she meant because it was one of my favorites from the past-Ageless Adornments! I said. I searched high and low all over my room but alas! I could not find it. I was REALLY distressed. Even with all my "crap" I usually know where everything is for the most part. But I could not find it. I had NO idea what happened to it and felt really bad that I lost it somehow.
So when one of the local stores were having a used stamp sale I was on a mission and you know what? they happened to have this set on sale used and I snatched it up. I called her and told her of my great happiness at having found this set and held it for her to give her at her visit.
So here she comes and unpacks her suitcase and I am so excited to give her the set and she says- "you know I found it after I called you- I guess you let me borrow it!"
And this is the card she made for me from the set- It is so pretty I can ALMOST forgive her for putting me through the stampin' wringer all that time.
At least I have my own set back now....
Lynda

Saturday, December 12, 2009

Tag Box


This is an adaptation of a box we made at Stampin' Up front row regionals. We diecut the bitty box with Bigshot in textured cardstock- if you use a 12x 12 CS you can get 4 out of one sheet.
I made a "free for all" at my last workshop- I put out all my holiday stamps from current and retired and have people just make tags that they like. Tie a ribbon around the top and mount an image on the front- here retired set Deer Friend- punched with 1 3/8 circle then a scalloped circle in red and another in white. Margery thought it looked like a poker chip- so I guess you can make a little gift box for game night as well using a different image in the center.

These are some examples of the tags we made - you can make several same tags or make several all different- up to you. It is a lot of fun- use the Crop-a-dile to quietly set the eyelets- easy peasy- tie with silver or gold elastic cord, string, whatever suits your fancy.
Only 15 days until Christmas!
Lynda

Friday, December 11, 2009

New Clear Mounted stamps from Stampin' Up

OMG! I think I died and gone to heaven!

I received my preorder from Stampin Up today- as demonstrators you can order a month earlier- all this will be available from the mini for customers starting January 5th 2010- and my wish for clear mounting stamps has come true!

I wanted to show you all how it looks and how it will work for you.

This set is called something Sweet and uses the sweet centers from the holiday mini as well to make a candy dispenser, flower, a magnifying glass, a fishbowl to name a few. All the images are printed in the front of the box in actual size.


This is how it looks all stacked up side by side for easy finding with names written clearly and ALL the images in small size on the spine for easy finding. No searching to look for that sentiment in some set inside.


This is I {Heart} Heart set on the cover and inside. The cases are easy to open and close. It has the rubber sheet PRECUT with the clingmount already on and a sheet of clingmount with image printed on to match to use one of two ways.
You can peel off the paper off the clingmount on the rubber and attach to the acrylic block to use as is. Nothing else need be done. I think the cling is better to the acrylic block this way to tell you the truth.


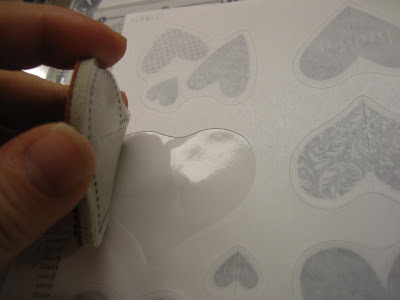
The printed cling sheet comes printed and precut with a cut in the center of the image to allow it to be peeled without the whole sticker coming off. It is cling on the back side and sticky on the front to stick to the clingmount side of the rubber stamp. Just tear te center cut and peel off the paper cover as shown. It is really sticky and may peel off so take care.


Then take the rubber stamp with the clingmount and stick it to the sticky part of the clingsheet as shown. Line it up as well as you can as it will be a permanent stick.
( I have goofed and had to peel it off- but do it carefully not to tear the clingmount foam- and repositioned it- but it is easier done sooner than later)


This is what it looks like if you place it exactly on the sheet.


Peel the whole thing off and the clingsheet will come off the backing as shown-
and it is now ready to use.


This is the front of another set - one of my favorites called Vintage Vogue and next is how it looks from the back of the box. The box is translucent so you can see the images through the box if you used the clingsheet.


This is what it looks like all cut up inside the box.


When you use the clingsheet that comes with the set you can see the image through the acrylic block so I plan to mount all my stamps this way. To use the stamps, attach to the clear block and hold it there for a few seconds and it will hold.


The stamps have a deeply etched image so you can use it as needed but you all who know me as a having a bit- all right, a lot- of OCD issue, I like a really tight image with no margins.


So I've been cutting rubber on an angle with a craft scissors to only cut the rubber and not the clingmount - as shown- really pretty easy-


And this is my final stamp- LOVE IT!
There was a recent Christmas poem posted on SCS that I wanted to share with you that made me laugh- my advice- keep your door closed!

Twas the night before Christmas,
I'm glued to the tree.
I'm wondering what Santa brought just for me.
Could it be cardstock or inkpads or lace?
Or some stamps, I said, with a smile on my face.
And that's when I heard him......"Hi Santa, " I said
He replied, "You know....good girls should be in their beds".
"I know I should Santa,and now I've been caught.
But I was just so excited to see what you brought."
"Well, let's take a look in this room where you work".
He shook his head quickly, and left with a jerk.
I heard him exclaim as he put it in gear.
"You've got enough crap,I'll see you next year!"

I am having my Christmas early today!
Lynda


Monday, December 7, 2009

Punch Owl gift card


This is an adaptation of the card with the Owl from Mercedes' blog here http://mercedesweber.blogspot.com/
that I made up for my December workshop.
The owl is made up of 1 3/4 inch circle in choc chip, the wings are choc chip and creamy caramel scallop square punched and cut on diagonal, the white of the eyes are 1/2 circle, the feet from the Boho Blossoms punch in pumpkin, the hat is curly label on the side. the hat brim is punched with wide oval punch first before punching it with scallop oval and glittered using course glitter. Beak is the same punched flower as the feet -just one petal.
Stamp the sentiment from Teeny Tiny wishes set, punch with word window and then with modern label punch. Make sure you only tape the left side of it so it does not stick to the red cardstock.
The Olive green CS is 5 1/2 x 8 inch CS folded in half just like the red CS then scored 3 inches from the cut edge to make a mountain fold inside the card as shown below to make the holder for the gift card.


Run the whole thing through the Top Note die- Yes it will cut through all 4 layers- making sure you put the cut edge of the card to the edge of the die and the folded end in the middle of the die so it does not get cut. Punch out a slit on the fold with word window to make opening for the gift card. Tape down the fold on the edge. I ran the petals a plenty embossing folder - putting in the cardstock only part way in to partially emboss. I then punched a small hole through the front of the red card and through the olive green cardstock to put the ribbon to tie it.
You may want to tell the receiver that there is a gift card inside as they may only open the red card and not look inside the top note decorations as some people would probably do.

18 days 'til Christmas!
Lynda