Showing posts with label Gift idea- kids. Show all posts

Thursday, February 14, 2013

Lynda's Fancy Favor Box Candy Dispenser


 I had a medicataion dispenser a while back and thought it would make a cute candy dispenser as a smaller version but I wasn't sure how to do it so I sketched and thought about it and with  Valentine's Day approaching, I finally got around to putting it to paper and making it for my DH.  I wanted the box to be not too big and after couple of different trials found the Fancy Favor bag to be the perfect size.  This is the side view with the box filled with Reese' pieces but I think a lighter candy like taffy or something bigger would be better and would not spill out as much- although this was really cute. 
I decorated the top with a topper using a DSP from More Amore. 
You take the fancy favor die, diecut a piece.  One of the middle panel, cut 1/12 inch up from both sides and cut across the center as shown.  If you want to emboss the box or stamp on it, best to do it now.
When you put the box together it will look like this.
You want to make another sheet to reinforce the front flap and the bottom. Cut sae color cardstock 3x 2 5/8" and score a smidgen less than 1 1/2 inches as shown.
It will fit in like this but don't do it yet. 

You need the side mechanism which will make this work. I tried several different methods and I think this is the easiest.  Take a piece of paper 1 at least 3 inches long by at least 1 1/2 inches.  fold it half along the long side. ( this is a scrap I had more like 3x 4) - in the picture the fold is across the top.  Cut a little wedge off the bottom about 1/4 inch and another about 1/4 inch away at the same angle as shown. 
Put the whole thing- fold on top and the bottom taps hanging over as shown and circle punch - this is a 2 1/2 inch circle punch and punch to just beneath the a 1/2 inch mark.
Now you have the mechanism for the door. 
Unfold and cut in 2
Depending on how much you want the drawer to open, you need to make the cut.  I thought about 45 degrees were good.  You score at the dotted line and cut 1/4 inch out so we can tape it down.
Put one of the taps as shown- this is the right side, (left side would be mirror image) put tape on both sides of the tab to tape down to the cover.  If you want a brad, ribbon or some pull mechanism in the front, this is the time to do it.
After you tape the mechanism to the sides and any pull mechanism for the front, I would put the reinforcing panel as shown and tape it down so the inside looks neat and you have a stronger drawer front.
Fold the mechanism in as shown and close the drawer.
As you open the drawer now the mechanism will catch and you have this adorable dispenser!

See mom?  all those years with my nose to the math books did pay off!

Enjoy!

Lynda

Thursday, October 11, 2012

Googly Ghouls October make and take and Lin's card


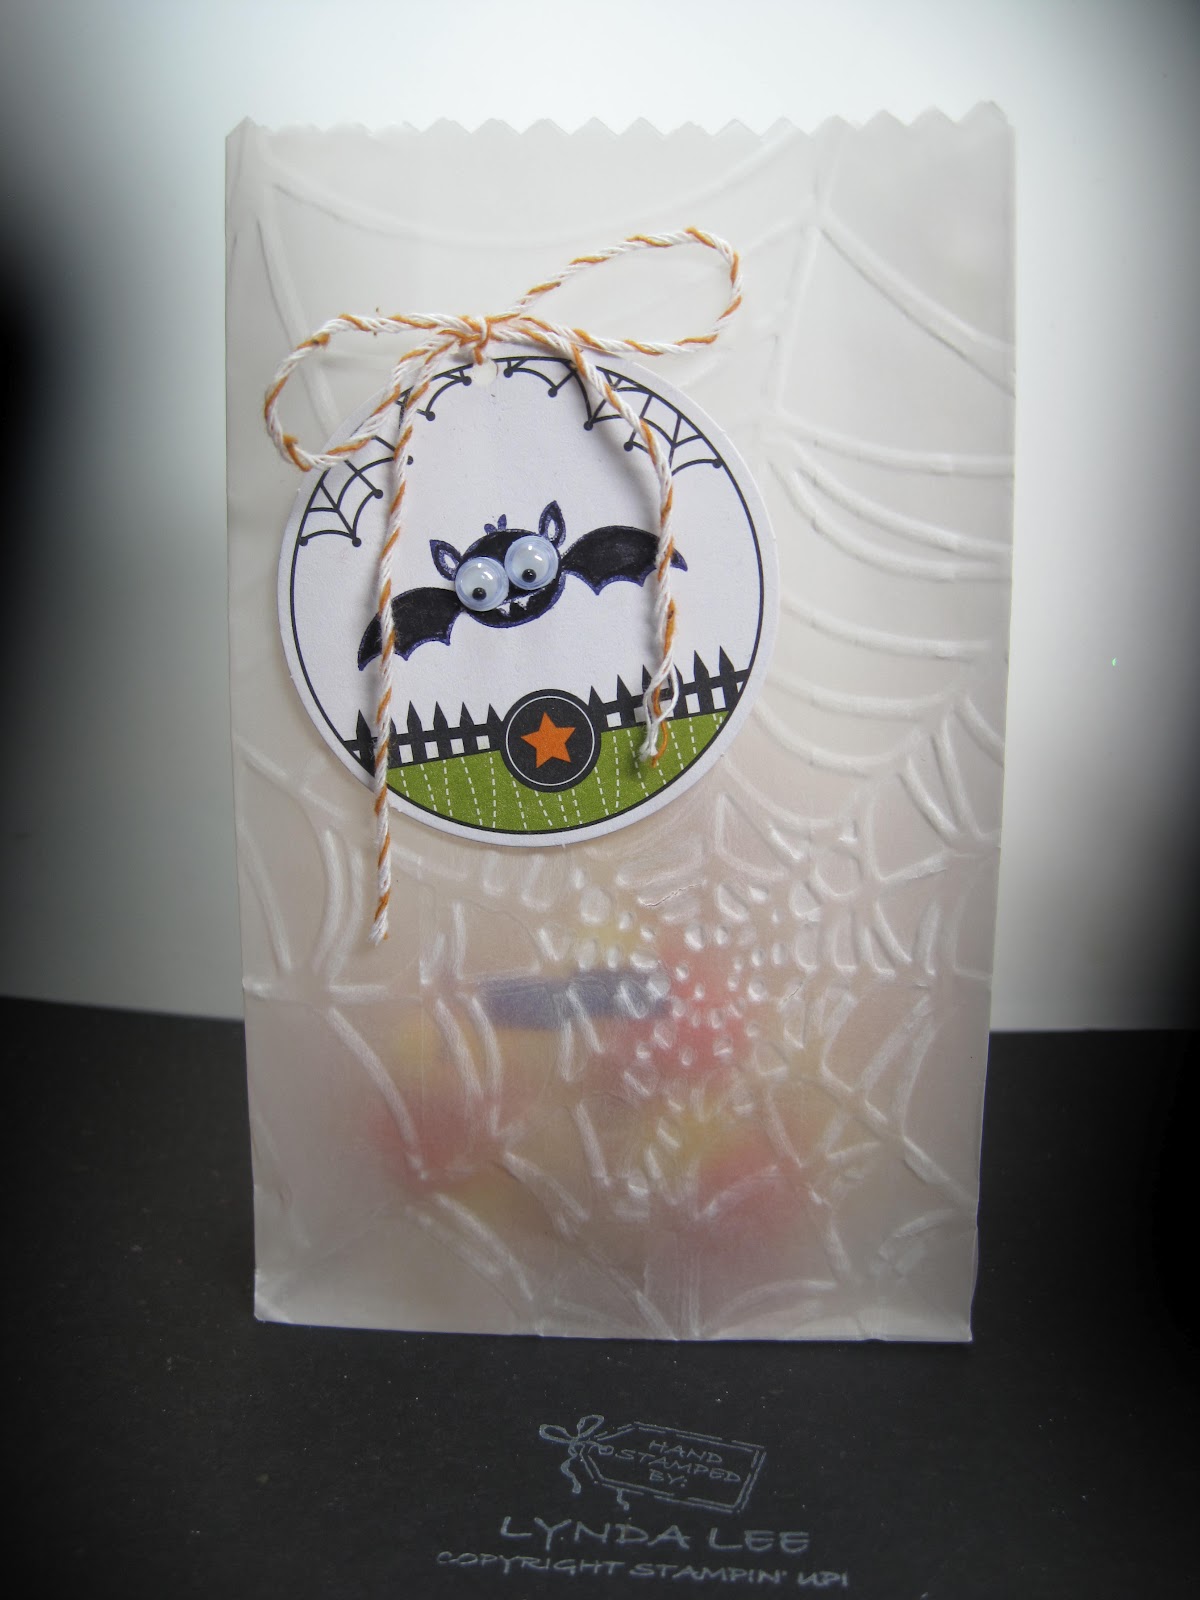
   Because I became a doctor in 1987 and finished my training 5 years later I missed the window to be grandfather'd in for a never ending license and have to take an exam every 10 years (which I think is a GOOD THING!) but it does take a toll on the family and my extracurricular activities as I have to prepare for it.  So my projects for my workshop this month is really pretty simple.  This is one of the projects we will be making this week.  Take the Ghoulish Ghouls desinger kit (it comes with 10 glassine bags, 10 pieces of pumpkin pie twine and 20 preprinted tags you can embellish how you wish and a package of googly eyes-- so FUN!).  Emboss the bag with the spider web embossing folder.  Stamp the bat on the preprinted tag and add googly eyes. Put the twine through the hole on top of the tag and then make a bow from the twine and glue dot the whole thing in place. Fill the bag with candy of your choice.  You can also fold over the top and staple or punch 2 holes to loop the tag through as well.  Whatever suits your fancy.


I have downline friends that are amazingly talented. 
Lin Tsai made this card and we were all WOW'd at my last stamping party.  Love the layout, simplicity, really works well.  Thank you, Lin for sharing it with us!

Monday, September 24, 2012

Batty Purse


Stampin Up used to have a contest in their monthly magazine and this was one of several entries that was made by Missy Roeber from Utah that won.  Because there were no directions, this is what I did.

Take a black purse diecut and emboss with the spider web embossing folder once- not embossing the top part. Use the left over paper from the purse to punch out 2 large ovals about 2/3 of the oval. I then used a 1/2 inch circle punch punched out scallop bottoms of the wings.   Using the petite pennent builder punch
out 2 black pennants for the ears.  Cirlc punch 3/4 inch white carstock for the eye and 2 more 1/2 inch circles in black for the pupils.  Pennant punch 2 more to make the fangs- with enough room on the triangle to tape it under the ourse cover. Add the handles with the mini brads and it is all done.  Add some sparkle to the eye with the uniball Signo gel pen.

Fill with candy of your choice and give it to someone you like to say a Batty Hello!

Monday, October 24, 2011

Jungle Party Favors


My twins wanted to have their party at the Jungle- a indoor playground of mazes and tunnels- I asked them what kind of theme they wanted and I expected Lego or pirate or something but not no response instead- so I decided to just go with the name- the Jungle- I had these grass strip dies from Sizzix- which I initially complained had blades that were too tall but worked out better for the jungle feeling. The animal diecuts are from Spellbinders that I got years ago on sale that I diecut with close to cocoa CS (retired, sadly) and embossed and colored in with chocolate chip die ink for the animals- Zebra was black on whisper white CS.

I diecut fancy favor boxes in real red, stamped the sentiment from Friendly Phrases set, stamped my kids' names with simple alphabet from PTI, assembled the box, wrapped the grass and used dimensionals to attach the animal diecuts, then added a chocolate chip textured CS strip with brads for handles. Filled them with jungle theme pencils, erasers, bracelets, a packet of tropical flavored starburst and a Lego minifigure- one of which was a zookeeper with a gorilla and a banana- very apropos.


Lynda


Friday, April 1, 2011

Chris and Gabrielle's Flower Hair Clips


My sister Chris sent me these pictures of hair clips she and her talented little girl Gabrielle made "inspired" by my hair clips I made using the crocheted flowers from SU here http://stampingdoc.blogspot.com/2010/04/flower-hairclips-for-gabrielle.html and I thought- My little grasshopper has surpassed her master- (you have to say it the old Kung Fu show way) Aren't these just darling? They used packaged flowers in different colors with brads with matching color hair clips.
so pretty!

and here is Gabrielle, our crafter extraordinaire modeling her creations! Oh So Pretty!


Sunday, October 17, 2010

Fancy Favor Box easy with no waste!


October is a hectic month in my family. In the last week there had been 5 birthday celebrations, my DH, FIL, my own father and my twins. To top it off there are these superstar things in school where you are supposed to do something special and with going to work, meetings after work, baking cupcakes after meetings after work, getting up early to make favors for the twins birthday party where I think everyone in the class came, I am done for.
But I did want to share with you a little trick for using the fancy favor box. You know I hate waste and to
use the fancy favor box the "right way" I would have to use 12x12 CS and waste a lot of paper- but the real problem was that I did not HAVE any 12x12 enough to make treats for 40 favors. So this is what I did. Take 8 1/2 x 11 CS and cut it longways- so 4 1/4x11 -and lay it on the die (I took a silver sharpie and marked the edges so I knew where it ended) so that the bag flap and the bottom flap are shortened- it should look like the picture on the left after you diecut it.


I then take a piece of matching CS about 2x3 ( I did use a 12x12 for this so that I got 24 pieces out of one sheet). I stuck some sticky tape as shown. (the tape on the box side goes on the side that will be outside of the box by the way.)


I was going to use this specialty Rockability DSP strip (retired that I bought extra just for this occasion) so I used it to guide the areas I wanted to stamp. The sentiment on the back is from a hostess set More the Merrier. The names are made from simple alphabet from PTI.

The boys picked out a pirate cake so I made the thme pirate and used the sword from Pirate time (retired) and embossed it with silver EP. Simple but I thought really cute. The boys gave me thumbs up.


Once I have everything stamped then I put the box together.


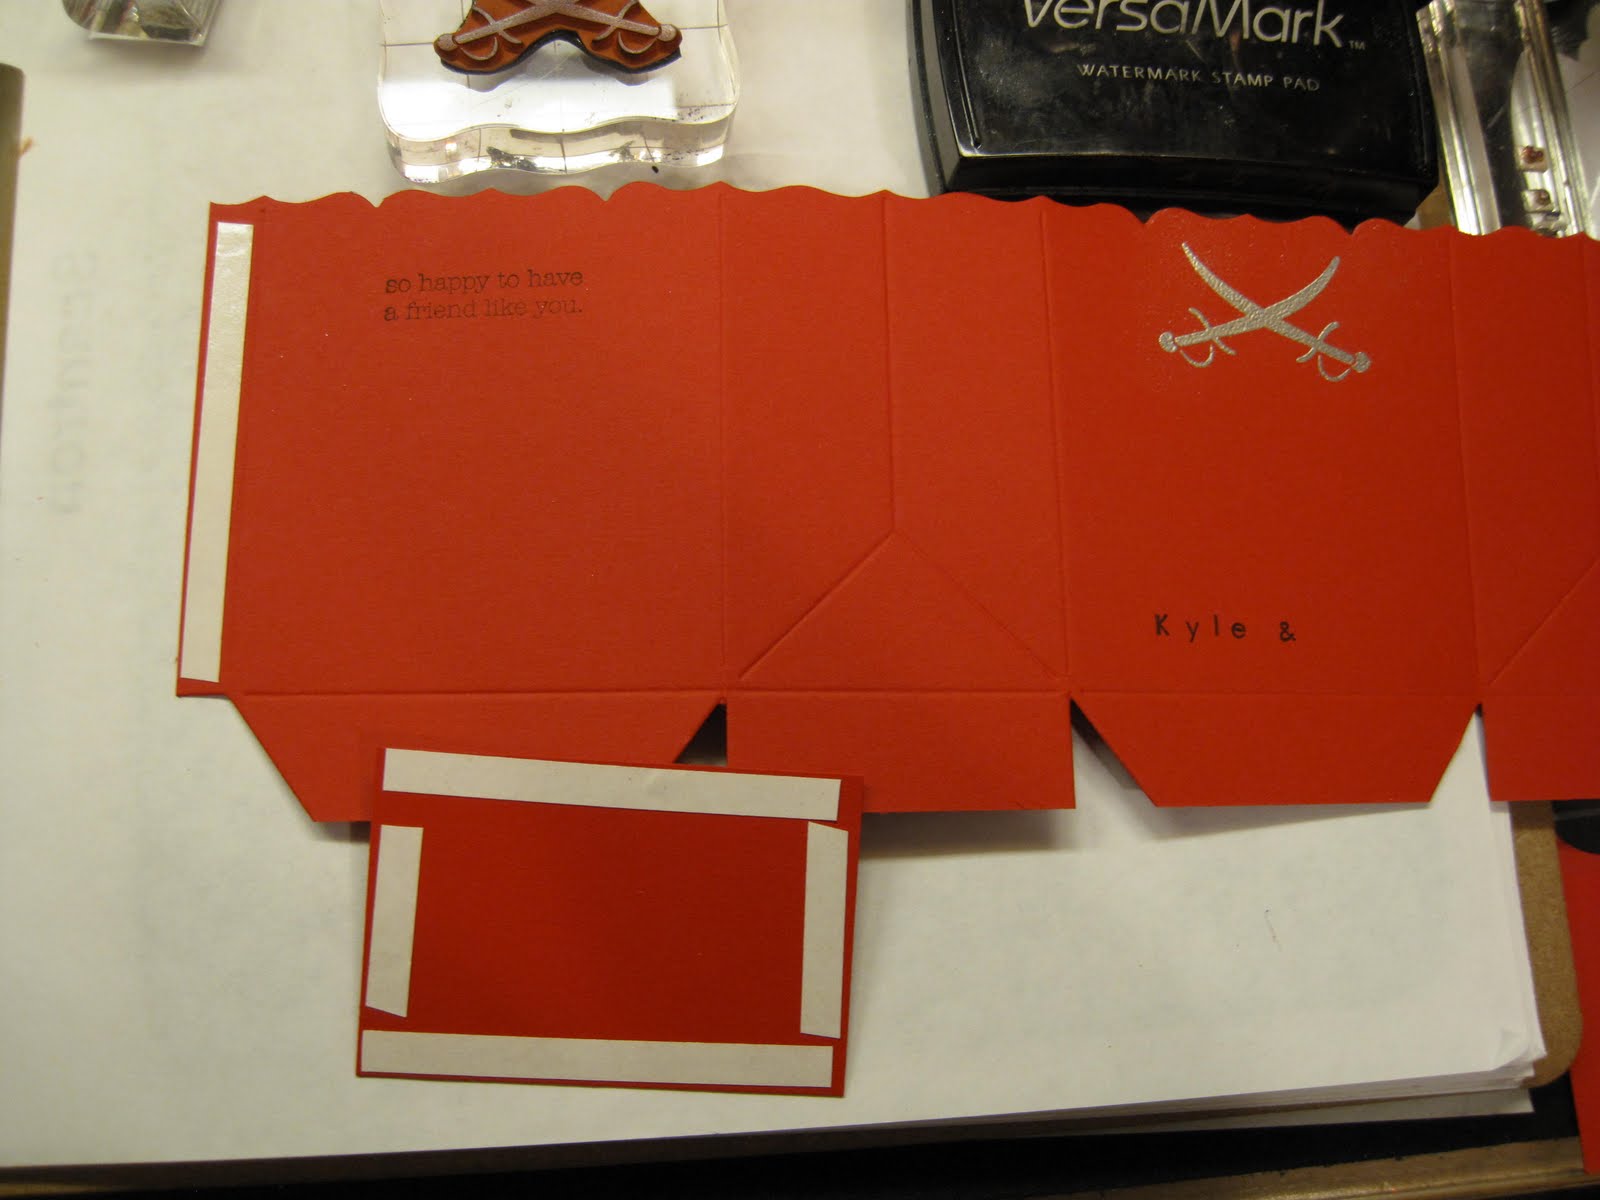
First I put the side together. Instead of picking it up and trying to stick it, it aligns better if you just put it down and close the other side down onto it. It will be perfect everytime if you do it this way.

The size of 81/2x 11 allows for just over 1/4 inch overlap perfect for the sticky strip to hold it strong anyway.


This is how it looks closed.


I then put the strip around the center because it does need some extra space for the folds. I find it always easier to glue things on when they are flat. I like to use sticky strip for this as well as it is really secure. I also like a small strip at the end to keep it really securely on.

Start from one edge and wrap it around while you fold the box over and over to accomodate the ends.


Keep going around the edges until you come to the edge and tape it securely so it does not fall off.


This is how it should look when you are done.


Now take the rectangle piece and tape it on . I did fold the shorter ends in first then with the angled cuts on the side on top of that before I attached the bottom unlike the picture.


This is how it looks when you have it attached. I did push it from the inside to make sure it was really stuck. On one of my favors, I stamped the sword in black so that I could pick it as a special one that could win a prize.


I used my crop-a-dile to attach textured black CS 8 1/2 x 3/4 inch strips as handles using some red eyelets.


This is what it looks like from the back. It was not too hard and for less than 1/2 the cost of those store bought cheesy favors I was able to give a personalized gift. I filled it with crayola crayons that I bought at start of school year just for this purpose when it was dirt cheap, crayon erasers, slap stick, pirate stickers, and a little candy treat for the kids ( I know it is bad for you but what birthday favor is complete without something that is bad for you but still yummy!)

Now to have these kids write thank you cards for all the things they received from their friends....sigh. I have to go make 40 thank you cards.... The things we do to teach our kids good manners! I do think it is worth it. You just have to start young so that they think there is no other options.
Lynda


Monday, September 13, 2010

Marisa's Candy wrapper treat


At my last demo get together Marisa (check out her blog here http://bellaconfetti.blogspot.com/ )had us make these cute little candy wrapper boxes and I was strapping my brain to come up with a candy wrapper for a make and take and thought perfect! She use the Halloween Hoot set which I do not have yet so I had to improvise for my workshop and this is what we did.
Took the razzleberry CS and diecut it with the new candy wrapper die (another LOVE IT- think Miss Piggy saying this in high falsetto- moment!)
then stamped the spider web and Spooky from the Wicked Cool set in black to add some interest to the box, assembled the box then wrapped 1 1/2x 6inch Wicked Fun DSP around the center.

I needed a sentiment that would fit inside a circle and I know I wanted to use the witches shoe from the same Wicked Cool set so I was searching for a sentiment and came across the perfect sentiment on Batty for yOu set-" trick or treat, smell my feet".
I already clingmounted my sets in the past so it was no big deal to use the craft knife to separate the words from the image. Now I have more uses from the same set!


I inked the shoes using pumpkin pie and crushed concord markers onto whisper white then stamped the words in black, punched it out with 1 3/8 inch circle punch then layered it onto a celery CS punched with the scallop circle punch, mounted the whole thing with dimensionals. Using the CS as the base, the candy wrapper is sturdy enough to hold in the candy without any tie at all so you can twist and untwist to get the candy out.
I am just loving this die!


This is the final project! Thanks Marisa for the inspiration!
Lynda