Showing posts with label Giftcard idea. Show all posts

Saturday, December 21, 2024

shopping bag card

 Shopping bag card


• Poppy Parade cardstock basecard scored at 4 1/4 x 11 score at 3 1/2 and 9 to make a 4 1/4 x 5 1/2 A2 size card in a different fold
• white cardstock for inside middle panel 4 x 4 3/4; inside bottom panel 4x 2 3/4  to stamp sentiments
• shopping bag from DSP 4x 9 1/2  score at 1/2,4,4 1/2,5,8 1/2, 9 and turn 90 degrees 1/2 from bottom and 1 inch from top (if directional)
• 1/8 inch circle punch to make hole for the ribbon or awl to make hole
• 2 pieces of ribbon for bag handle- 2 pieces of scotch tape to tape down the ribbon - 
• belly band 1 1/4x 9 1/2 or so white cardstock - put opening in front to hide behind element - stamp sentiment in poppy parade ink and put the snowman (from Snowy Wonder set over the fold to hide the seam
 

Saturday, December 7, 2024

Gift card card


 super easy Gift card card

take extra thick white Cardstock or whatever cardstock you want to use  4 1/4x 11 scored at half at 51/2 to make a A2 card and fold one of the ends at 1 1/4 to fold over on the front to create a pocket for the gift card
take 2 pieces DSP 4 x 1 inch - one for the folded flap and the back of card that is exposed to the front
1 DSP 4x4  for the left of the front panel 


Tuesday, January 23, 2024

punched belly band money/giftcard holder using Filled with Happiness stampset


punched belly band money/giftcard holder using Filled with Happiness stampset

basecard is 3 1/2x 11 Tahitian Tide cardstock- score with long side across the top at 4 5/8 and 9  1/4
DSP 3x 7 3/4 score at 1/2 and a smidge over 4 1/8 - punch out the center with modern oval punch (but any punch will work)


Stamp the image and Punch it out using the same punch in white cardstock here 
You want this to show exactly where the DSP was punched out when the belly band is on.
Left side gets folded over to create a pocket for the money or giftcard as shown.
inside panel whisper white  4 3/8x3 1/4
Stamp with different (or same) if you want from the same set and color as desired.

Easy peasy card using basic card items but a little different
I am always looking for a different fold using the basic card size that fits into an A2 envelope and however way we can use up our ever growing stash of DSP!

Sunday, December 31, 2023

easy fold Gift or money holder card-


 easy fold Gift or money holder card-  using standard A2 cardbase ( for 4 1/4x 5 1/2 inch size )

take basecard of 11 x 4 1/4 inch and score in half at 5 1/2 inches and fold the right front of card at 1 1/2 inches from the edge  to create the pocket on the left on the inside as shown. this is where you put the money or the gift card.

use any 6x6 DSP - you need to cut the DSP so the picture is continuous (we are using One horse open sleigh DSP) -make sure your paper is right side up.
height of DSP is 4 inches -and 6 inches across  and cut at 3 3/4 for the left side main panel and the next piece is 1 1/4 " to go on the right side and the 1 inch left over piece you can glue on the inside near the pocket 

sentiments from Brightest glow  stampset
something fancy dies to cut it out 

added a little layered circle sentiment in the front- - make sure you only glue it down on the left side of the opening. place on the top or bottom or middle depending on the DSP paper - whatever looks best to you. 


another example depending on the DSP you choose it will all look a little different.


Saturday, December 23, 2023

giftcard envelope and Ornament box and tags from Sending Cheer


Last minute panic for giftcards and money envelopes for stocking stuffers solution!

The giftcard envelope uses a 6 x 5 1/2 cardstock scored at 1 1/4 and 3 3/4 along the 6 inch side and scored 3/4 inches from both sides on the f 1/4 inch side. cut the 4 corners as shown and taper the middle tab.-
DSP  3 1/2 x 5 3/4 inches (here Merry Bold and Bright) 
wrap around the outside 1/8 inch from the edges.
Punch out a half circle from the inside end as shown to make it easier to pull out the card.
Tape the 2 tabs to close the envelop as shown below. 

Place the gift card and wrap with a piece of ribbon. Here I added a piece of stamped and diecut bulb and put the ribbon through the top loop for a fun element. 

easy peasy stocking stuffer and you can make 4 out of any 12x12 cardstock  and 6 out of the DSP so use up your hoarded stash!


 Ornament box and tags from Sending Cheer Stampset and Dies- one of my faves from the holiday mini- I'll be using it to make tags forever.

2 -2 5/8 inch circles (BUT ANY SIZE WILL DO)
2 1/2 INCH DSP (HERE MERRY BOLD AND BRIGHT)

Gold foil for the ornament topper using country corners die-(you need 2)- smallest for the topper to fold in half to make the top of the circle ornament - punch out center with a 1/8 circle punch to thread the gold ribbon. 

Box  3x 4 3/4- score 3/4 inches on both sides along the long end
score at 2 2 3/4 inches with the long side on top . and glue between 2 circle ornaments to create a little box to put in some money or candy. 
stamp the gingerbread man in pecan pie and diecut out after stamping the face with early expresso. for you from the same set using the label die. Use dimensionals to adhere. 

Friday, December 24, 2021

25 Days of Christmas- Day 24- Peaceful Cabin Popup giftcard Box Card


Giftcard Box card sounds redundant doesn't it but it really is a box that holds a giftcard that is a popup. I cased this from https://buckeyeinklings.com/2021/09/02/pop-up-box-in-a-card/ but the box she had was a bit too big so I shrunk it down a bit to make it the size you see below. it fits the giftcard on its side exactly.
The base card is thick white CS. I took another piece of white CS and stamped the trees in Mossy Meadow but I wanted it more green so I used the water painters to spread the ink to make it a bit more green.  Stamped happiest holidays with heartfelt wishes. I used blender brush to use Balmy Blue with Basic borders dies to create some Cloud background and the fox in soft suede.


Stamp the house in black on a scrap piece of paper and diecut some fences from crumb cake as shown to create the front of the card..


  This is the dimension I used for my card. You will need  DSP 3x 6 1/2 or so. Score at 1 1/2, 3, 4 1/2 and 6 inches vertically.  Score at 1/2 and at 1 1/2 inches.
remove the middle panels on the bottom and cut the 2 remaining bottom diagonally as shown.
Put tape on the side tab and put the box together. then put the tape on the 2 triangles.


put the taped triangle face down on the fold of the card as shown with diagonal of the triangle on the fold.  When you close the card the top fold with stick to the top triangle and make the popup. Make sure the box and the giftcard does not pop out of the margins of the card though.
Enjoy!


Thursday, December 23, 2021

25 Dyas of Christmas- day 23 - Sweet little Stockings Giftcard holder


 This is a sweet little gift card holder I made using the Sweet stockings DSP.  I don't even have a dog right now but lowe that golden retriever wrapped in christmas lights!  Above is how it looks closed and below is how it looks open.


Take a piece of 4 1/4x 11 inch cardstock and score it at 2", 4" and 9 1/2" old olive cardstock.
Fold over the right side and tape the 2 sides to create a pocket for the giftcard as shown- you need a piece of 1 1/4 x 4 inch piece of christmas light paper to decorate the top.
Take a piece of 4x4" Cherry Cobbler cardstock and emboss with Tasteful Textiles 3D. You will tape it  only onto the middle section as shown below so when you open the card you still see the front of the card.
Take the large tag from the Stockings Dies - stamp the sentiment from Sweet little stockings in Cherry Cobbler. Fussy cur the dog and cat from the Sweet Stockings designer paper as shown and mount with dimensionals.- because the background is white even if you don't cut it exactly it still looks great.

Enjoy!


Friday, December 17, 2021

25 Days of Christmas- Day 17- Easy envelop hack


I have nephew and nieces and children of my friends who I adore and want to give them a little bit of money for christmas but want to put it in something a little nicer so this is an easy envelop hack I use.
I have some envelope dies but I want it to conserve paper and have it fit perfectly into the 12x 12 designer paper so this is what I came up with and it is almost as easy as using a die.
take a 12x12 DSP and cut it into 4 x 6 pieces- you will get 6 out of each 12x12 DSP.


Score the piece at 2 3/4 and 5 1/2 on the 6 inch side and at 1/2 inch across the bottom as shown.

Use a circle punch to punch a half circle across the top as shown to make easier to get the money out.


cut out the corner and the left side bottom as shown.

and put tape on the flap pieces  on the right as shown.


this is what it looks like and it took no more than it would to diecut this out and I used 2 12x12 DSP to make 12 envelopes with no left over paper and this is what it looked like- super cute and easy peasy.  for last minute money envelopes- but of course you can use this idea to make any size you need.


Enjoy!
Lynda

Saturday, December 24, 2016

small giftcard snowman 4 panel twist and pop

There has been a lot of cards with twist and pop 4 panel cards that have been really cute- I did one for my workshop and everyone seemed to really like it. I did want to make a smaller version for a giftcard popup so I engineered it using the dimensions of the giftcard.
you can get 3 cards out of one sheet of 8 1/2 x 11 CS.- This is the inside of the finished card on the right. If you open and close the card really fast, he looks like he is clapping!

I have made this card with many different sizes but the basics of the mechanism is the same.

The base of this card is 11x smidgen more than 2 8/10  inches (1/3 of the 8 1/2) folded at 5 1/2 inch on the 11 inch side. (Long ways)

The pieces for decoration are as shown on the left. You need 1 piece 3/4" x smidgen more than 2 8/10 inches or so(width of card) 2 black buttons (this was a button punch but you could just use a 3/4 inch circle punch.  I took a 1 1/2 inch strip of tangerine CS and cut them by hand into long triangles to make a bunch of noses.  The big white curved white piece was for guideline for drawing the head of the snowman in the corner under the hat with a black marker.      The hat was made using black and red glimmer paper.  The base was 3/10 inch strips, the banc was 1/2 inch strips and the main hat was 1 1/2 inch tall.   I cut the piece twice as wide and cut it in diagonal to get 2 pieces. Make sure you cut the diagonal on the proper side, otherwise it will not fit (the glimmer paper is not double sided to be able to flip it).  The holly on the hat was a pack of pre-made stickers from Michael's.
This is the mechanism for the gift card popup.  I also sized this so that you will get the most out of a 8 1/2x 11 sheet of paper.  cut it by half  into 5 1/2 x 8 1/2 inch piece then slice them into pieces a little bit smaller than 1 3/4 inches.  Score in half longways and at 1 7/8 from each corner make a pencil mark and make a diagonal scoreline. It should cross in the center.  The is the mechanism part.   I used a black sharpie to mark up one of my score boards so I can do this easily.  see below.


You fold the mechanism like this and put sticky tape on the triangular part on top and bottom and this gets put into the fold of the card as shown.  I eyeball it but lot of people like to measure it which is fine.
When you open it it should look like this.
Take the other strip 5 1/2 x 1 3/4 and score at 7/8, 2 3/4 and 4 5/8 inches as shown.
put the center of the piece on top of the center of the mechanism piece.
You need to put tape or glue onto the opposite corners- either left bottom and right top or left top and right bottom.  It will twist differently depending on how the glue/tape if put but it does not matter.

Then open the the piece to adhere the 2 corners as shown.


I added red gloves (hand cut from 2x2 piece of red carstock to fit) and glued it as shown to the 2 outer rectangle corners.
Pop the center out and you have the twist and pop card.

I attached money by putting on a little bit of tombow tape onto the wrist area of the gloves while it was flat and the money folds into the popup.  It was a fun way of giving money for Christmas.
 This is how you mount the gift card- use 2 pieces of tape - scotch or packing works fine and fold them in half, place the first tape with the fold on the left of the center mountain fold and the second tape on the right of the mountain fold as shown on the right.


When you put the card on the tape it floats like this and looks like the snowman is holding it out.
If you want to give cash you put two tiny strip of Tombow monoadhesive on the base of the red mittens as shown- it is not terribly sticky and money can be easily taken off.
When you adhere the money- nice crisp ones would be nice- it folds up like this
It twists and fold flat inside the card so it does not show.
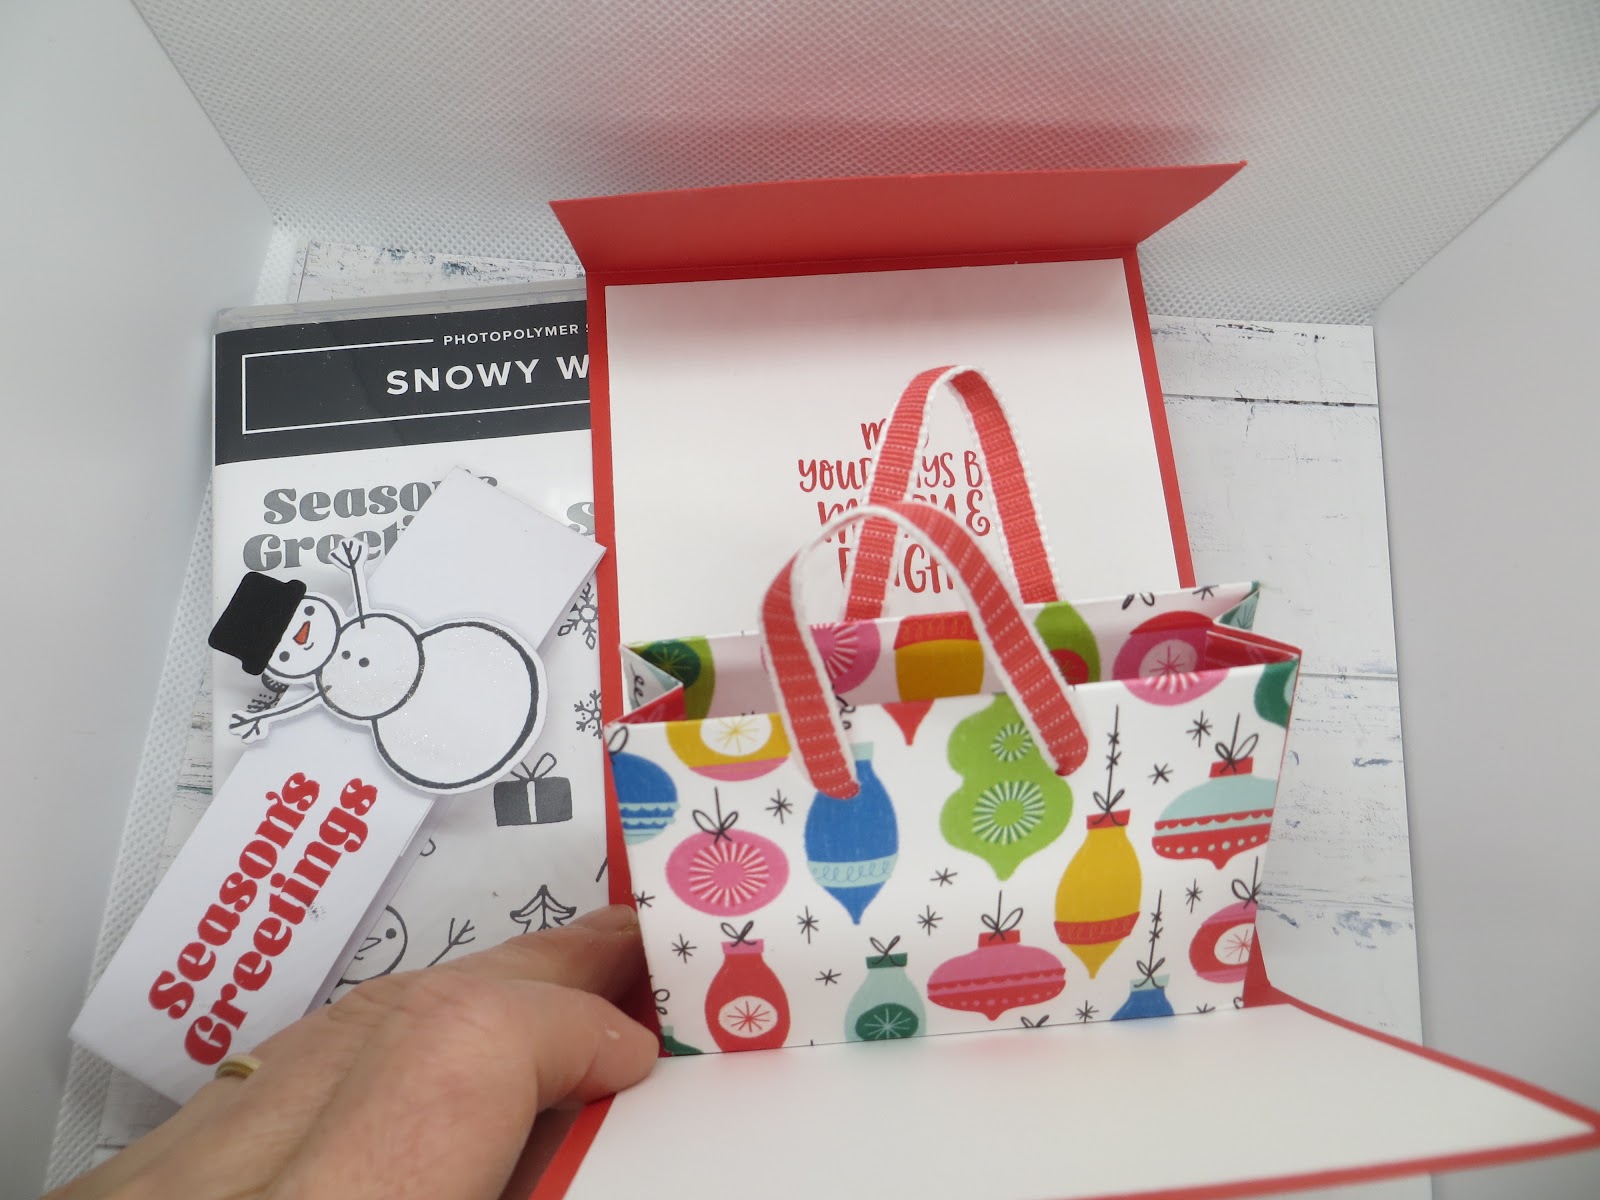
 I made little pockets that holds the cards- they are a little too fat to mail-
I took some DSP 6 1/2 x 5 1/2  - you can get 4 sheets out of a 12x12 paper if you cut it carefully - score it at 3 inches and at 6 inches along the 6 1/2 side and 1/2 inch along the 5 1/2 side.-cut out the corner and one of the 1/2 inch tabs as shown on the right and then punch the top with the envelope punch to make a little groove to complete the package.
Enjoy!