Showing posts with label How to- Clingmounting. Show all posts

Monday, June 20, 2011

A radically different way to Clingmount SU stamps


There is nothing that frustrates me more than trying to stamp something and have that stamp fall off from the acrylic block because the clingmount was not holding and ruin my image. As much as I LOVE Stampin' Up stamps the plastic image you put on the back often just does not STICK! Arggggh! I wanted it to stick but I also like to see the image especially words - I have stamped things upside down before. So here is my radical approach. It's a bit scary but it does work - at least for the new stamps. The rubber on a new stamp often

do pull aprt from the cling foam as shown in the first image. ( Be gentle and do not ruin the foam- if it does not pull away, I would not try this technique ). I put the foam down on my craft sheet (that does not stick to anything ) with the sticky side down.


Now peel off the paper off the cling side.


I normally would use my Tsukineko tack n' peel but did not have one big enough so used double stick tape on my a large clear block that fit the rubber- and it works just fine.


I stuck the bare rubber stamp onto the tape.


I inked the rubber well with Stazon black - it dries quick and is permanent.


Then I stamped the cling side of the foam putting the rubber exactly over the foam shape - the clear acrylic helps you see!


See? a perfect image.


I clean the stamp with stamp cleaner as soon as possible to get rid of the stazon so it is not permanently black.


then I peel the foam off my craft sheet carefully and place it over the back of the rubber.

A perfect stamp with no plastic to impede the stickiness of the clingfoam. You can trim it now to your heart's content.


Now, if I can have Stampin Up do this instead of me, it would be just perfect!


Lynda


Saturday, July 24, 2010

Redoing the clingmount instructions for Stampin' up


You all know I love clingmounted stamps and have been converting my woodmounted to cling YEARS before Stampin Up finally came around to the idea. I am super glad that they did keep the rubber because the images from rubber is so much nicer than the clear stamps that are also quite popular now days and vary in quality quite a bit.
But I myself and others have complained that the stamps with the clingmount, once the image is put on the back with that clear image seems to not cling as well as the gray clingmount foam without the image.
But I really like having the image in the back so I can see what I am stamping- hence the popularity of the "clear" stamps.
So, although this is a little extra work, I want to show you my semi-solution to this. It is a bit more work but I think worth the effort in the long run.

I first trim the extra rubber around the edge with the scissors at an angle so I will not cut into the foam surface side- you will trim a little of the foam but try not to cut off the base because you want to keep as much of the cling base surface area as possible.
I also had trouble with mounting the clear sticker on the back and getting it centered just right- you know what happens to your eyes after 40?
So this part is the extra work- I trim the sticker sheet as tightly to the image as possible as shown- you can see the diecut margins so it gives you about 1/8-1/4 inch clearance all around. I did this while watching TV and it went really fast.


Then I pull off one side of the sticky side cover- it is always scored like this which makes it easy. It gives you the other side to hold onto and makes centering it on the foam much easier.


I put the sticky on the back of the stamp as it should be- watching the orientation. So half will be stuck and the other half can be lifted as shown.


Now that you have the sticky exactly where you want it, you can just peel of the other half of the sticky and stick it on the grey foam.


This is what it looks after after you place the sticky on completely.


I think this is much easier and exact than trying to put the stamp onto the sticker with the sticky side up as they instructed because the sticker always seem to pull up from the cling for me and I just had a lot of trouble with it.


Now just peel off the backing and you have a perfectly placed image with clearance around the edge of the stamp of the just grey foam cling and it seems to just cling better.


Care for the raw grey cling is the same- rinse off if you lose the cling to rid of dirt.

The card at the beginning is a simple take ten card thank you for my customers this month- using vintage wallpaper embossing folder on Poppy cardstock- I can see that it will be my go to color this year. The dotted scallop ribbon border is just perfect! The image is from the Cute by the Inch hostess set stamped in Poppy ink on whisper white and mounted on Crumbcake CS punched with scallop square punch and the whole thing mounted with a dimensional to raise it up a bit. Another easy peasy card. I have a few variation ideas on this I will show you another time.
Lynda


Friday, December 11, 2009

New Clear Mounted stamps from Stampin' Up

OMG! I think I died and gone to heaven!

I received my preorder from Stampin Up today- as demonstrators you can order a month earlier- all this will be available from the mini for customers starting January 5th 2010- and my wish for clear mounting stamps has come true!

I wanted to show you all how it looks and how it will work for you.

This set is called something Sweet and uses the sweet centers from the holiday mini as well to make a candy dispenser, flower, a magnifying glass, a fishbowl to name a few. All the images are printed in the front of the box in actual size.


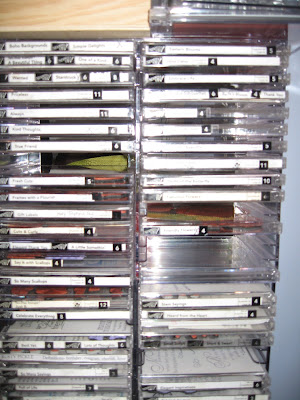
This is how it looks all stacked up side by side for easy finding with names written clearly and ALL the images in small size on the spine for easy finding. No searching to look for that sentiment in some set inside.


This is I {Heart} Heart set on the cover and inside. The cases are easy to open and close. It has the rubber sheet PRECUT with the clingmount already on and a sheet of clingmount with image printed on to match to use one of two ways.
You can peel off the paper off the clingmount on the rubber and attach to the acrylic block to use as is. Nothing else need be done. I think the cling is better to the acrylic block this way to tell you the truth.


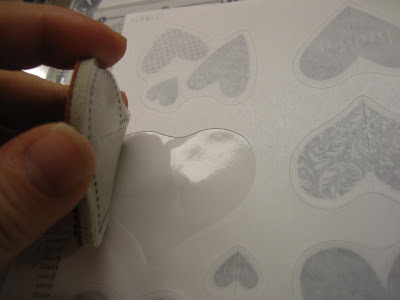
The printed cling sheet comes printed and precut with a cut in the center of the image to allow it to be peeled without the whole sticker coming off. It is cling on the back side and sticky on the front to stick to the clingmount side of the rubber stamp. Just tear te center cut and peel off the paper cover as shown. It is really sticky and may peel off so take care.


Then take the rubber stamp with the clingmount and stick it to the sticky part of the clingsheet as shown. Line it up as well as you can as it will be a permanent stick.
( I have goofed and had to peel it off- but do it carefully not to tear the clingmount foam- and repositioned it- but it is easier done sooner than later)


This is what it looks like if you place it exactly on the sheet.


Peel the whole thing off and the clingsheet will come off the backing as shown-
and it is now ready to use.


This is the front of another set - one of my favorites called Vintage Vogue and next is how it looks from the back of the box. The box is translucent so you can see the images through the box if you used the clingsheet.


This is what it looks like all cut up inside the box.


When you use the clingsheet that comes with the set you can see the image through the acrylic block so I plan to mount all my stamps this way. To use the stamps, attach to the clear block and hold it there for a few seconds and it will hold.


The stamps have a deeply etched image so you can use it as needed but you all who know me as a having a bit- all right, a lot- of OCD issue, I like a really tight image with no margins.


So I've been cutting rubber on an angle with a craft scissors to only cut the rubber and not the clingmount - as shown- really pretty easy-


And this is my final stamp- LOVE IT!
There was a recent Christmas poem posted on SCS that I wanted to share with you that made me laugh- my advice- keep your door closed!

Twas the night before Christmas,
I'm glued to the tree.
I'm wondering what Santa brought just for me.
Could it be cardstock or inkpads or lace?
Or some stamps, I said, with a smile on my face.
And that's when I heard him......"Hi Santa, " I said
He replied, "You know....good girls should be in their beds".
"I know I should Santa,and now I've been caught.
But I was just so excited to see what you brought."
"Well, let's take a look in this room where you work".
He shook his head quickly, and left with a jerk.
I heard him exclaim as he put it in gear.
"You've got enough crap,I'll see you next year!"

I am having my Christmas early today!
Lynda


Monday, February 16, 2009

How to- Clingmounting Stamps 101

I have many stampers who are coming around to the idea of using clingmount to mount their rubber stamps to acrylic blocks instead of permanent mounting to wood blocks. So I thought I would do a 101 on cling mounting.

There are two different widths to the clingmount- the usual is about 1/8 inch thick in gray to the left and thin which is about 1/16 inch thick in black shown on the right. My preference for mounting onto the CD cases is the thin mount for Stampin' Up rubber. They are deeply etched, which is a great quality for stamps but in the CD case the regular clingmount is a tad thick and the rubber will sometimes touch the other side of the case.


Clingmount is a foam with 2 sides- a supersticky side to which you permanently adhere your bare rubberstamp and the otherside you adhere to your acrylic and allows you to cling over and over again. (Should it lose its stickiness, you run it through clean water and it will regain its stickiness)

The clingmount sheet comes in 8 1/2x11 and sometimes 8 1/2x14. They are a bit pricey at about 4 dollars a sheet so I use every nook and cranny squeezing in as many stamps as I can - sometimes I can get as many as 4-5 stampsets per sheet depending on the size of the stamps. Whatever I do not use, I keep the white sheet to keep the supersticky side clean.
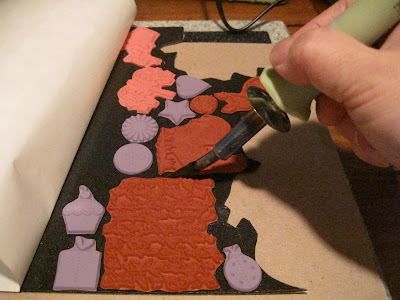
I peel my rubber from the foam mount that it comes with from SU and mount it directly onto the sticky side as shown. Wood mounted stamps need to be removed from the foam mount and cleaned off some before mounting on the supersticky side. Try to label your stamp so you know which company it came from so you can give proper credit if needed.

You can sprinkle baby powder to make the exposed sticky less sticky and used to use a pair of craft scissors to cut it but it gets really gummy and my wrist got tired. so I changed to a hot knife and I tell you.... it cuts like butter!


I would advise that you double check that you have all the stamps for the sets you are cutting and mount them all before you throw out the garbage. I have couple of sets missing one piece. I have turned my stamping area upside down and still cannot find them. I have flushed one down the drain- it was an itsy bitsy heart image then went down the drain as I was washing all my stuff off. BooHoo. At least it didn't block my drain so a call to the plumber was averted, alas.

Now where to store all those stamps?
This is Kompac storage which is about the size of a DVD case. It already comes with a storage sheet but is pricey at about $2.50 a piece. I buy these from Harry at Rubberstamp Concepts in bulk. I buy the thin clingmount from him as well. He offers the best price by mail order if you do it by bulk- so get a bunch of your stamping friends together and do an order.


For CD's I buy the EZ Mount stamp storage panels from Sunday International. The storage sheets are not the nice plastic like the ones Harry sells but is more like a laminated white cardboard but Hey! if it works and is safe for my stamps, I'm OK with it. I had tons of regular CD cases ( thin ones will not work! ) left over after I got my IPod and loaded all my CD's on them, so ask around. There may be other people trying to get rid of them too. I saw that my clingmounted stamps that I placed directly on the CD cases started to make a cloudy etching on the CD case and I am told although it has not happened yet, it can lose its cling. Clear stamps can be directly placed on CD cases without losing its cling.


Sometimes I like to put like stamps together. Cheep Talk and Good friend set just screamed to be put together so I used one large case to put both in.


The large cases also fit my background stamps perfectly as well- the real reason I bought a bunch of these. But I had to snap off little tabs inside - easy to do with bare hands- because the stamp was just a tad too big and then it was perfect.

The storage sheets fit inside the tabs in the standard CD case and I put my clingmounted stamps directly on them.
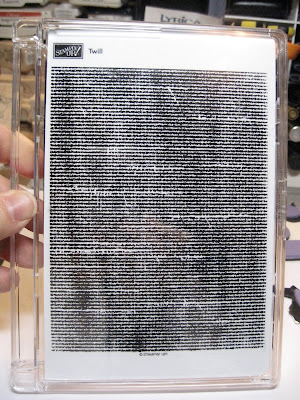
You can StazON images onto the sheet but I usually stamp another piece of paper to index easily from the front and then adhere the clear image from Stampin' Up on the cover so I can see where the stamp belongs when I have it out.


I place the label on the spine and all those cardstock strips left overs from the layering I glue and place behind it to make it easier to see at a glance.
Now you are ready to store your stampsets easily in CD/DVD storage units and mount on acrylic blocks for use with minimum space.
The left over SU plastic containers are used as giftboxes, hold projects, little scraps, etc. The wood blocks are in a big bin at home where my three boys play with them like building blocks. I am always looking for a good home for them, so if you are local and interested, let me know.
Happy Clingmounting!
Lynda


Wednesday, January 28, 2009

Stamp Storage- my solution

I have- I hate to admit- THOUSANDS of stamps- how to organize it all with all the things I still keep collecting becomes an issue- Space is always a premium so I have been unmounting for several years now and I have to tell you I LOVE it! However there has been several discussion forums on SCS and other sites re: safety of CD cases with clingmount which has been my choice for mounting my stamps- I am concerned that if unmounted in envelopes or bags that the image will get squished and distorted somehow- I've destroyed some stamps having them lay about and having something on top and having the imprint of something permanently imprinted on the rubber- not good- so I like the hard case of CD's. The thin clingmount will allow deeply etched stamps like SU to sit without the opposite side of the DC case touching the rubber. Thin clingmount from Harry at Rubberstamp Concepts offers the best deals on it if you buy bulk.

I cut a piece of paper with stamp images and insert it into what would be considered the "front". Inside the stamps are mounted onto the EZmount Stamp storage panels from Sunday International- again the best price I could find- 10 for $3.49 plus tax and shippping and on the back side I stick on the index images from the stampset. On the spine I stick the label on so so that the "front" in on the bottom so the stamps sit on the storage panels.


By doing it this way I can have a whole mess of stampsets close to me so that I don't have to get up in the middle of stamping to see what sets I have to fit what I am doing. Try stacking this many stamps in the regular boxes and you will have a tower that undoubtly will topple over regularly. I put a 1/4 inch strip of white paper that I am always cutting off to highlight the name of sets- my Christmas sets have a strip of red paper behind it so I can tell- Fall/ Halloween is orange- you get the idea.
Best acrylic handles to use with these? basically whatever you can afford. My favorite? Close to My Heart with grid vinyl attached for perfect placement each time.
I llike being able to see through my handle to place my stamps and even with rubber stamps this works really well.
Just my humble opinion.
Lynda