Showing posts with label Tools- Big Shot. Show all posts

Tuesday, May 19, 2015

A little flower box topper

 I got the Bouquet Bigshot die when I saw the bouquet on the occasion catalog cover but the largest flower in the set was really huge - a bit too big to use for the projects I had in mind but the rest of the die was really quite useable and I wanted an easy way for people to make the flower so this is how I set it up for my workshop.

Each person got a sheet of whisper white CS.
They are cut longways into 2 1/8x 11 inch pieces as shown on the left.
 I stacked 2 of the pieces and cut them 1 1/4 inch piece rectangles as shown.
The other two strips are cut into 1 3/4 inch pieces.  I used 8 of each on my flower but this will make lots more for people to play with or make fuller flowers.

You can put a stack of 4 larger rectangle over the bigger flower and 4 thinner rectangles over the smaller petal as shown. Then you only have the run it twice to make all 16 petals. Really speedy.  Then run the black for the stamen and the Old Olive for the petals.

 Here are all the ingredients to make one flower.
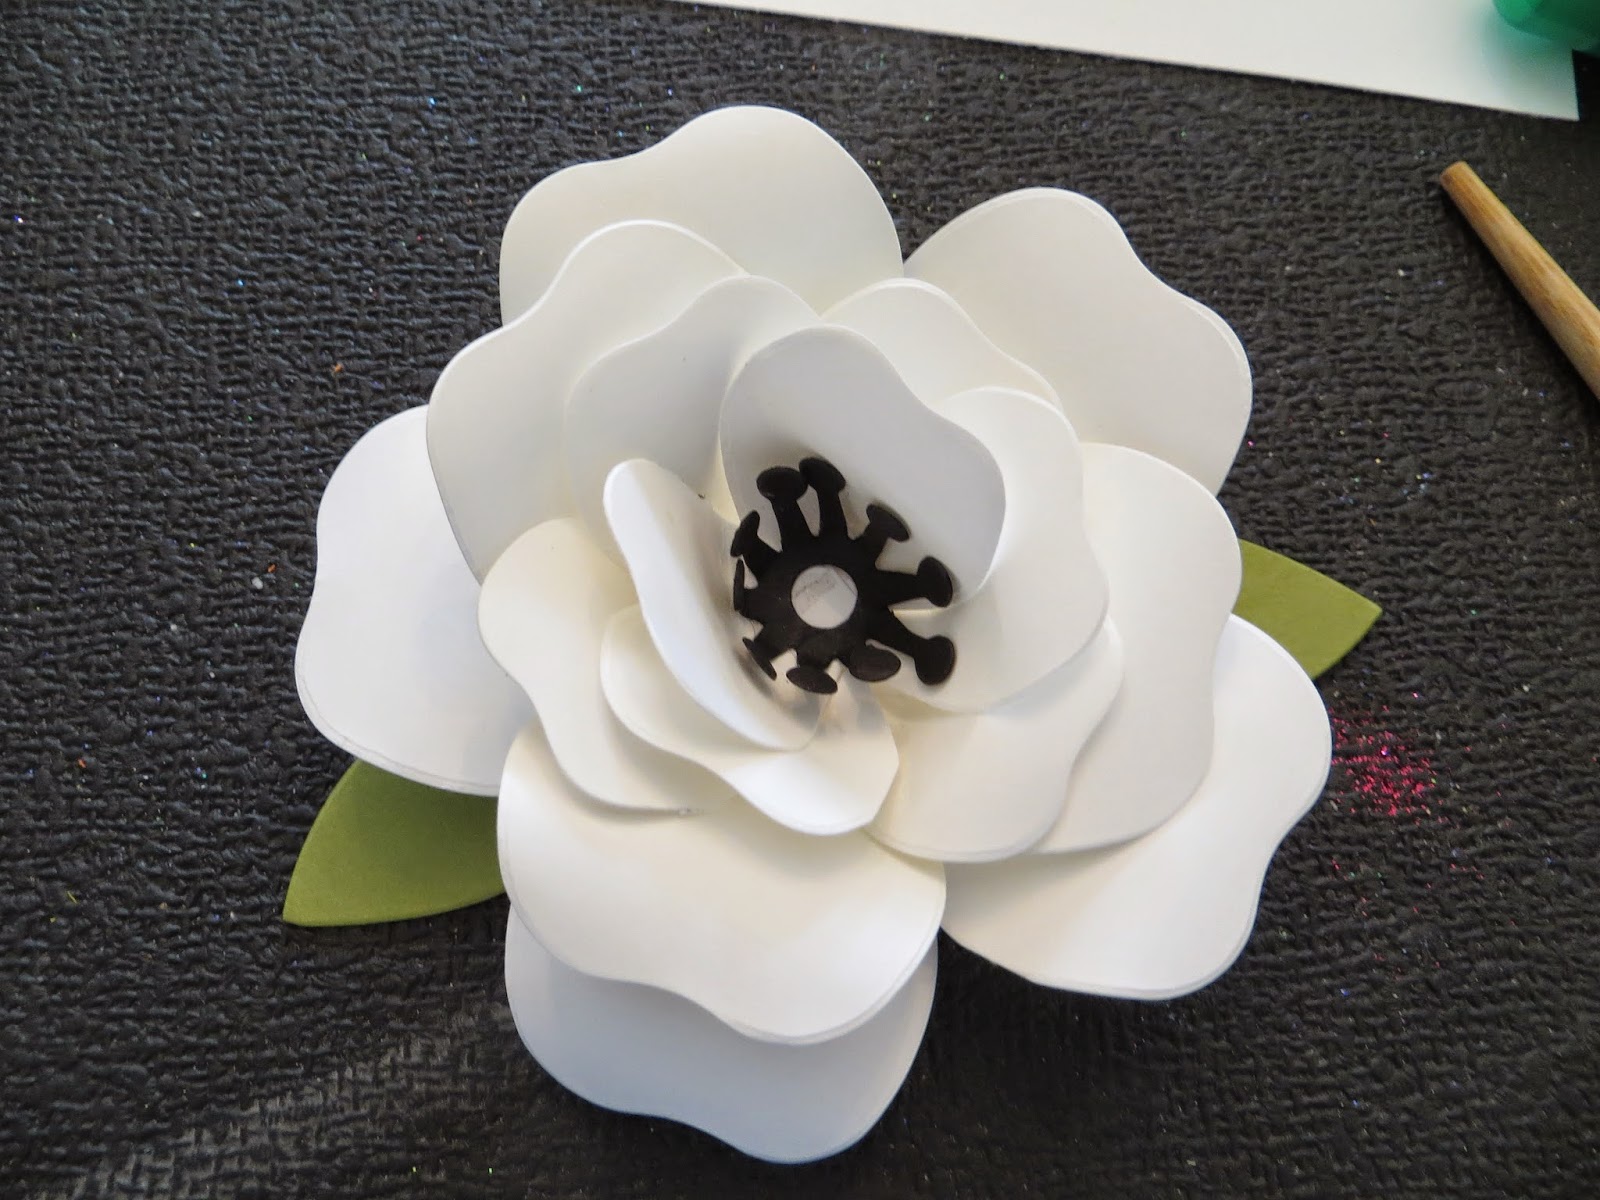
8 Big petals, 8 smaller petals, 2 green leaves, a black center.  I used one 1 1/2 inch circle as the base to build the flower and a daffodil delight 1/2 inch circle (the clear faceted button shows what is underneath and the daffodil circle helps it look better)
 The outside petals are folded over but less severely than the ones that go in the center.
 Use a chopstick or some rounded stick to curl the petal edges.  This step is crucial to make it look a little more realistic.
 Use the circle to tape down the 5 petals as shown.
 I then added the 3 left over petals in the center as shown.
 Then the smaller petals are placed, 3 petals per layer in 2 more layers. 
Then I put the 2 left over petals in the center- you could put 3 which may make it easier then add the center stamen.


This is how it looks from the back.  I initially made it without the base and it was all wonky after it was made - with the base it is more sturdy and easier to attach to the box anyway.
These are the flowers I made with 2 different size faceted buttons- both really pretty!  Enjoy and try it yourself.  You can make the box with the boxmaker from Stampin' Up in different color for a more masculine look, texture the box, or stamp on the box  to make it your own. 
Lynda

Sunday, April 5, 2015

Happy Easter Berry Basket

 Did I tell you that I was in love with the Berry Basket?  Yes, yes, gazillion times yes! This was the Easter Basket we made for my party last month and it was given to Max a sweet little boy when his mom invited Kyle over for a play date.

Coastal Cabana was diecut with the Berry Basket die then filled with paper grass and yummies including a giant egg with skittles inside it.
The tag was stamped with the small honeycomb and Happy Easter from Teeny Tiny Wishes on Daffodil Delight punched out with Note Tag Punch and stapled together  with the butterfly diecut from Whisper white onto the basket with the Crisp Cantelope Thick baker's twine with the stapler.

 I then covered the larger clothespin with Retro Fresh Designer Washi Tape and clipped it over the staple to look like it was holding it and an easy peasy basket to hold all your little goodies.   I really like this size -  i think it holds plenty of candies and goodies for the day.

Enjoy!

Lynda

Saturday, February 15, 2014

Boyscout centerpiece

 My boys have been involved in Boy Scouts for years and now my husband is the den leader and when he does something he does it all out. 

They were charged with making centerpieces for a dinner and the boys in the den had to be involved in making it and of course Stampin' Up to the rescue!

My husband picked the colors- Night of navy and Summer Sun (retired) cardstocks and I used Designer Rosette Bigs XL die for the Bigshot to diecut and crease the cardstock.  The boys had to mountain and valley fold the cardstock and taper it closed with sticky strips and then help hold it while an adult hot glued the piece together. I downloaded some images of boyscout icons and printed it out on photo paper for them to cut out or punch using the circle punches.  The big ones used 2 strips taped together. 

The container is the nut container from costco painted gold inside by the boys, stuffed with a foam shape and stuffed with gold fold paper I had left over from a gift I received, cut using the fringe scissors to make strips. 
 Used some other printed star papers to add interest to the rosettes to coordinate.  The containers were wrapped with corrugated glitter paper I bought at a local craft store with the fleur-de-lis the symbol of boy scouts diecut (non SU) using a gold corrugated glitter paper.  Added the letters with the boyscout motto and Voila!.  Each kid made a big and a small rosette and helped put it together and I thought it looks spectacular!  Not bad for a home made recycled project, eh?

Wednesday, October 10, 2012

Ornament Keepsakes embossed two ways

Another project from one of my parties.  Take the expresso base CS and emboss the edge with the Delicate Designs folder.  Take a piece of whisper white and stamp the trees from the Lovely as a tree set and the sentiment from Greetings of the season  in lucky limeade.  I stamped the Ornament using the Raspberry Ripple but it was so sopping that when I sprinked the clear embossing powder on it right away, it stuck and embossed beautifully (if you wait a bit, it won't stick)  - alternatively you can ink with versamark and then the dye ink pad but sometimes I find the color not as brilliant. Tie a white stitched ribbon and attach a crystal in the center to finish.  It may look a bit hard, but it's not.....

Sunday, July 22, 2012

Moving Forward flip card

I wantd to make a flip card for my stamping party and I thought the moving forward set- Stampin' Up's Ronald McDonald House stampset for this year I thought would fit this bill.  I have a thing for dirigibles.  I just think this set is darling.  I cut off the sentiment on the bottom to use separately and just stamped the image using Calypso Coral then used the blender pen to remove the color from the propeller and the basket and used pacific blue and real red markers to add additional colors.  The clouds from Up up & away is stamped in Baja blue to match the 1/8 taffeta ribbon on the left.  I used a 4 1/4x 7 1/2 cardstock to score at 2 3/4 and 3 3/4.  Use the

2 3/4 line to line up the diecut (the center peaks line up with the score mark)  Put it in the big shot to cut but put the second cutting pad on top from the edge ot the card up to the first score line.  Then flip it over and diecut from the long side to the second score line so that the middle part is still attached.    Diecut 2 more pieces in whisper white and stamp your image of choice on the front and back. I also embossed a little message that hides behind the front when it i closed in turquoise and embossed the margins with the chevron EF.
  What little boy or girl would not love this card?
Enjoy
Lynda


Sunday, July 15, 2012

Papillon Potpourri make and take

I designed this for my make and take this month and many people wow'd but once they made it they realized how simple it was to make and it made for a great make and take.  Unfortunately I did not have the new paper piercing tool with its more ergonomic handle so I got a little more carpal tunnels symtoms today but really was easy to do.  Take a Pool Party CS and emboss the edge using the Delicate Designs Folder- is this thing gorgeous or not?  I so love our embossing folders!  Then I diecut a whisper white CS using Apothecary Accents Framelit, used the new Essentials paper-piercing pack, lined up the die and poked the holes around.  Stamped the butterflies using Early Expresso onto scraps of Pool party, Calypso coral and Lucky Limeade CS and punched them out using the butterfly punch. Lined them up to where I thought the sentimen would best fit and stamped the sentiment using same Expresso inkpad with sentiment from Just Believe set, then added the butterflies using dimensionals cut in half on just the center of the butterfly bodies so the wings are free to flap and really truly easy peasy card.  Hey, any card that requires no scissor work in my book is two thumbs up! 

Thursday, June 21, 2012

Papaya Collage Case from Sandy Mathis

 I was looking for a card to make for my stampin party using the papaya collage using Summer Starfruit and the card from Sandy Mathis just took my breath away so I had to case it- no, let's face it why mess with perfection? I just copied it.     The central panel is very vanilla CS diecut with the Labels collection framelet stamped with sentiment from Just Believe in Soft suede and the leaves are stamped first in Starfruit then dauber'd around the edge directly on the stamp with rose red then stamped on the vanilla CS.
Add the layer of DP from Comfort Cafe, the starfruit CS embossed wtih Vintage Wallpaer , tie it with crumbcake ribbon and layer it onto the crumbcake CS.  Stamp 2 butterflies onto crumcake using suede ink, cut it out and add 2 pearls and a very shabby chic card that I can see Shelly loving.  Thanks, Sandy, you are amazing!

Sunday, April 29, 2012

Market Basket -upside down Petite Purse

 On Saturdays we have a local organic market  that we love to go to with bunch of local vendors with piles of vegetables. fruits and flowers. It is just fun for my kids who love fresh kettlecorn and sampling berries with juices running down their chins.

So I made a little market basket using the petite purse die upside down.  This is really easy to make. Diecut petite purse using crumbcake and cut off the part that would normally be the"bottom". 
Trim off the rounded part of the sides of the purse and tuck and tape what would be normally the "top" of the purse inside the bag to create the bottom.  I made a handle from soft suede cardstock and then "sueded" it by crumpling it and taking the CS apart to create a real soft "suede" handle that was attached using mini brads.  (the handles were a tad long so I trimmed it to size.

I also love the flowers that they wrap in newspaper and wrap with cording and of course my market basket would have to
have one too.  I die cut little leaves sizzlet using some variety of left over green cardstocks pieces then punched blushing bride CS with the little flower from the itty bitty punch set adn put a little pearl in each one.  I put some dimensionals inside the cone of First edition DSP to allow the leaves to be more 3D. 

The mini ceramic veggies I have collected over the years for a doll house that I will never have - unless it's made out of Legos! 
Oh well!
Lynda

Saturday, April 28, 2012

Rosenberry Rooms blue and black bag

Splitcoast had an inspiration challenge using a company called Rosenberry Rooms specializing in children's rooms and and there a diaper bag caught my eye- http://www.rosenberryrooms.com/169-chocolate-ice-diaper-tote.html
I love the pale blue and black combination so I decided to make a replica using - of course - the Petite Purse die.  I die cut the purse with Pool party CS and another in basic black. Cut off the top part  of the pool party one to create an open purse.  Trim the black one to make a border on the bottom 1/2 inch all around.  I used the cropadile to punch an 1/8 inch circles to thread the ribbon (I punched it so there would be ribbon going around each corner) then tied it as shown (actually it's the back because the front has that tiny slit for the closure I did not want to see in the front...) Added the 1/8 in taffeta ribbon for handles (tucked it in under the ribbon using tiny glue dots so it is as neat on the inside ) and my little purse is ready for an outing!

Enjoy!
Lynda

Thursday, April 26, 2012

Zebra Petite Purse


You can find inspiration in lots of different places and I saw this bag in an ad for Nordstrom for this zebra bag I went nuts.  Looked for a zebra paper (you would think with the years of DPS I have amassed over the years there would be a zebra print I could use but NO! The ones I had had too big a print and would not work.)  I had an old Ellison texture plate and tried to ink it up with black to create the texture but that didn't work either- it just made a huge mess on my silicone rubber that I used to layer the template.  So I thunk and thunk and thunk... and this is how I did it!    

Diecut the Petite Purse with whisper white CS.  Take the texture plate and ink it up with Versamark pad all over. 
Put the whole diecut onto the texture plate (the positive, negative and the handle) and emboss the whole thing making sure the edges are all in the plate (it does fit but barely!) Emboss using black embossing powder (if you are not using SU then make sure it is a detail embossing powder). Try to be careful handling it because you don't want to rub the powder off.  Heat emboss  and this is what you get.  I used the white gel pen to outline the edges and it really makes it pop.  Added a little white brad for the closure.  I really racked my brain for this one trying to figure out how to do it.  I am thinking I should work on cards using the retired sets for the next few weeks....

Lynda


This is the texture plate I used to create the texture on this project. (not SU).


Tuesday, April 24, 2012

Another Crocodile Petite Purse

I was cleaning out the house and found a bunch of shopping magazines and I was perusing before I recycled the magazine and this page from Loehmann's caught my eye. Cool texture and I liked how the purse was edged with another layer of crocodaile and stitching.  I thought I could do that!  and this is my version.
Diecut 2 Petite purses from the crumbcake CS.  Ran one of them through the Cuttlebug EF then sponged it using mustard, crumbcake and soft suede to add some texture then took the second purse and cut the edges about 1/4 inch wide as shown.  I sponged that too. (When I tried to use the crocodile folder on that it did not have enough contrast and without the embossing, it looked better I thought). Added the stitching with the pen part of the chocolate ship stampin write marker.  Added the brad  (retired SU) and the handls with the mini brad and I thought pretty darn close, eh?

I am having such a ball with this die, can you tell?  Enjoy my madness!  Lynda

Monday, April 23, 2012

Faux Louie Vitton Purse in melon


 I saw an ad in a Nordstroms catalogue for this chocolate purse with little symbols printed all over it and I thought it would translate well into our Petite Purse using the Melon Mambo embossing powder.  I wanted something small so used A to Z (soon to retire) stamp with the versamark pad and embossed it  with the embossing powder. Added the handle and corners and central flower with melon mambo CS.
I added s little line of stitching  with the white gel pen and a little pearl in the center of the itty bitty flower and it is a sweet little purse that I would not mind carrying this around myself!

Enjoy!

Lynda

Sunday, April 22, 2012

Petite Purse Upside down Picnic Basket

I must be crazy- I have been dreaming about this all night- I flipped the Petite Purse down upside down and and was dreaming how I was going to make this picnic basket.  It is a bit unorthodox but I thought it worked well.  You need 2 Petite Purses cut out from Crumbcake CS.  Emboss one of the purses with the square lattice EF (you do need to run it through twice to fit the whole purse.  I used a sponge and some Soft Suede ink with a sponge to add soime dimenstion and tesxture. Cut down the rounded edge from the side and cut apart the part that would be normally the bottom to make the lid.  Score what would have been the top at 1inch from the edge to make a crisp edge and glue the lid to the inside.
I made reinforcing strips as you would see on real baskets with a 1/4 inch strips and a 1/8 inch strip on top of that. added little dots like little nails you would find on real baskets using chocolate chip stampin write markers and sponged the whole thing to add some distress.  I made the closure using the natural Hemp twine and used linen thread to tie a little piece of toothpick that I cut and sponged with Soft suede to match (like a toggle).  Then I used the mini brads to add the handles- again sponged with soft suede.  The slit for the opening I put to the back and with the texture hard to see that it is even there...
The top of the basket was also covered with strips of 1/4 inch and then 1/8 strips on top and then sponged again.  I thought it would be fun to add wine bottle and glasses, and maybe the bread from Studio Sketches to add some realism but didn't have time... but wouldn't it be fun?

Enjoy


Tuesday, April 17, 2012

Petite Purse with First Edition DSP

Patty Lee made a darling purse a couple of years ago using black base and using word printed DSP which I loved and kept as a sample and I used that as a guide to make a similar purse using our Petite Purse die and First Edition DSP.

I love the color combo. I diecut Lucky Limeade CS using the Little leaves sizzlet, glued it down and then punched Cherry Cobbler CS with the Boho blossoms and layered all three flowers, crumpled it up and used a mini silver brad to hold it altogether!

So classy!

Enjoy!

Lynda