Showing posts with label How to- Technique. Show all posts

Saturday, October 7, 2023

Pick of the Patch and Abundant Beauty Stencil for Embossing


How fun is this card? When I saw the new holiday catalog this was on the first order. Love the little crow.
Base card is Calypso Coral with a layer of Old Olive and basic black embossed with the Abundant beauty stencil. I stamped the sentiment after since I changed my mind about stamping it on the side of the white panel but it still worked fine thankfully.
stamp the 3 pumpkins with calypso coral on a scrap piece of white cardstock and the leaves in Old Olive- punch out the leaf, stem and the 2 pumpkins using the Pick of the patch punch. fussy cut the last small pumkin- I stamped the crow on it before i cut it out so it was just one piece.  stamp the vines and cut it out and you are read to put it together.
I had actually stamped the pumpkins on the white cardstock so I could figure out where I wanted to place the punched out pieces but I made this one without doing any punching at all. - I used masking to stamp the stem and the leaves and vines where I wanted it. so more of a one layer card- sorta.  this is how I visualized the card when I was first coming up with the idea.
This is a total case from Dena Rekow- she was doing unconventional colors and I loved her card- I did tweak it with a strip of DSP on the left but it is really straight from her. 
Calypso coral, Fresh Freesia, Petal Pink and pumpkin Pie- who would have imagined a purple pumpkin!

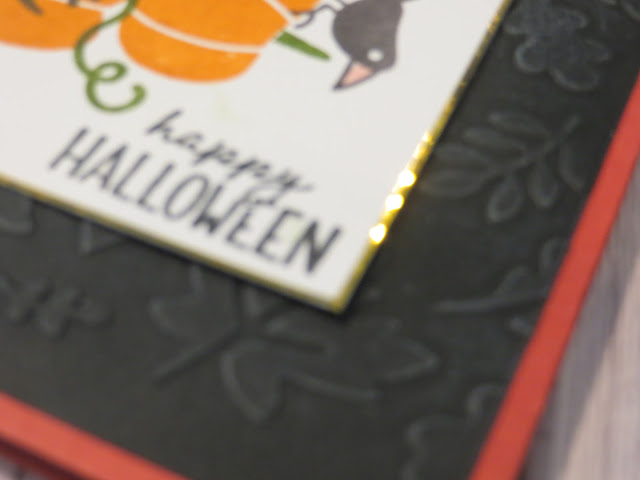
This is what the embossed cardstock look like.  I used the embossing rubber in my diecutting machine with the stencil to make the embossed cardstock.  I did use a little white  pigment pad to rub my fingers over the raised area in the black leaves embossed to make it pop a little- shown below.  The current stampin' Cut and Emboss machine does not come with the rubber embossing mat but you can buy it on line- spellbinders have a 2 pack for way under $10 

This was the houndstooth pattern but someone suggested it looks like bats and I have to agree!
There are multiple stencils: houndstooth, autumn leaves, snowflakes as well as the multiple layering stencils for the flowers so the stencil set is definitely a bargain.
 

Saturday, December 11, 2021

25 Days of Christmas- Day 11- Easy Pinwheel Card- How to

 Here is the card we made for our class last month- I finally got around to posting the blog on how to do it.

I did heat emboss with clear embossing powder the Pumpkin from Pretty Pumpkin set all on the back side of the panels so that it would add some interest without detracting from the main images. These are the 4 panels we made. the top was made using the Pretty pumpkin set and sentiment. 
colored in with Pumpkin Pie, Cajun Craze and Old Olive stampin' blends.
Panel 2 was made using flowers from Nature's Harvest and the sentiment from Quiet Meadow- I stamped the flower on a postit note to create a mask to stamp the words- colored with Daffodil, pumpkin pie , old olive and soft suede.
Stamped the pumpkin in pumpkin pie then did a rock n roll with cajun craze to add some color to the edge and then added some old olive to add some interest to the pumpkin.  the sentiment is from Encircled in Friendship stampset - what a lovely sentiment! 
The last panel was a piece of Daffodil embossed with the timber Embossing folder.  Diecut a tag from Taylor made Tags dieset, stamped the image from Nature's Harvest, stamped Love from Quiet Meadow set, added a piece of Daffodil Delight 1/4 " Ruched Ribbon- currently on clearance and the card is done.


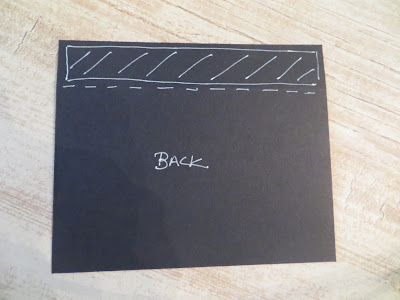
The basic mechanism is pretty straight forward - you will need even number of the basic panels 4 1/4 by 3 1/2 scored at 3/4inches as shown below.   For this card you will use 4 panels. 
the back of the panels will have tape on the section marked on top


You should start with 4 pieces that should be scored like this on the left.  
You will then tape the one piece onto the piece below at the fold line until you have all 4 pieces stuck together as shown below.


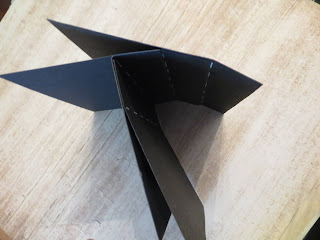
 the 4 panels should be stuck together staggered like this. From the side it should look like this.

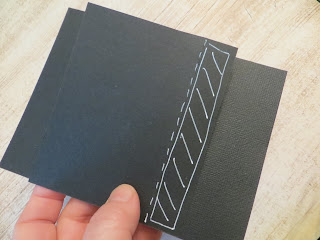
You then want to fold over the top part at the third fold as shown on the left  and from the top it should look like the picture below that - although the card was flipped the other direction.
then you waill have the back of the top piece as shown on the panel on the bottom right.  


You put the tape on the back of the top piece and then you fold it under and tape it down as shown below.
Now you should have a four sided pinwheel as shown on the left from the top. Basically you are taping one piece on top of the other to make the pinwheel so no need to make a center panel- it is thinner and easier to mail.    The accent panels are 4 x 2 1/2- decorate it however you want  with whatever fancies you- I think this would be super cute with kid's pictures for grandparents- or a multiple sentiment birthday card-  Love the idea.   This four panel card will fit inside a A2 envelope.
 You can extend it by another 2 panels- it has to be even for it to lay flat for mailing but the six panel card will be 3/4 inch longer so you will need a larger envelope- at least A6 ( 4 3/4 x  6 1/2" ) to mail it but isn't it super cute?


Tuesday, February 19, 2013

Chalkboard two-way

 The challkboard look is so popular these days so I wanted to showcase it in  my workshop  but using another technique in combination.  The base is daffodil yellow- although it is hard to see.  Take a scrap piece of whisper white with the small writing from French Foliage set stamped on it in black and place it on each corner- left upper and right lower as shown. 

Take a black cardstock and stamp the images in Whisper White Craft pad (and it does not matter if the flowers and leaves overlap since you will decide what you want on top by how you color.  The sentiment is from Sale-a-bration Vintage Verses and teh flowers and leaves from Secret Garden but any solid image will work.  You can use a sponge to smear the ink a bit to make it look 'chalky'.  Then take your watercolor pencils to color in the flowers however you wish.  I chose yellow  to match the basecard then added some orange.   Rip the corners to reveal some of the stamped writing.  Add a line using the white watercolor pencil if you wish.   At the end, I used Dazzling Details to add a little sparkle to the center- but warning- if you do this at a make and take, let time to dry.  Very pretty but simple.


Wednesday, April 18, 2012

A happy birthday Popup


I got a card like this for a swap at Leadership in January and didn't think much of it until I opened it up and thought WOW! Cool little popup- The card did not have anything in it to identify whose card it was- I took it apart to figure out how it worked and I wrote it up for whoever wants to make it- If you know whose idea this is, PLEASE let me know so I can give credit to the cardmaker.... this is so clever!

Take a cardstock 4 1/4x 11 and score it 2 1/4, then at 7 1/2 inches along the long side. scallop punch the short side on the left and emboss with square lattice folder or some other folder of your choice up to the first score line as shown.
Take a piece of 1 1/2x 4 3/4 strip of CS and score it at 3/4 inches.
Take a triple flower punch and punch 3 different colors to make the bows. Attach one for the center bow centering it on the score line using sticky strip on the short scored side only as shown and then again on top of that. The right side should not go over the score line on the right (see first picture). This is the pop-up mechanism.
It should look like this when the fold is open.
Take 3 - 1 1/4 inch squares of coordinating DSP and little strips of cardstock and the triple punched flowers and adhere as shown. Make sure you put tape only on the middle mechanism and not on the whole back so it will glide back and forth well.
Add more sticky tape as shown and attach a 2x3 inch piece of carstock with your sentiment ( or gift card or picture or ....whatever you want to pop up!)
Be sure to stamp the sentiment before you stick it on to ensure a clean stamped image. Then sticky strip the front sides up to hide the mechanism and let it slide!
This is what it looks like when it is being put together. Decorate the front however you wish!
I thought it would be fun to do balloons, birthday cake, pictures etc!
Have fun with this!
Lynda

Saturday, April 14, 2012

Faux Crocodile Petite Purses

I have been really happy playing with the summer smooches suite that I got especially this little Petite Purse Bigshot Die. I mean- what's not to love?
Grant you I have only boys and no one in my whole family seems to share this little joy of mine but look at it! Is it not the most stinking cutest thing you've ever seen? I guess I am in my little happy bubble and it just makes me smile every time I look at it- so I look at it A LOT!

Anyhow, a while back one of my friend demonstrator had shown me how to do a faux crocodile technique and I thought it would be PERFECT for this and I think it works!

I used chocolate chip CS on this wone with gold brads and punched 5/8 inch circles and embossed those too and added little gold brads through the bottom to make this one- bit of a pain in the butt to add the brads on the bottom and to versamark this one (It words best to use the versamarker to ink it up after to glue the piece on the corner otherwise the embossed circle gets all cracked and ugly. Certainly not a demo or make and take project!)
This is one using the Pacific Point CS. I decked it out with some silver chain that my friend Margery gave me a while back as well as the Ice circle brads (retired SU). It is so faux Chanel!
This is the back of the purse.


This works with any color cardstock so use whatever color you have on hand. This is using Cherry Cobbler and gold brads.
It is really easy technique to master. This is how I did it.
Diecut your Petite Purse in any colorstock of your choice.


Versamark the area you want to have the faux crocodile. You could use the versamark pen or dab the area on the pad like this if it is a big area.
This is what it looks like.
Put clear embossing powder over the versamarked area.
Scratch a design like a crocodile- free form, using a scoring tool, a toothpick or a old dried up pen. Toss the clumped embossing powder that forms on top - do not put it back into the clean powder. Heat set it as shown.
It words for all color cardstock beautifully so try it out!
Lynda

Thursday, November 10, 2011

Spotlighting with Up Up & Away


This is one of the cards I will be demonstrating tonight at my workshop. It is spotlighting in a bigger way. The base card is Island Indigo.
1. Take a piece of whisper white CS.
2. Sponge the sky using Bashful Blue classic pad and a sponge using a scallop circle -I put two taped together to make a more irregular shape that I like.
3. Sponge the ground using Lucky Limeade using a ripped piece of Cardstock. (Put the template on top and sponge below it)


4. Using the Cutter/scorer cut down one inch inside the border of the white piece as shown.


5. Stamp 3 balloons-

More mustard ink on Daffodil CS

Island Indigo onto Bashful Blue CS

Lucky Limeade onto whisper white CS.

Cut out the balloons and Sponge the edges- this is important to make it more 3D

6. Figure out where you want the balloons to be and stamp the basket below the area in black.

7. Stamp the sentiment in black

8. Add a crystal jewel on the O of the YOU to add a little something.

9. Stamp the bird in flight using Island Indigo on the outside panel.

10. Mount the balloons with dimensionals. then mount the whole inside panel with dimensionals.

Hope your day is uplifting!

Lynda


Sunday, June 12, 2011

Direct to Paper


This week's tutorial on SCS was Direct to Paper- Gosh I had not played with this is such a LONG time, it was really fun and so easy. It would have been fun to have the stampin' spots - the little cube stamp pads - but alas I did not have any so I used the big pads. Before I did anything though I embossed the sentiment on the right with clear- you could have used white- and then ran down the colors on a white piece of cardstock- I just picked a color group and went down the list- daffodil, pumpkin, tangerine, regal rose, melon mambo, real read and rich razzleberry. No thinking is even required.


After it was all done, I thought a dark silhouette image would look good and since I am on the Fabulous Floret bend, used it AGAIN! The words are from the WordPlay set. Have fun with it- it's like going back to kindergarten!


Lynda

Sunday, January 16, 2011

My little list book


You've seen them before- the yellow notepads- you buy them by bulk and have an office supply store cut it in half for you lengthwise to get these notepads. I've covering them and giving them as gifts for a while but I was never happy with the closure. After my Christmas card closure idea I made this variation and it is not bad and I like the neatness of it.
It has a little pocket on the left for any loose papers or to add something in.

I took an 8 1/2x 11 poppy cardstock and scored it at 2 5/8, then another 2 5/8, then 1/4, 2 5/8, 1/4. This is all detemined by your notebad width and thickness. So score it 2 times, the width of your pad, once the thickness, once the width then the thickness again and what is left over is the closure. Because the pad was not quite 8 1/2 inches, I scored the bottom 5/8 inches so that the pad would fit perfect (and folding over the CS makes it more sturdy- for getting kicked around in your purse bottem!)


I used an oval cutter to cut the closure part.


I folded over the cover part and punched out a heart - but you can punch out any shape.


I also cut out the bottom of the pocket so that the pocket bottom would not be so bulky


When you open it up this is what it should look like.


Ii stuck a piece of packing tape on the pocket side so that the sticky would peek out from the other side- I KNOW you will be tempted to touch the sticky part but DON'T or you will not have a very strong closure and will have to rip it off- carefully and replace the tape. I freehand cut the S shape so the pocket could be easily used but you could just do it at an angle using your cutter. Try to do this before you add the tape so it does not stick to your cutter.


I took another cleanly cut piece and laid it - STICKY SIDE UP - so that it is sticking to my finger on the picture -on top of the heart shaped punched out that has the sticky side peeking through it and centered it and stuck it to the heart- this is going to be on the closure but I wanted it centered to the heart. It is now somewhat free floating but once I close the notepad it will be centered perfectly on the closure to receive the sticky from the heart shape.


When you close the closure flap over the note pad and put the cover on it the sticky heart sticks to the tape on the closure flap and keeps it closed. I just hated the velcro ripping off the notepad as I kept using it and magnets were more bulky although I like it a little better.


This is what the closure mechanism looks like.


I covered the notepad top with a decorative paper to match the cover.


Put a lot of sticky tape to adhere the notepad to the base.


and these are a few variations on the card. The DSP on top is Sunny Garden. The green DSP is Certainly Celery and the saffron paper is retired Sale-a-bration paper that just happened to match. I also punched out 3 little hearts (small heart punch) from the Glimmer paper from the new Occasions Mini- you get 2 12x12 sheets of most fabulous paper - it punched- like butter!- I was worried because it had a lot of texture but no worries! I stamped Love from the Valentine Defined set on the bottom. The one on the left is going to a sweetheart of a gal who babysat my 3 little monsters over Christmas- She did not want to be paid but I just have to thank her in some way! They are some vouchers for my workshop that she attends faithfully as a thank you. How to make those using MDS will be another post.
You know those Weeble? They wobble but they don't fall down.... remember?
I feel like someone just whacked me and I was really wobbly for a while but I think I am finally standing upright again and better than ever! Thank you all for your support through these difficult times - All your words of encouragement really hit home and I so appreciate them!
and more Fun Posts to come- I have been making a bunch of stuff- just didn't have time to post but I'll be better!
xxxooo
Lynda