Showing posts with label Tools- Diecuts. Show all posts

Tuesday, October 25, 2022

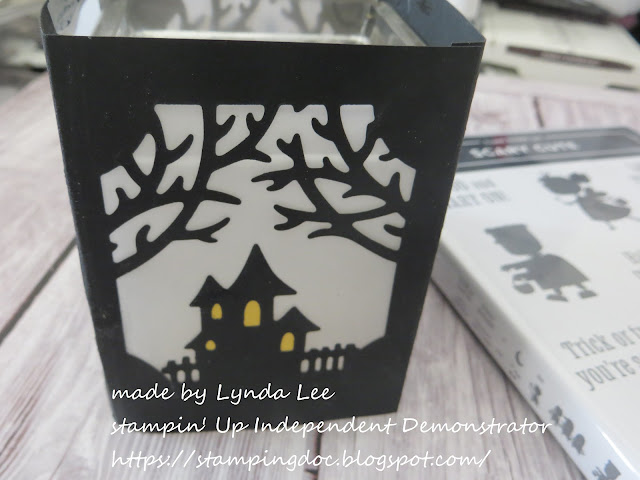
Scary Cute candle holder - Happy Halloween!


I love open window dies like this- I have made candle holder covers the last few years for my friends using die for Halloween and Christmas and when Stampin' Up Holiday catalog revealed this die I know I HAD to HAVE IT! and I love it. 

I took black cardstock and diecut windows on 3 sides as shown and die cut the cat and the spooky house. I took a piece of vellum cardstock and where the big opening was stamped the kids in versamark and embossed it using black embossing powder.  added the little bats and the moon in daffodil and used extra scraps of daffodil behind 

the cat's eyes and for the windows on the house.

I had a square glass votive that fit the dimensions perfectly but I have some glasses that hold the electric or real votive candles inside as well. 

I went into a closet to see how it would look and it is amazing.  The picture would not show but it was still cool. 


Don't you LOVE this? Enjoy! Lynda


Friday, October 25, 2019

Stitched lace and Daisy Lane


Hhow lovely is this?

Love the sweetness of the stiched lace with all its fine details expecially with the matching edge diectu to make the scallop- have to love it!

Basecard is Daffodil stamped with the sentiment from a Paper Pumpkin stampset.
Stamped the Daisy lane small daisy with Melon Mambo 3 times and punched it out. Put the Perennial Essence Floral Center ( had to wait forever for these as they were on back-order but worth the wait- they make it so perfect!

Stamped the leaves from Painted Harvest and punched it out.  Tied the whole card with the ribbon from Sale-a-bration and what a sweet little card - would be perfect for Easter or any little one's special event.

Thursday, November 22, 2018

Take out Box Pumpkin


 I had this vision of a pumpkin from the Take out box but when I made it it just did not look like what I imagined. but when I turned it upside down, then Voila, it was how I imagined it.

I made a bunch of these at my last party and it was super easy to make.

Cut the box out and layered it together as shown. I used a pencil to draw the pumpkin lines before I put it together. 

Assemble the box, fill with treats, close the box and turn it upside down.

I took the leaf using the Leaf punch from stampin up and a tiny strip of Old Olive cardstock which I curled using a pencil.
I glued the two ends together to make a stem and mounted the whole thing on the boxtop where the pencil marks converged.
like this.

It was so easy and so cute!
Happy Thanksgiving!

I've been playing with other ideas for this box- love it!

Friday, March 23, 2018

A little z box pop-up garden birthday card for someone special


 I have been thinking about this card for a while now-I thought a garden of flowers would be perfect using this z box pop-up template.

The base is Pool Party - I dauber'ed some whisper white ink to make some clouds in the sky although hard to see.  Stam the sentiment from Beautiful Bouquet in Soft Suede.

I diecut the fence-  I collect all these dies so not sure which company this is from- I let the end not cut so I could extend the fence the whole 11".    the tree is from the retired Beautiful Branches but I guess you

could use any tree die in chocolate chip and Old Olive.    Added strips of crumbcake to make the soil in the middle for the sunflowers to bloom from.
The little flowers, leaves and branches are from a Tim Holtz die, retired SU Botanical blooms framelit and little flower stamps I got from Michaels for a $1  over the years. 
 The sunflowers are the centers of the SU retired Beautiful Bunch stamped with soft suede on daffodil delight CS punched out with 7/8 "
scallop punch- see image end of this post.  I colored in the center with bronze Stampin Blends to contrast.  The leaves below are from retired Botanical Blooms in different green CS.  I used a 1/4 inch strips of clear plastic- cut from packages with glue dots on both ends to keep the blowers from drooping.  They are clear so pretty invisible.


My most favorite of all is the little graduated star flowers.   It's from the  Star Border punch- you punch once and you get all these little stars that fit perfectly on a little branch of leave to make such a cute little stick of flowers.  I did add a little starburst in center of each flower with real red and in case of the yellow flowers with soft suede to add a little depth.   Add some butterflies- the bigger butterfly is from You Move Me set- stick a few around here and there. Below is the card totally opened- This card has taken me a better part of a day to cut all the tiny pieces-  I love it and I hope whoever receives this will love it too.


the flower stamp with the center stamped- I use the little stampin spots for this- it's perfect for inking that little area.  The center of the flower colored in....

Enjoy!

Tuesday, October 3, 2017

Birthday Delivery Girl


 This set came with this really cute Birthday Memories DSP that you could cut with the matching Framelit. The Girl came with the cupcakes all around her and it was just too cut to waste so I diecut the girl, then diecut the cupcakes with the large layering oval framelit and used a smaller stitched shaped framelit to hide the hole left by diecutting the girl and mounted the girl with dimensionals to pop her up.
Stamp the presents and stamp the sentiment with versamark, heat emboss with white embossing powder then softly falling embossing folder on 
 the real red cardstock piece.
Such an easy card - just diecutting and embossing but cute nevertheless!

Tuesday, September 19, 2017

Oh So Eclectic Case


I saw a card by Claire Daly that used this card sketch but the colors did not work for me and I did not have the DSP she used so I changed it up and this is what we made this past month's party.

Basecard is Berry Burst with another layer of Berry Burst on top diecut with the Eclectic Layers framelets.  A layer of silver glimmer paper behind the cutout for some extra shimmer.  Stamp the little tulips from the stampset in Berry Burst.  Stamp the sentiment from Happy Birthday Gorgeous and punch it out with Pretty Label.   Stamp the leaves with old olive and cut out a soft sky flower and the powder pink flower after stamping with Berry Burst again.  Diecut all the pieces and mount as shown with some Rhinestone basic jewels and Gold faceted gems (because the clear ones are on backorder) but the variation I think is still pretty.  

Sunday, January 22, 2017

Cool Treats Sundae with sprinkles

 I just absolutely adore this set- the DSP is so sweet and the dies are just the right size and so sweet.  The base is Soft Sky with a layer of Watermelon Wonder then another layer of Soft Sky.
cut a piece of DSP and put it across the bottom with little room on the bottom for the sentiment.

Diecut a stitched circle die and then diecut the bowl and the spoon with Silver Foil Sheet. I used the scoring tool to free hand the lines for the bowl.  Diecut vanilla, pink pirouette and Pool party ice creams and chocolate chip for chocolate syrup on top.  Diecut the cherry with the watermelon wonder and used chocolate chip marker to color the stems.
The little sprinkle die does come with the set but I was using the basket die from the Basket bunch since they have multiple pieces that you can cut at one time- so convenient that they are identical....
I made a pool of Tombow multipurpose glue and used a tweezer to touch the back of each sprinkle to the glue and voila, an easy birthday card.
I did use dimensionals for the scoops.
Enjoy!

Wednesday, June 29, 2016

Jar of Love Hello Shaker card


 Such a fun little card we had at my last stamping party.  Base card is Pool Party. Take the DSP (here I used the It's my Party DSP from Occasion catalog (retired) fold the bottom up by about 1/2 inch and diecut the tall jar shape.   I took a piece of clear windowsheet   bigger than the jar opening all around and stamped the jar and sentiment with Staz-On,  Make sure to lift straight up to prevent smearing.   Adhere the clear window sheet to the back of the DSP. putting tape just on the edges of the DSP.  Now, place the foam adhesive strips around the edge of the jar on the clear adhesive sheet. I used the embossing buddy to take some of the stickiness and static off the sticky strips. add some hearts diecut and some sequins and put a piece of whisper white CS larger than the cut out to ocver and adhere the whole thing onto the base card,  Stamped the lid with Crumbcake, diecut it and put it on in the front.  I tied a little cord into a bow and attacked it on the corner o the lid tied with the tag,    Enjoy!

Tuesday, April 12, 2016

Picture Perfect Botanical Garden

This was one of the projects at my last month's workshop.  The hardest part was the hummingbird- I had to do it several times before I got the jist of it- definitely a learning curve with it- although my friend Makani got it the first time perfect- she is an amazing stamper!  The base is blackberry bliss with a layer of Hello Honey.  Stamped the Hardwood background using versamark to get that subtle watercolor look.  Hello Honey was way to strong when I stamped it straight so if you use it definitely stamp off first.

Diecut the whisper white with the leaves- make sure you have the orientation right on that one.  Stamp the
sentiment before you mount it just in case.
Used the Botanical Gardens suite to diecut all the little flowers again and mounted them using dimensionals  and Multipurpose glue and put the jewel crystals in the center.

The hummingbird is stamped first with stamped off Pear Pizazz with #1 stamp, full strength Pear Pizazz with #2 stamp and the Blackberry bliss with #3 stamp.  Then use Melon Mambo for the collar stamp.  You do have to fussy cut the bird but it does not take long- took me less than a minute to cut it out and you know how I hate cutting with scissors!

Friday, April 8, 2016

Botanical Garden Gold and white cards and a great idea

I was at Michael's few months ago and they had their best buys- this box of 60 cards and envelopes for sale for $5.  I couldn't pass it up. The envelopes are paper thin and cheesy but man - a gold card and envie for 10 cents?

Anyhow in the pack were these really cheesy white heart with LOVE printed on it.  There really is no one I could possible send these to as it stood but there had been really pretty black  and white stripe cards I had seen.  When I layer cards and have to cut the cardstock to size there are always 1/2 inch strips left over that I keep and these left over 1/2 inch whisper white strips were perfect for this purpose.

Stamped the sentiment from Rose Wonder stampset in black.
This was the original cards that I put strips of white on.
I have to give credit to Gayle, one my Stamp-n-chat friends who brought a bunch of pieces diecut already in a container like this so we can pick and choose what we wanted and I thought it was brilliant.  So with all the little scraps of paper that I have I have been just diecutting all the pieces from the Botanical Gardens suite so I can make bouquets in a jiffy.  Love It!
So making all these cards were just a snap.  Just pulled some flowers are and laid them down.
With the gold stripes I wanted to add a little touch of gold sparkle so with little left over Gold Glimmer paper I punched out little 1/8 inch circles.

The flowers and leaves were mounted using dimensionals or the green Multipurpose glue - depending on whether I wanted the depth or not.  Leaves were stamped with Mossy Meadow - the white flower was sponged with the dauber with Calypso coral and the little gold circle added to the center.
This is just another variation on the same idea.
So all those little tiny pieces of cardstock, before you throw it away, see if you cut a few pieces of flower or center or whatever out of it.