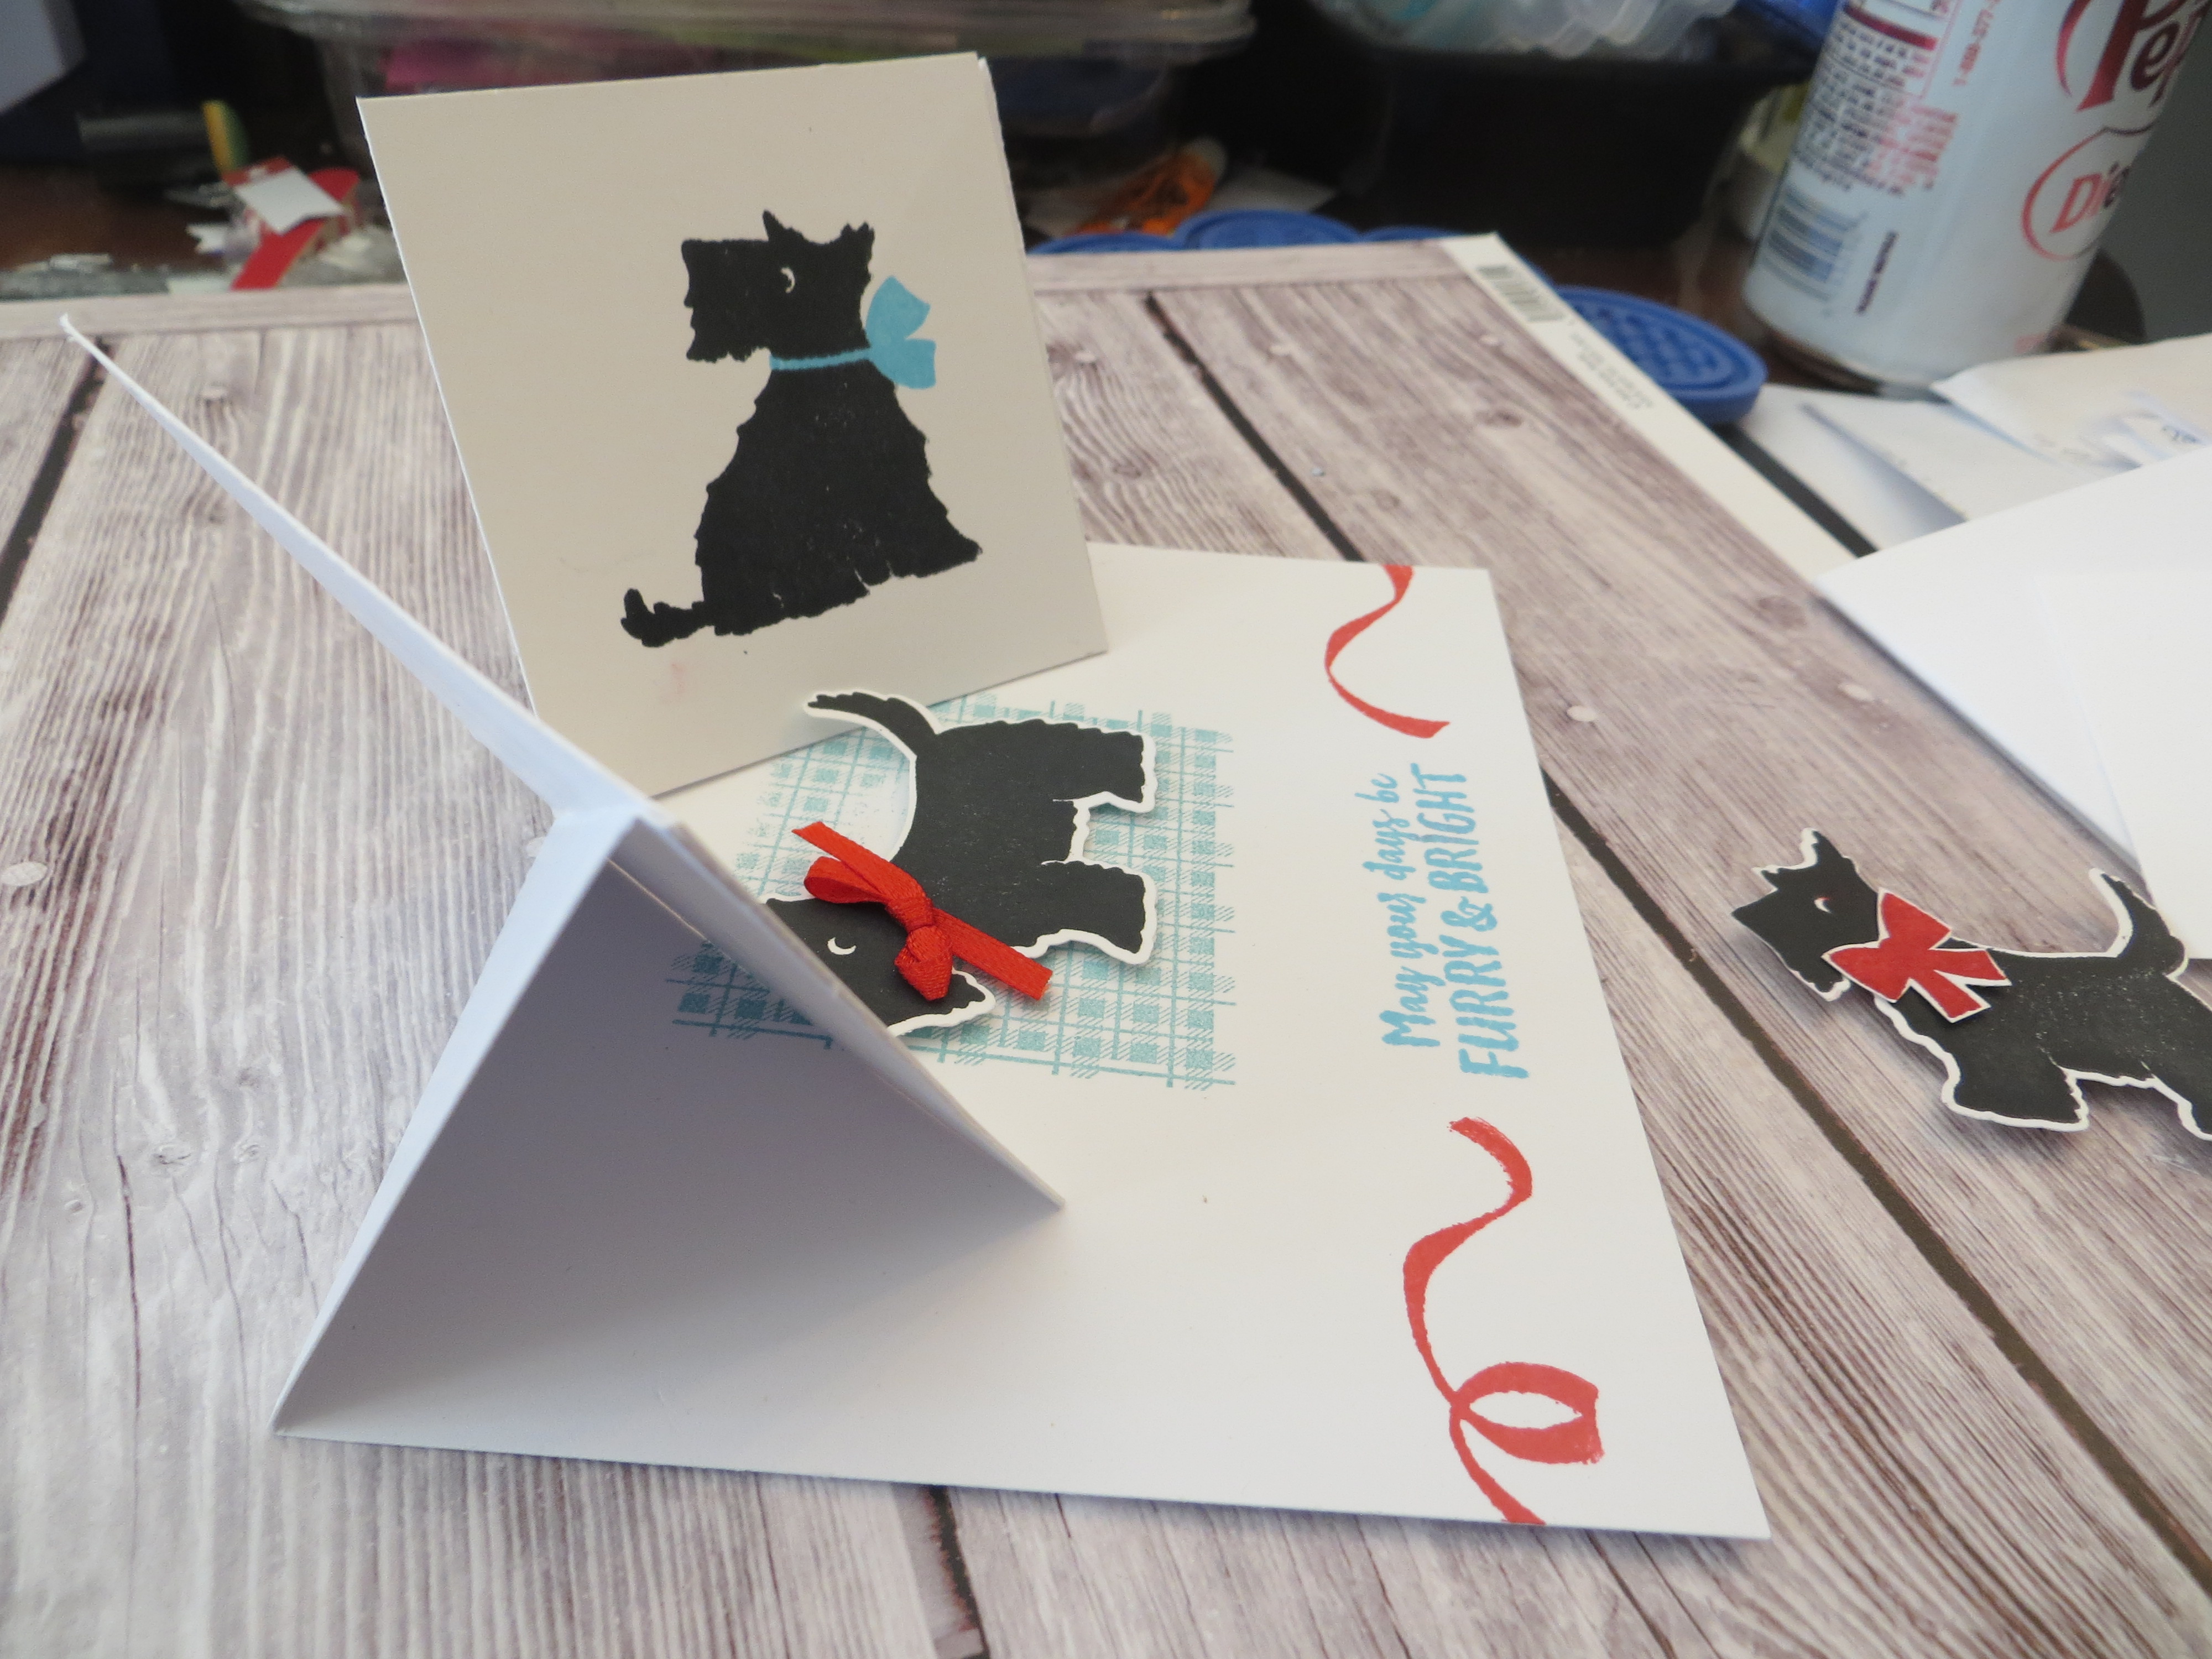
Bee my Balentine Box window Card
Tuesday, February 13, 2024
Easy Bee my Valentine Box window Card
Saturday, October 14, 2023
flip flap card
Tuesday, March 14, 2023
Share a milkshake gatefold explosion card
Tuesday, February 28, 2023
Taco Fiesta four panel popup
I cut the chips and placed them around the guacamole and cut the bottom of the chip in a round pattern so it looks like it is stuck in the guacamole.
Wednesday, December 14, 2022
25 days of Christmas- Splendid Thought swing card
I really love the simple line images from the splendid thought stampset but just didn't have much opportunity to show it in my classes but with the Framed Florets die it was a fun play card to make. take a base petal pink cardstock 5 1/2x 8 1/2 and score at 4 1/4 to make the basic A2 card. cut a piece of DSP from the Splendid Day for the front panel 4 x 5 1/4 with upright image. You can adhere it around the margins to secure and run through with the diecut to cut the heart border and the oval frames. Diecut a piece of white for the insde oval piece. (You will have a whole mess of sparkly hearts and left over ovals which you can save for another project)
just take a piece of cardstock 6 inches by 4 1/2 and score at 2 and 4 inches to create a trifold as shown on the left. you just want to tape it on the back panel only so that it is big enough to cover at least half of the oval opening.
stamp flower and sentiment on the white oval. I then close the card and adhere the oval frame and the white oval panel on the front panel of the mechanism on the right side only so that it will slide back and
forth.
take a piece of white cs 4 1/4 x 5 3/4 for sentiment panel for the inside. You can also stamp the mechanism panel with leaves as shown. The DSP had a petal pink version and a seafoam green version and I just did not have enough for the whole class so some got pink and some got green- they are pretty either way. Super easy mechanism but big impact.
Enjoy! Lynda
Tuesday, December 13, 2022
25 days of Christmas - Framed Florets Z-fold
I was intent on having 4 projects for my November class and then when I saw this set I could not resist adding it to our class so this ended up being our 5th card- a bonus!
take a base card of Polished Pink cardstock - one piece 5 1/2x 8 1/2 like the usual A2 card and another piece :
1 1/2x 8 1/2 and score both at 2 1/8 and 4 1/4. flip the 1 1/2 inch piece so that it makes the z fold mechanism. stamp the sentiment on the front of the smaller piece and emboss with white EP and heat set.
cut two 4 x 1 7/8 inch pieces of DSP
for the left front and right back panel and same size pieces of white cardstock for the inside panels. stamp with sentiment of your choice. diecut the ovals panel and frame from the Framed Florets set. Stamp the flower image in the smaller oval piece and color as you wish- the colors from the DSP is what I chose- Polished pink, evening evergreen, blushing bride, soft succulents. take some scrap pieces of white and stamp the small flowers and leaves and diecut to use as accentsMount the pink strap piece making sure to only tape the left half of the font panel. mount the left half of the oval panel to the left half of the card as shown.
Sunday, December 11, 2022
25 days of Christmas- Bay Window card with Window Wishes
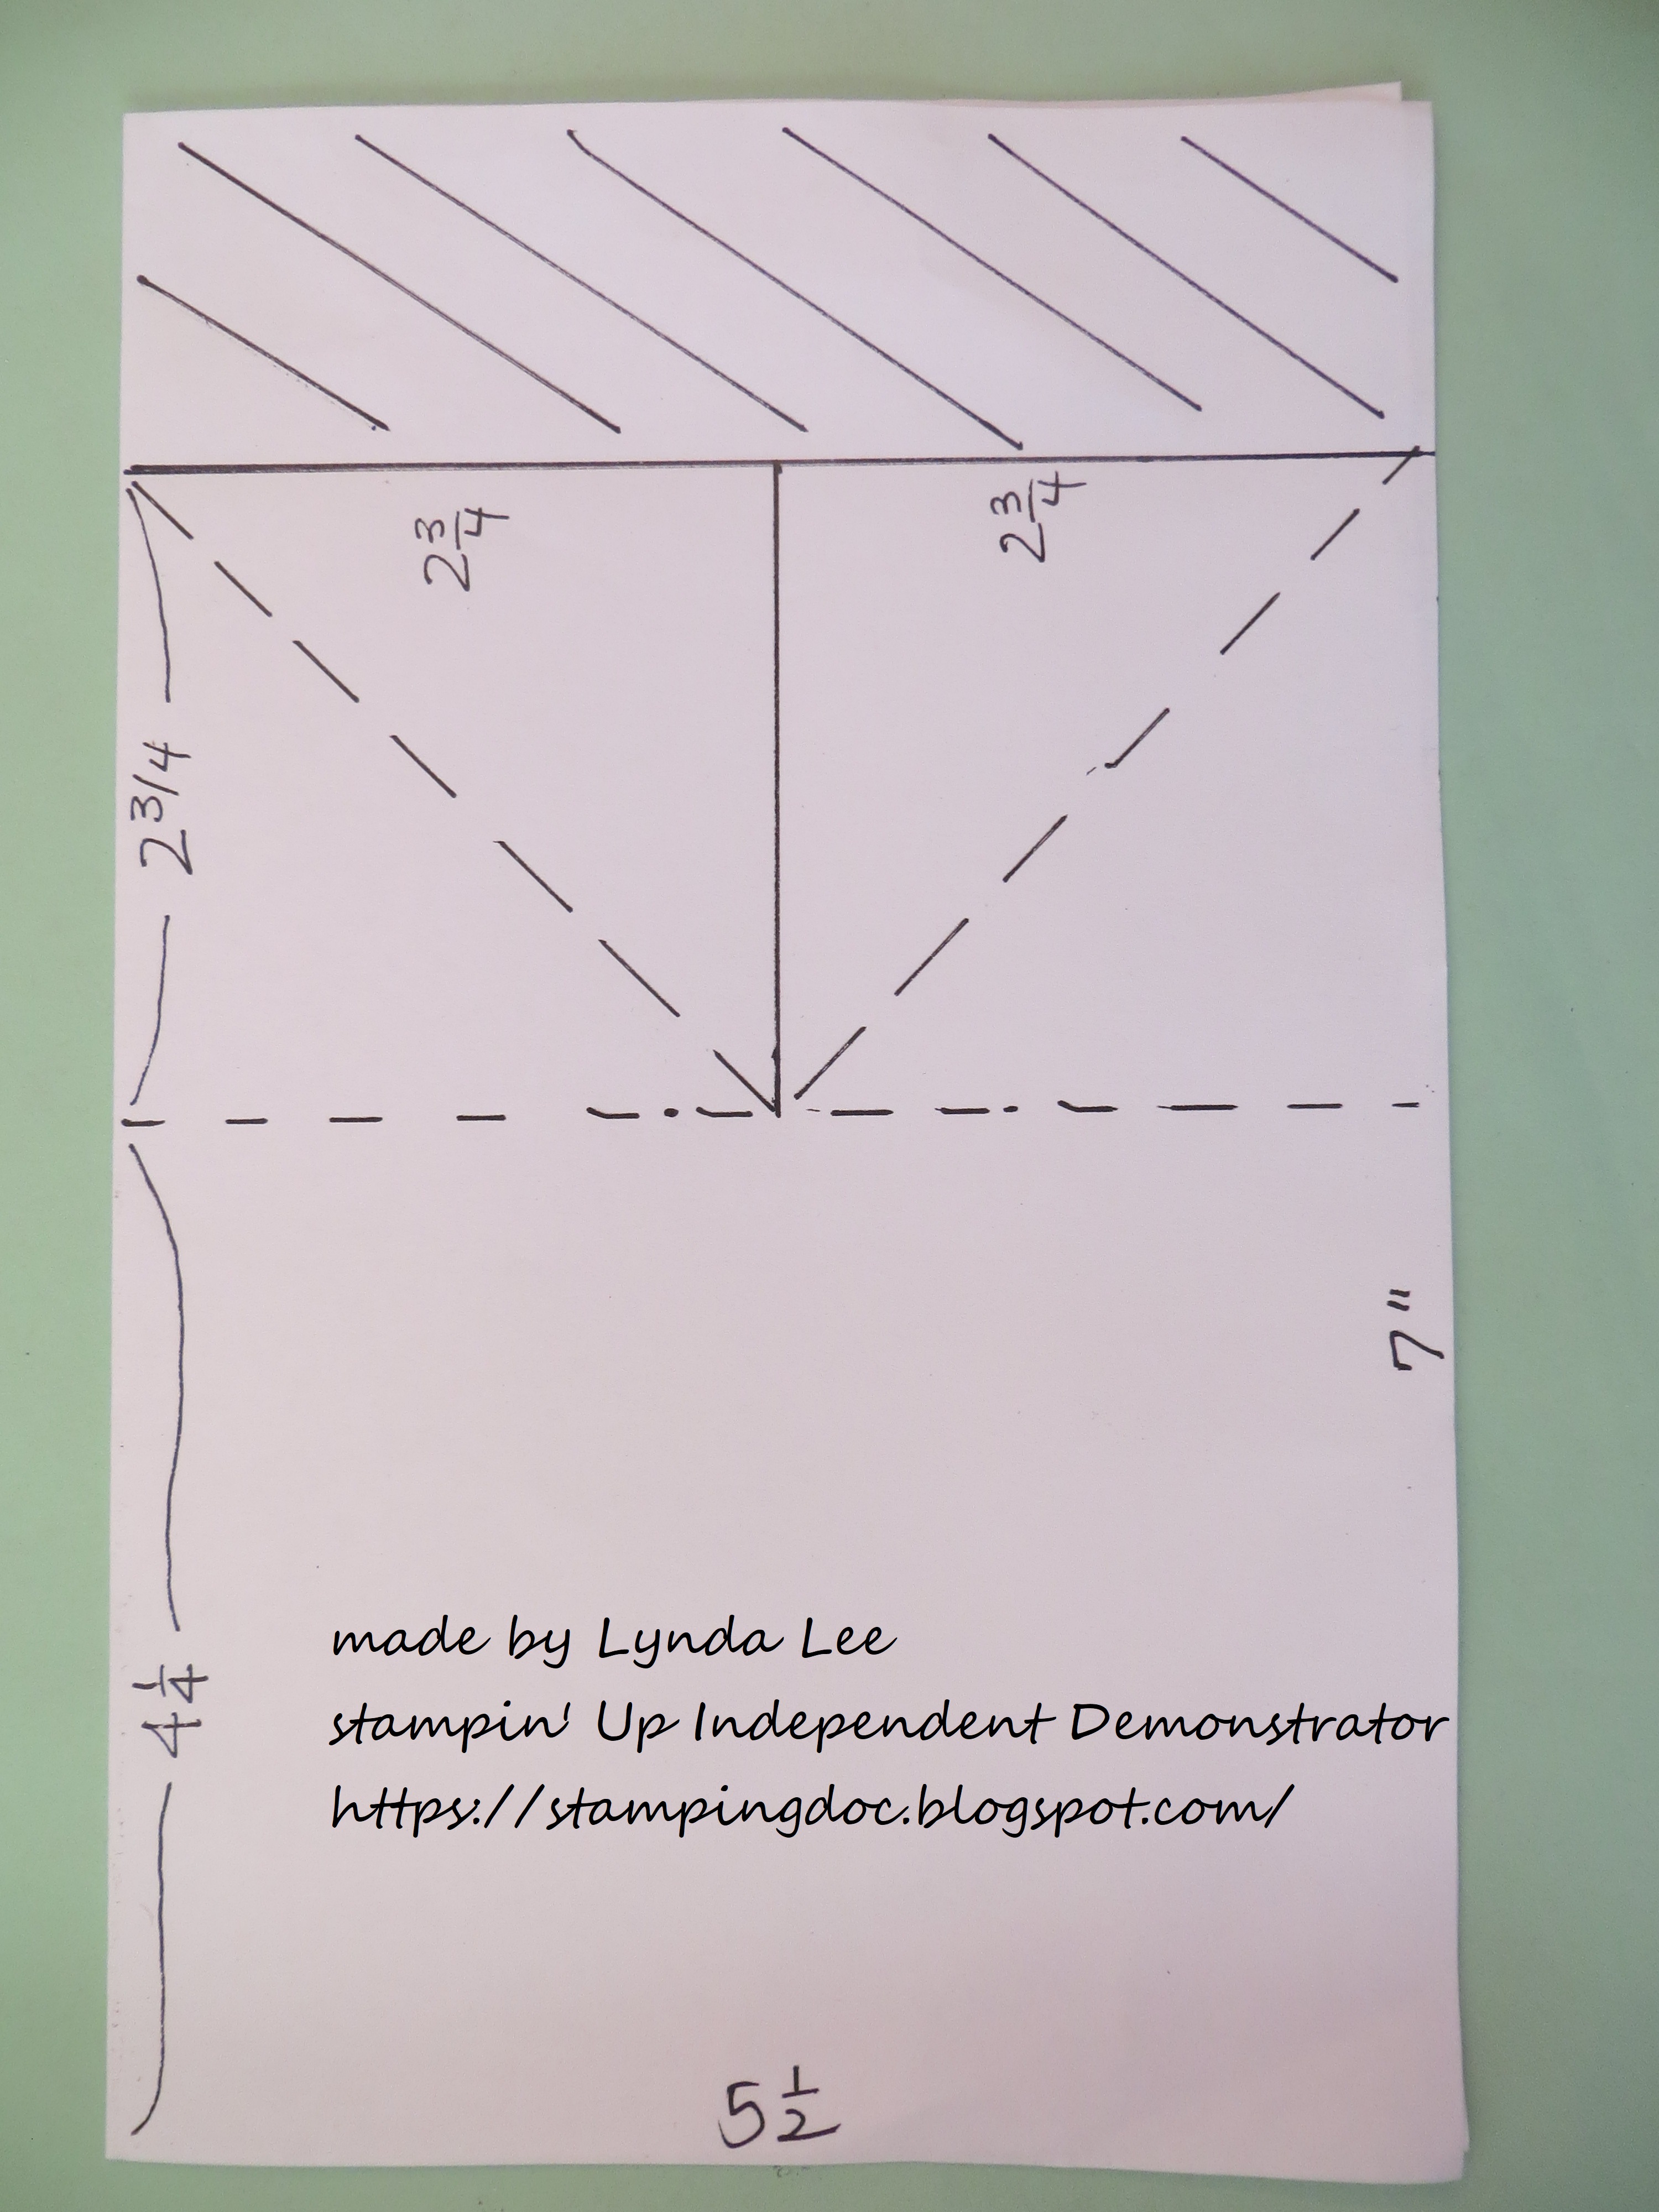
take a 11x 4 1/4 inch thick white CS base and score along the 11 inch side at 5 1/2, 6 1/4, 7 1/8, 9 5/8 and 10 1/2 as shown on the left.
I diecut the window in the center panel - the die with the small panels on the top only cuts out the holes for the window. I used another scrap piece to diecut the frame piece with the arched top.
I stamped the sentiment using Soft Suede on the top of the arch. using a scrap I stamped the house in Granny Apple green and roof in Soft Suede and diecut it out with a piece of white to creat the snow bank.
Take a piece of Pool Party 2 1/4x 4 inches. Place behind the window opening and stamp the tree with early Expresso and snow with versamark and emboss using white embossing powder and heat to set.
Place behind the window and mount using dimenstionals to create some depth.
I used Design a Daydream DSP 2 pieces each of 4x 5/8" and 4 x 3/4 ' strips as shown below.
Now this is the mechanism so make sure you pay attention to this:
take a piece of 4 1/4x 1/4 inch thick white cardstock strip and tape or glue down on the far right side of the inside panel leaving about 1/8 inch space from the edge. Now tape the last DSP piece using tape only on top of the white strip on the right side so that you leave the left side of the DSP open- this is where you will slip in the front panel to pop it up.
now tape the far left side panel to the inside panel so it stays stuck as shown on the far left in the picture to the left. Once you slide the right front panel to the inside DSP panel it should look like this.
take it out to mail and it mails flat- hopefully whoever receives the card will know enough about you to pop it up.
Enjoy! Lynda
Friday, December 2, 2022
25 days of Christmas- Scotty Dog Double Fold easel A2 card
and this is how it looks from the back.


Saturday, November 12, 2022
Hello Harvest Standing pop up
• the base card here is soft suede 4 1/4 by 11. Score along the 11 inch side at 5 1/2, 6 3/4, 8 3/4, and at 10 inches. you will fold it in and tape or glue onto the last bit after the 10 inch score and tape it down as shown on the left to create the right side bottom rectangle .
• You will need another panel 2 3/4 by 5 5/8 for the front panel in soft suede scored at 3/8 and 1 5/8 on the 5 5/8 inch side . put tape on the 3/8 inch section
see above left side bottom of the center panel. make sure that the front panel when folded does not go higher than the panel behind it.- once placed then tape the front panel bottom to the front of the back piece and the whole mechanism is set.Make sure to put the DSP on the back piece BEFORE you tape down the front panel though.
• the back panel DP is 4Inches wide and 3 3/4 inch tall.
• front panel is 3 3/4 tall and 2 1/2 inch wide.
I stamped the pumpkin from Hello harvest set with memento black and colored it in with pumpkin pie and cajun craze and pale papaya.stamp the flowers in soft suede, colored it in with variety of colors. stamp the sentiment in Curry and diecut and mount with dimensionals -
Tuesday, September 20, 2022
Max's Starwars Birthday platform popup card
This set was from Galactic Adventures the third and the sequel.
it mails totally flat which is so cool.
My nurse Mary Lou had given me some birthday cards with this popup mechanism which I totally
I will be making my Christmas Cards out of the die as well so can't wait to show you what that will look like....
I love the sentiment and I found a banner die and stamped Max's name to personalize it.
I was happy to hear his mom send me a message that he really liked it. Worth the effort!
Tuesday, September 13, 2022
Sending easy Diamond Easel card

Take a 3 inch square of Fresh Freesia cardstock and match the corner to the triangular part of the card and glue or tape down the part over the triangular base card only so the top part is free to flip. That is the mechanism. Now you can decorate however you want. You will need 3 pieces of DSP. 4 inches by 1 inch to put on the top between the 4 1/4 and 5 1/2 inch score line, a 4 inch by 1 7/8 inch to put between the 2 1/8 and 4 1/4 inch score line in the front. lastly you need a 4 inch by 2 inch piece for the bottom of the inside of the card as shown. Take a 2 3/4 inch of white cardstock - this piece will go in the center of the diamond. Here I stamped the leaf from the Sending stampset in Granny apple green. Stamp the flowers in Highland Heather and GOrgeous grape and center with Daffodil Delight. diecut it out and mount on card using dimensionals. Stamp Sending in Gorgoeus grape and diecut and the outline in white and attach onto the white cardstock. stamp sentiment in Gorgeous grape on the little label- this is from Cracker & Treat box die - it needs to be small enough to hide behind the triangle when closed. I used dimesionals to pop the label up so it would catch the point of the triangle to make the easel card. So easy and probably my favorite cardshape for ease of making and impact . Any little image that fits in the s 3/4 inch square would look super cute. tape down the first section so the pop up is with the diamond part only as shown below. THe DSP here is from the hostess set Pattern Party (retired- one of my favorite for its black and white patterns) but any coordinating DSP would work